Thursday, July 30, 2009

Masala Chicken Curry

I hardly cook Indian food even though we love eating it. I think it's because of the number of ingredients and steps used in the entire cooking process that has always thrown me off. For us it's always easier to go to a restaurant if we have cravings for curries or banana leaf rice (you literally eat off a banana leaf instead of a plate). I guess it also doesn't help when there is an excellent Indian restaurant just outside my apartment block and within easy walking distance. This restaurant serves not only good banana leaf rice but they also whip up a mean Indian fish head curry. I read somewhere that this dish doesn't originate from India but rather from Malaysia and Singapore (and some even say China) but that's another story altogether. I hope to try cooking this one day.

So with some spare time over the weekend and with plentiful of spices which I had purchased a while back, I decided to embark on cooking a masala chicken curry. The last time I had tried my hand for the first time at making chicken briyani rice . I served the curry with some yellow basmati rice cooked with ghee, some tumeric powder, cinnamon stick, cloves, star anise, sliced fresh ginger and shallots, and seasoned with salt.


Masala Chicken Curry
(serves 3 - 4)

For Marinate:
750g kg chicken, washed and cut into medium sized pieces
1/4 cup plain yogurt
1/4 cup of mixed chopped coriander and mint leaves
1 tsp red chilli powder (adjust to suit your spice level)
¼ tsp turmeric powder
salt to taste

For the Paste:
6-7 cashew nuts
4-5 tbsps milk

Dry roast and make a fine powder:
1” cinnamon
10-12 curry leaves
3 cloves

Rest of the ingredients:
3-4 tbsps of ghee (you can use any other oil, except olive oil)
2 big onions finely chopped
1 large tomato finely chopped
1 tbsp of tomato paste
1 tsp ginger-garlic paste
1 tsp coriander powder
3/4 tsp black pepper powder (adjust to suit your spice level)
¼ tsp cumin powder
mint leaves and almond flakes for garnish


Method:

1) Marinate chicken pieces in chilli powder, turmeric powder, yogurt, mint, coriander and salt for 20 minutes.

2) While the chicken pieces is marinating, make a paste of cashew nuts and milk. Keep aside.

3) Dry roast cinnamon, cloves and curry leaves for 1 minute (you can do this in a frying pan over low heat) and grind into a fine powder using your spice grinder.

4) Heat 1 1/2 tbsps of ghee in a pot. Add the onions and saute till soften. Add ginger-garlic paste and saute further for another 3-4 minutes on medium heat.

5) Add coriander, cumin and pepper and combine well and fry for another minute.

6) Add the tomatoes and tomato paste and let it cook for 3-4 minutes. Combine well and cook till oil separates. Dish out into a bowl and set aside to cool. Then add the ingredients into a food processor and blend until it becomes a paste. Keep aside this masala paste.

7) Heat 1 1/2 tbsps ghee in a pot and add the marinated chicken and cook on high flame for 3-4 minutes (make sure you stir to avoid sticking to the base of the pot), reduce heat and cook for another 4-5 minutes.

8) Add the ground masala paste, cashew nut paste and ground powder of cinnamon, cloves and curry leaves and combine well. Cook till chicken pieces are soft and you get the desired curry consistency. Add a bit of water if it looks too dry. Add salt to taste.

9) Garnish with fresh coriander leaves and almond flakes.


Monday, July 27, 2009

Tea Time Treats with Mallows and Milan Cookies

The July Daring Bakers' challenge was hosted by Nicole at 
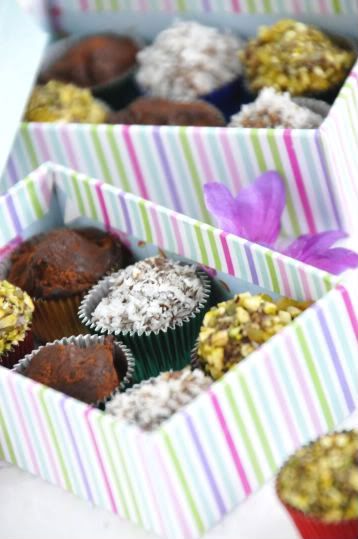
Sweet Tooth . She chose Chocolate Covered Marshmallow Cookies and Milan Cookies from pastry chef Gale Gand of the Food Network.

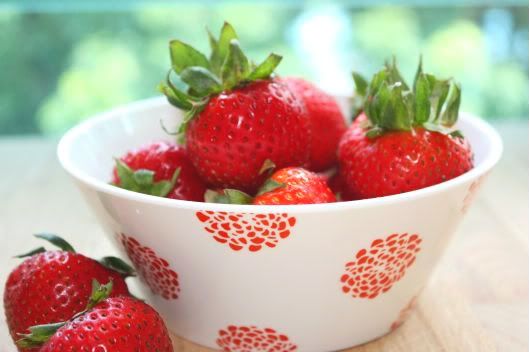
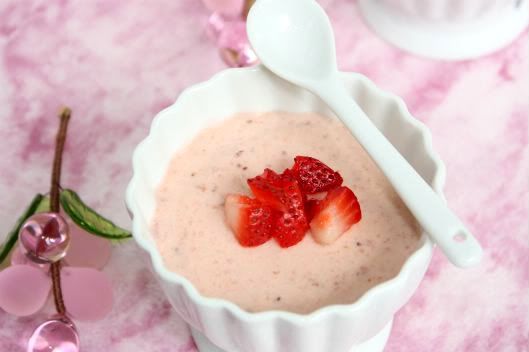
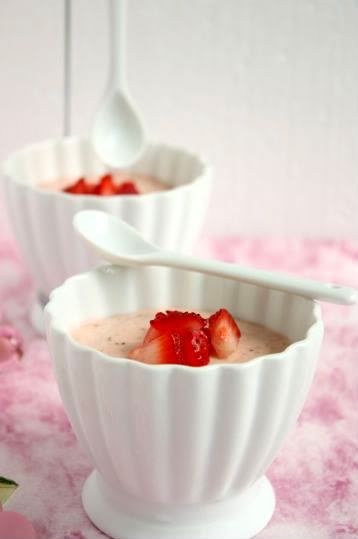
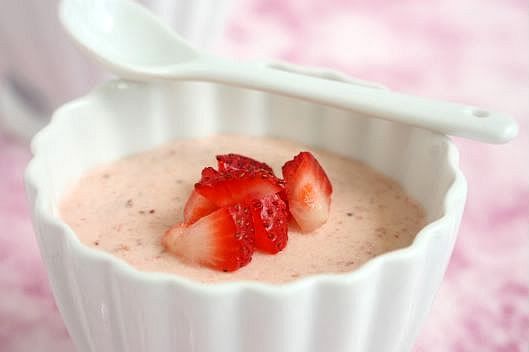
Nicole has mentioned that we could attempt either one or both cookie challenges. I found it pretty intriguing that the first cookie had an element of making your own marshmallows. Not that I am keen at all about marshmallows! I find it too sweet and the texture all too mushy! However trying to attempt something new and this being one, really had me going. I decided to do both cookies as the recipes were pretty simple to follow. I also did some research on how to make marshmallows as well as watching some videos on the entire process. The twist about the marshmallows used in the Mallows cookies was that they didn't require the 12-hour setting period. The marshmallow batter (if you can call it that) was piped immediately onto the cookies instead. I decided to go about making a small batch of strawberry marshmallows to pair off with the cookies.


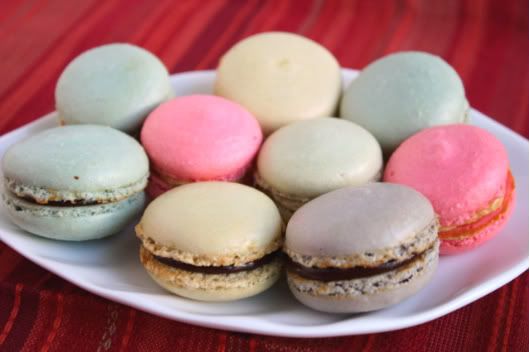
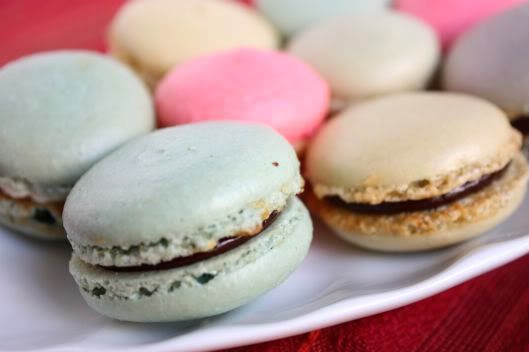
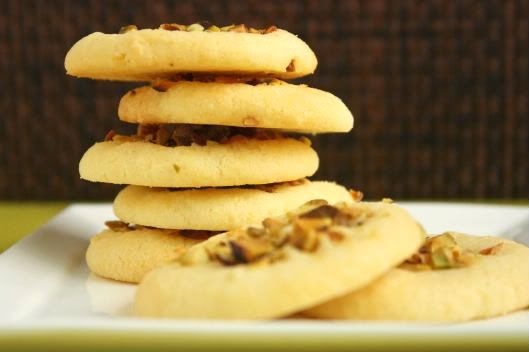
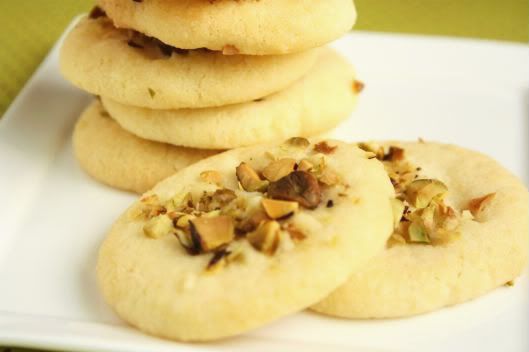
Would you believe if I told you that I did both challenges over a Saturday? Well I did and I am glad that I had as it left my Sunday free to do other things. I started off with the Milan Cookies first as it was the easier of the two. And like Nicole's instructions, the cookie batter did spread quite a bit. As a result it was difficult getting consistently shaped cookies. Instead of lemon extract, I used orange blossom water and a bit of orange zest to the batter. For the filing, I made lavender bitter chocolate ganache instead of the original posted recipe. As I tasted the first batch that came out of the oven, the taste and texture reminded me very much of another previous Daring Baker's challenge, tuilles.

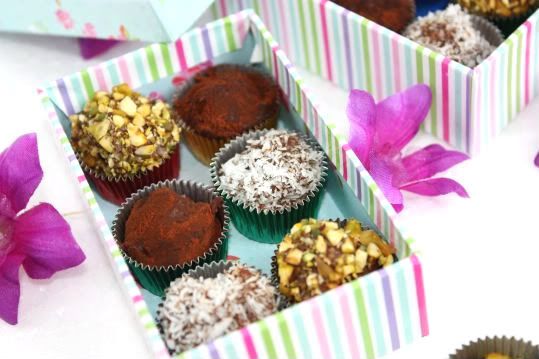
For the Mallows Cookie, I made strawberry marshamallows and these were piped onto the finished cooled cookie. I also added some mixed spice powder to the cookie batter. I didn't think much of the cookies on it's own when I had a quick taste. In fact I thought it was quite plain and paled in comparison with the Milan Cookies. But once the marshmallow and chocolate ganache were incorporated into the entire assembly, the Mallows tasted fantastic. I must say that the combination of all three worked perfectly. Thanks Nicole for such an interesting challenge this month!


Mallows(Chocolate Covered Marshmallow Cookies)
Recipe courtesy Gale Gand, from Food Network website
Serves: about 2 dozen cookies


3 cups (375grams/13.23oz) all purpose flour
1/2 cup (112.5grams/3.97oz) white sugar
1/2 teaspoon salt
3/4 teaspoon baking powder
3/8 teaspoon baking soda
1/2 teaspoon ground cinnamon
12 tablespoons (170grams/ 6 oz) unsalted butter
3 eggs, whisked together
Homemade marshmallows, recipe follows
Chocolate glaze, recipe follows

Method:

1) In a mixer with the paddle attachment, blend the dry ingredients.

2) On low speed, add the butter and mix until sandy.

3) Add the eggs and mix until combine.

4) Form the dough into a disk, wrap with clingfilm or parchment and refrigerate at least 1 hour and up to 3 days.

5) When ready to bake, grease a cookie sheet or line it with parchment paper or a silicon mat.

6) Preheat the oven to 375 degrees F.

7) Roll out the dough to 1/8-inch thickness, on a lightly floured surface. Use a 1 to 1 1/2 inches cookie cutter to cut out small rounds of dough.

8) Transfer to the prepared pan and bake for 10 minutes or until light golden brown. Let cool to room temperature.

9) Pipe a “kiss” of marshmallow onto each cookie. Let set at room temperature for 2 hours.

10) Line a cookie sheet with parchment or silicon mat.

11) One at a time, gently drop the marshmallow-topped cookies into the hot chocolate glaze.

12) Lift out with a fork and let excess chocolate drip back into the bowl.

13) Place on the prepared pan and let set at room temperature until the coating is firm, about 1 to 2 hours.

Note: if you don’t want to make your own marshmallows, you can cut a large marshmallow in half and place on the cookie base. Heat in a preheated 350-degree oven to slump the marshmallow slightly, it will expand and brown a little. Let cool, then proceed with the chocolate dipping.


Homemade marshmallows:

1/4 cup water
1/4 cup light corn syrup
3/4 cup (168.76 grams/5.95oz) sugar
1 tablespoon powdered gelatin
2 tablespoons cold water
2 egg whites , room temperature
1/4 teaspoon pure vanilla extract

1) In a saucepan, combine the water, corn syrup, and sugar, bring to a boil until “soft-ball” stage, or 235 degrees on a candy thermometer.

2) Sprinkle the gelatin over the cold water and let dissolve.

3) Remove the syrup from the heat, add the gelatin, and mix.

4) Whip the whites until soft peaks form and pour the syrup into the whites.

5) Add the vanilla and continue whipping until stiff.

6) Transfer to a pastry bag.


Chocolate glaze:

12 ounces semisweet chocolate
2 ounces cocoa butter or vegetable oil

1) Melt the 2 ingredients together in the top of a double boiler or a bowl set over barely simmering water.


Milan Cookies
Recipe courtesy Gale Gand, from Food Network website
Serves: about 3 dozen cookies


12 tablespoons (170grams/ 6 oz) unsalted butter, softened
2 1/2 cups (312.5 grams/ 11.02 oz) powdered sugar
7/8 cup egg whites (from about 6 eggs)
2 tablespoons vanilla extract
2 tablespoons lemon extract
1 1/2 cups (187.5grams/ 6.61 oz) all purpose flour
Cookie filling, recipe follows


Cookie filling:

1/2 cup heavy cream
8 ounces semisweet chocolate, chopped
1 orange, zested

1) In a mixer with paddle attachment cream the butter and the sugar.

2) Add the egg whites gradually and then mix in the vanilla and lemon extracts.

3) Add the flour and mix until just well mixed.

4) With a small (1/4-inch) plain tip, pipe 1-inch width sections of batter onto a parchment-lined sheet pan, spacing them 2 inches apart as they spread.

5) Bake in a preheated 350F degree oven for 10 minutes or until light golden brown around the edges. Let cool on the pan.

6) While waiting for the cookies to cool, in a small saucepan over medium flame, scald cream.

7) Pour hot cream over chocolate in a bowl, whisk to melt chocolate, add zest and blend well.

8) Set aside to cool (the mixture will thicken as it cools).

9) Spread a thin amount of the filling onto the flat side of a cookie while the filling is still soft and press the flat side of a second cookie on top.

10) Repeat with the remainder of the cookies.

Thursday, July 23, 2009

Strawberry Charlottes

I made some strawberry mousse recently as strawberries are now very much in abundance even though they are imported.


As it was only my husband and I who were enjoying the mousse, I decided to use the extra mousse for some strawberry charlottes. Instead of making the sponge fingers from scratch, I used store bought ones which I already have in my baking cupboard. The charlottes were supposed to have been topped with freshly whipped thickened cream but unfortunately in my haste I had over-whipped it and it split on me. I had no choice but to throw it away and it was such a waste! I am sure it would have been lovely sitting on top of the charlottes and would have been equally delicious. Anyway I still went ahead with the assembly of the entire dessert and topped each one with fresh strawberries and blueberries. These charlottes are so easy to put together and I'm sure they will wow your guests when served as individual desserts.


Monday, July 20, 2009

Marbled Lemon Blueberry Butter Cake

I had skipped last month's Cake Slice Bakers challenge and made it a point to make sure that I put aside time to complete this month's challenge. July's pick happens to be a butter cake using blueberries and lemon. Blueberries and lemon make a sublime pairing and this cake perfectly combines the two. In addition to the buttercream, the cakes were layered together with a home-made blueberry puree. The cakes had a marbled effect to it by adding dollops of blueberry puree to the cake batter and then swirling it around. This certainly was a change to the normal chocolate/vanilla marble cakes which I have baked.

As usual instead of making a full size one, I halfed the recipe to fit my 4" cake pans. If you are scaling down, do note that you will have more batter than required and I do not suggest that you use all of it. In past experiences, I had used all the batter and the sides of my cake baked out well but the centers remained moist. I had to bake them for another 10 - 15 minutes more resulting in the sides being overdone. Now I meausre out each of my 4" pan to ensure that each pan has no more than 280g weight - this includes the weight of my cake pan as well as the cake batter. I guess it'll be trial and error if it's your first time baking a triple layer cake.


Marbled Lemon Blueberry Butter Cake
From: Sky High: Irresistible Triple-Layer Cakes By Alisa Huntsman and Peter Wynne
Makes one 8 inch triple layered cake


Ingredients:

2 sticks (8 ounces) unsalted butter, at room temperature
2 cups sugar (I reduced the sugar slightly)
2 tsp grated lemon zest
1½ tsp lemon extract
7 egg whites
3 cups cake flour
4 tsp baking powder
½ tsp salt
1¼ cups milk (I used low fat milk)
Fresh blueberries, for decoration

Lemon blueberry preserves (below)
Lemon buttercream frosting (below)

{*1 cup of cake flour is equal to ¾ cup of flour plus 2 tablespoons of cornstarch}

Method:

1) Preheat the oven to 350 degrees F. Butter the bottom and sides of three 8 inch round cake pans. Line the bottom of each pan with a round of parchment or waxed paper and butter the paper.

2) In a mixer, cream together the butter, sugar, lemon zest and lemon extract until light and fluffy. Gradually add the egg whites 2 or 3 at a time, beating well between additions and stopping occasionally to scrape down the sides of the bowl.

3) Combine the flour, baking powder and salt, whisk gently to blend. In 2 or 3 alternating additions, beat the dry ingredients and milk into the butter mixture, scraping down the sides of the bowl several times. Beat on medium-high speed for about 1 minute to smooth out any lumps and aerate the batter.

4) Scoop 1 cup of the batter into a small bowl. Divide the remaining equally among the 3 prepared pans, smoothing the tops with a spatula. This gives you a smooth surface to work with. Add 2½ tbsp of the lemon blueberry preserves to the reserved batter and blend well. Drizzle heaping teaspoons of this blueberry mixture over the batter in the pans. Use a skewer to swirl the blueberry mixture in short strokes to drag it down through the lemon batter without mixing it in.

5) Bake for about 25 minutes or until a cake tester or skewer stuck in the centre comes out clean and the cake pulls away from the sides of the pan. Lat the layers cool for 10 minutes before turning out onto a wire rack, peeling off the paper and leaving to cool completely.


Lemon Blueberry Preserves

3 cups blueberries, fresh or frozen
¾ cup sugar
2 tbsp freshly squeezed lemon juice
1½ tsp grated lemon zest
1 tsp grated fresh ginger

1) Puree the blueberries with any juices that have exuded in a blender. Pass the puree through a coarse strainer to remove the skins.

2) In a heavy medium saucepan, combine the blueberry puree with the sugar, lemon juice, zest and ginger. Bring to a gentle boil over a medium heat, stirring often for 20 minutes, or until the preserves have thickened and are reduced to 1 cup. To check the proper thickness place a small amount of a saucer and put in the freezer until cold. Drag your finger through it. If a clear path is made through the preserve then it is ready. Let the preserves cool before using. (Can be made up to 5 days in advance).


Lemon Buttercream Frosting

1 cup sugar
¼ cup water
2 eggs
3 sticks (12 ounces) unsalted butter, at room temperature
2 tbsp freshly squeezed lemon juice (I would suggest adding some zest as well for added flavour)

1) In a small saucepan, combine the sugar and water. Bring to the boil over a medium heat, stirring to dissolve the sugar. Continue to boil without stirring, occasionally washing down the sides of the pan with a wet pastry brush until the syrup reaches the soft-ball stage, 238 degrees F on a candy thermometer. Immediately remove from the heat.

2) In a large mixer bowl with an electric mixer on medium speed, beast the eggs briefly. Slowly add the hot syrup in a thin stream, pouring it down the sides of the bowl; be careful to avoid hitting the beaters or the syrup may splatter. When all the syrup has been added, raise the speed to medium,-high and beat until the mixture is very fluffy and cooled to body temperature. This can take 15-20 minutes.

3) Reduce the mixer speed to medium-low and gradually add the softened butter 2 to 3 tablespoons at a time, beating well between additions. As you’re adding the last few tablespoons of butter, the frosting will appear to break, then suddenly come together like whipped butter. Beat in the lemon juice, and the frosting is ready to use.

To Assemble:

To assemble the cake, place a layer, flat side up, on a cake stand. Spread half of the lemon blueberry preserves over the top. Place a second layer on top of the first and spread the remaining preserves over it. Finally place the third layer on top and frost the top and sides with the lemon buttercream.

Decorate with fresh blueberries and serve.


Wednesday, July 15, 2009

Macarons with Earl Grey Chocolate Ganache

I was in the mood of making some macarons as I had some stale egg whites in the fridge. It's been a while since I made these little treats. Although they are really sweet, it's nice to have a few with a cup of hot tea. I decided this time round to add a variety of colours for a change and sandwich them with a chocolate ganache that is infused with earl grey tea leaves. In fact you can use other types of tea leaves such as lavendar, chai or mint if you don't fancy earl grey.


Macaroons with Earl Grey Chocolate Ganache
(makes about 60 shells)

Ingredients:

90g egg whites, about 3 eggs
70g fine castor sugar
120g icing sugar
90g finely ground almonds

Method:

1) For the whites: the day before (24hrs), separate your eggs and store the whites at room temperature in a covered container. If you want to use 48hrs (or more) egg whites, you can store them in the fridge. Bring egg whites to room temperature before using.

2) Sift icing sugar and ground almonds into a bowl.

3) In a stand mixer fitted with a whisk attachment, place egg whites into the bowl and whisk until frothy (about 1 minute).

4) Add half the sugar and continue to whisk on medium speed for another minute.

5) Add the remaining sugar and whisk on medium speed until it resembles soft peak meringue peaks. The meringue should have a glossy look to it. Add in the food colouring of your choice and whisk briefly to blend in the colours. Detach mixing bowl from machine.

6) Fold in half the dry ingredients using a spatula. Fold from below of the bowl to upwards in an 8 shape formation.

7) Add in the remaining dry ingredients and fold until mixed. Do not over-mix your batter.

8) Put mixture into a piping bag and pipe big rounds of about 1 1/2" circles onto parchment lined baking trays. Make sure that you leave sufficient space in-between each.

9) Bake for about 10 mins in a pre-heated oven of 160C.

10) Once baked and if you are not using them right away, store them in an airtight container out of the fridge for a couple of days or in the freezer. To fill: pipe or spoon about 1 tablespoon of ganache in the center of one shell and top with another one.

Earl Grey Chocolate Ganache

275g thickened cream
45g glucose (can be omitted)
250g Pur Caribe chocolate 66%
12g earl grey tea leaves
50g unsalted cold butter

Method:

1) Place chocolate in a metal bowl and place it over a saucepan of simmering water. Ensure that the base of the bowl does not touch the water. Stir the chocolate until it has melted.

2) In the meantime place thickened cream in a saucepan and place over a medium heat. Once it starts to simmer remove from fire. Pour cream over the tea leaves and glucose. Cover the bowl with a plate to insure the mixture for about a minute.

3) Strain the thickened cream and pour a bit over the chocolate. Stir the chocolate mixture and then slowly pour in the remaining cream.

4) Add in the butter and using a hand-held blender, blend the chocolate mixture until it becomes a smooth and glossy ganache.

5) Place mixture in the refrigerator for about 20 minutes until it is easy to pipe.


Sunday, July 12, 2009

Pistachio Almond Cookies

We were at Borders one weekend and as I browsed through the cookery section, I came across some books which featured cookie recipes. I particularly liked one book as it featured only one cookie dough with more than 20 variations to it. I thought this was great and furthermore as I read through some of the recipes, I realized that the ingredients and instructions were simple and easy.

I decided to try one recipe out one evening after work. Everything was done using one bowl only and I didn't even need to use my mixer for this. The cookies had a buttery taste to it and the pistachios added that extra crunch to each bite. I could not wait for the cookies to be completely cool before doing a trial test on about three.


Pistachio & Almond Cookies
Recipe Adapted from The Cookie Collection
Makes about 30 cookies

Ingredients:

225g unsalted butter, softened
140g castor sugar
1 egg yolk, lightly beaten
2 tsp vanilla extract
225g plain flour
55g ground almonds
55g pistachio nuts, finely chopped
1/2 tsp salt

Method:

1) Put the butter and sugar into a bpwl and mix well with a wooden spoon. Then beat in the egg yolk and extract.

2) Sift the flour and salt into the mixture. Add the ground almonds and stir until thoroughly combined. Halve the dough, shape into balls, wrap in clingfilm and chill in the refrigerator for about 40 minutes.

3) Preheat the oven to 190C. Line 2 baking sheets with baking parchment.

4) Unwrap the dough. Pinch some dough, about 1 tablespoon, and roll into a balls. Put on the baking sheet, spaced well part. Flattened each ball slightly with your palm.

5) Bake for 10 - 12 minutes. Levre to cool on the baking sheets for 5 - 10 minutes, then using a palette knife, carefully transfer the cookies to wire rack to cool completely.


Thursday, July 9, 2009

Strawberry Mousse

We seem to be having an abundance of strawberries which are being imported from USA because it's summer time there. Sometimes if I'm lucky I'm able to get really sweet berries. Otherwise they are usually half ripen.

With so much strawberries on sale now, this makes me want to search out recipes using this fruit. I thus decided to try out a mousse which seems relatively easy. And I must say that it was not only easy, it was delicious as well! The mousse had a slight tartness to it and was extremely smooth with each bite. You can also opt to serve the mousse with some whipped cream, fresh cut strawberries or a strawberry sauce.


Strawberry Mousse

Ingredients:

2 teaspoons powdered gelatin
1 tablespoon water
8 oz (210g) strawberries, pureed
1/4 cup (50g) sugar
1/2 teaspoon lemon zest
1 tablespoon lemon juice
3/4 cup (190ml) heavy cream

Method:

1) Prepare the strawberry mousse: sprinkle the gelatin over the water in a small bowl and set aside to bloom (soften).

2) In a medium saucepan set over medium heat, stir together the strawberries and sugar just until hot.

3) Add the gelatin and stir until it is completely melted. Let cool to room temperature.

4) In the meantime, whip the heavy cream to soft peaks. Once the strawberries are at the right temperature, carefully fold the whipped cream into the fruit base.

5) Pour into serving bowls and chill for at least 4 hours or overnight.


Sunday, July 5, 2009

Espresso Truffles

I had always thought that truffles were difficult to make. Probably because these delicious “melt in the mouth” chocolates always looked so pretty and delicate over the counter. If I happen to go to any chocolate boutique shops, I would just gaze at the delicate workmanship put into some of their truffles.

I can’t really say that I am a chocolate addict. I do like chocolates but will not crave for it and at times not touch any even though the entire box of tempting treats could be right in front of my nose. I clearly remember that the last time I ever bought a box of dark chocolate truffles was in February. Now that’s a long time ago! And some of you will likely say I must be mad! Although the box was small, probably had about a dozen or so pieces in it, would you believe that this same box was still in my fridge until a week ago! My husband was rummaging through the refrigerator, in one of his “have you got anything to munch” moods when he came across the box of truffles. He took it back out with him from the kitchen to the living room and plop himself in front the telly. He said to me in passing that the truffles were a bit dry already, likely because of the timeframe it had been sitting in the fridge. I thought he would have a few pieces and put the rest back into the fridge. It was until much later in the evening that I discovered how much he had really put away .. into his stomach that is. The evidence of an extremely empty box of truffles was thrown into the kitchen trash bin. I guess I sort of exclaimed “What! You mean you finished everything!”. His standard reply to such situations would be “I might as well finish it. It was sitting a bit too long there.”


Espresso Truffles:
Makes about 35 pieces

Ingredients:

1/2 cup (125ml) heavy cream
2 teaspoons instant espresso powder
3 tablespoons of Kahlua
65g of good quality semi-sweet chocolate (55% cocoa)
65g of good quality bitter-sweet chocolate (70% cocoa)
Chopped pistachios, desiccated coconut and cocoa powder for coating

Method:

In a small heavy saucepan, bring the cream and espresso powder to a simmer over low heat. Add the liqueur and remove from the heat. Add the chocolate and let stand a couple of minutes then stir the ganache until completely smooth. Let cool to room temperature then refrigerate until firm, about 3 hours. With a spoon or a melon baller, scoop out balls of ganache, roll them in between your palms fairly quickly (this is the messy part!). Then coat the balls in either chopped pistachios, desiccated coconut or cocoa powder. Refrigerate the truffles for at least 2 hours before serving.


Wednesday, July 1, 2009

Grissini (Thin Bread Sticks)

Grissini are Italian bread sticks which I have read originates from Turin. They are usually thin and long individual pieces of dry bread and are often used as an accompaniment to many Italian meals. You can often find it served on your table as part of the bread basket.

I haven't made grissini before but by the looks of these bread sticks, I think they would be fun to make. The dough is pretty much similar to that of pizza and like pizza you can flavour them with practically anything you fancy. You don't have to worry about how the sticks look and it's pretty much like playing with dough. I made these on a Sunday lazy afternoon and we had these for tea time with a cup of coffee. The grissini were delicious warm from the oven and I think the flavours I enjoyed best were the ones with garlic and parmesan.


Grissini (Thin Bread Sticks)
Yield: 64 bread sticks
Recipe Adapted from Baking Illustrated


Ingredients:

623g all purpose flour
397g water at room temperature
2 tsp instant yeast
1 1/2 tsp salt
2 Tbsp extra virgin olive oil
Topping of your choice (I used a mixture of various ingredients. 1st batch - sesame and fennel seeds; 2nd batch - cracked black pepper with Italian herbs; 3rd batch - garlic flakes, crispy bacon bits and grated parmesan and 4th batch - garlic flakes, grated parmesan and oregano)

Method:

1) Combine the flour, yeast, and salt in a mixing bowl of a stand-mixer. Using a dough hook, mix the ingredients for about a minute.

2) Combine the water and olive oil in a liquid measuring cup. With the mixer on low speed, add the liquid to the dry ingredients in a steady stream.

3) Change to speed 2 and mix the ingredients for about 5 minutes until the dough is smooth and elastic. (If the dough is still sticky, add a bit more flour)

4) Roll the dough into a ball and place the dough in a lightly oiled container. Turn the ball of dough around to ensure that it is all covered with the olive oil. Cover the container with clingwrap and let the dough rise at room temperature until doubled in volume, about 90 minutes.

5) Preheat the oven to 190C. Line a large baking sheet with parchment paper.

6) Punch the dough down and then divide the dough into four equal pieces. The steps that follow will be repeated for each of the four pieces. Keep the pieces you’re not working with covered.

7) On a floured counter, roll the dough out into a rectangle about 12 x 8 inches. Cut the dough into 16 strips of equal width. A pizza cutter works very well for this.

8) Fold each strip over on itself (half lenthwise as this makes the dough stronger). On an unfloured surface, roll the strip into a long snake. Make it a bit longer than the length of your baking sheet, to allow for spring-back.

9) Place each strip evenly spaced apart across the width of the parchment-lined baking sheet.

10) Lightly spray or brush the grissini with olive oil and sprinkle on the topping. Cover the baking sheet loosely with clingwrap and leave aside for 20 minutes.

11) Bake for about 25 - 30 minutes, until golden brown. Cool on a wire rack.


Related Posts with Thumbnails