Saturday, February 28, 2009

Chocolate Valentino

By the time this auto-post, I will be on a flight to Bangkok, Thailand for a long deserved holiday .... gosh it's been so long! I hope to post up some pictures of my trip and also to visit each of your blogs when I get back later in the week.

This month's Daring Bakers challenge comes to us from Wendy at A Charmed Life and Dharm at Dad-Baker & Chef. Both Wendy and Dharm are passionate about baking for their families and their blogs speak a lot about this. As hosts for this month, Dharm has chosen a Chocolate Valentino cake by Chef Wan (recipe comes from Sweet Treats by Chef Wan) whilst Wendy picked a Vanilla Ice Cream recipe to accompany the cake. (We were given the option of making any ice-cream of our choice though)

I was very excited by the fact that one of the hosts happens to be a fellow Malaysian. You can image how my excitment went on "over-boil" when I read that the recipe for the flourless chocolate cake is from Chef Wan, the flamboyant Malaysian chef. How much of a coincidence is this ...! I've watched Chef Wan so many times on television and he is a very talented chef. As this is February and the month where Valentine's Day falls, I guess it is timely that a chocolate cake had been chosen. Romantic lore commonly identifies chocolate as an aphrodisiac. The reputed aphrodisiac qualities of chocolate are most often associated with the simple sensual pleasure of its consumption. Thus it's no wonder that chocolate is one of widely given gifts to loved ones during this particular day, besides red roses of course!

I only managed to squeeze the last weekend to complete this challenge. The cake itself was pretty simple as the ingredients and steps were very minimal. I've not tried a flourless cake, be it baking it or eating one either, so I was quite keen to try this out. I did half the recipe for an 6" version. The cake very much resembled a brownie when it came out of the oven. However I must honestly say that I was not too keen about it and would have much preferred a conventional brownie or better still a chocolate cake. As for the ice-cream, I already had a couple of tubs of home-made flavours sitting in the fridge, so that was easy-pessy. The flavours were Raspberry Ice-cream, using a Strawberry Ice-cream recipe I had previously made (but substituted with raspberries instead) and the other was a Peanut Butter Ice-cream. I also decided to try out another ice-cream flavour for this challenge, a Lemon Curd Ice-cream.


Chocolate Valentino
(receipe from Sweet Treats by Chef Wan)
Preparation Time: 20 minutes

Ingredients:

454g semisweet chocolate, roughly chopped
146g unsalted butter
5 large eggs separated

Method:

1) Put chocolate and butter in a heatproof bowl and set over a pan of simmering water (the bottom of the bowl should not touch the water) and melt, stirring often.

2) While your chocolate butter mixture is cooling. Butter your pan and line with a parchment circle then butter the parchment.

3) Separate the egg yolks from the egg whites and put into two medium/large bowls.

4) Whip the egg whites in a medium/large grease free bowl until stiff peaks are formed (do not over-whip or the cake will be dry).

5) With the same beater beat the egg yolks together.

6) Add the egg yolks to the cooled chocolate.

7) Fold in 1/3 of the egg whites into the chocolate mixture and follow with remaining 2/3rds. Fold until no white remains without deflating the batter. {link of folding demonstration}

8) Pour batter into prepared pan, the batter should fill the pan 3/4 of the way full, and bake at 375F/190C

9) Bake for 25 minutes until an instant read thermometer reads 140F/60C. Note – If you do not have an instant read thermometer, the top of the cake will look similar to a brownie and a cake tester will appear wet.

10) Cool cake on a rack for 10 minutes then unmold.


Lemon Curd Ice-cream
(serves 6)
(receipe from Taste Australia)

Ingredients:

50g butter, chopped
2 eggs, lightly whisked
60ml (1/4 cup) fresh lemon juice
2 tsp finely grated lemon rind
215g (1 cup) caster sugar
300ml thin cream
250ml (1 cup) milk
4 egg yolks

Method:

1) Combine the butter, egg, lemon juice and rind, and half the sugar in a medium saucepan. Cook, stirring constantly with a wooden spoon, over low heat for 5 minutes or until mixture thickens slightly. Remove from heat. Strain lemon curd through a fine sieve into a medium heatproof bowl. Cover with plastic wrap and place in the fridge for 30 minutes to cool.

2) Meanwhile, place a metal container in the freezer to chill. Combine the cream and milk in a medium saucepan. Bring to a simmer over medium heat. Remove from heat and set aside to cool slightly.

3) Whisk the egg yolks and remaining sugar together in a medium heatproof bowl until thick and pale. Gradually stir the warm cream mixture into the egg mixture.

4) Pour into a clean saucepan and place over low heat. Cook, stirring constantly with a wooden spoon, for 10 minutes or until the custard coats the back of the spoon. Transfer to a medium heatproof bowl. Set aside for 10 minutes to cool.

5) Gradually stir the custard into the lemon curd and stir to combine. Place in the fridge for about 2 to 3 hours until completely cold. Then pour into an ice-cream maker and chill according to manufacturer’s instruction.

Note, if you are making this by hand, skip (4) and (5) above:

1) Pour into a clean saucepan and place over low heat. Cook, stirring constantly with a wooden spoon, for 10 minutes or until the custard coats the back of the spoon. Transfer to a medium heatproof bowl. Set aside for 10 minutes to cool.

2) Gradually stir the custard into the lemon curd and stir to combine. Place in the chilled container. Cover with foil and place in the freezer for 6 hours or until almost set.

3) Roughly break up the ice-cream with a metal spoon and transfer to a large bowl. Beat with an electric beater until smooth. Quickly return to the metal container. Cover with foil and freeze for 4 hours or until firm.


Peanut Butter Ice-cream
(recipe from Martha Stewart)
(makes 4 cups)

Ingredients:

2 cups heavy cream
2 cups whole milk
1 cup salted cocktail peanuts
6 large egg yolks
2/3 cup sugar
1/4 teaspoon salt
1/2 teaspoon pure vanilla extract
1 cup chunky peanut butter (I used smooth peanut butter and omitted the peanuts)

Method:

1) Heat cream, milk, and peanuts in a medium saucepan over medium heat until bubbles begin to form around edges. Remove from heat, cover, and let steep at room temperature for 3 hours (or refrigerate overnight).

2) Prepare an ice-water bath. Uncover cream mixture, and reheat until hot but not boiling. Whisk yolks, sugar, and salt in a large bowl. Add cream mixture in a slow, steady stream, whisking constantly until well combined. Return mixture to saucepan, and stir constantly over medium heat until thick enough to coat the back of a spoon, about 8 minutes. (Do not let the mixture come to a simmer.)

3) Strain through a fine sieve into a bowl. Discard solids. Set the bowl in the ice-water bath. Stir in vanilla, and let cool, stirring occasionally, until cold, about 20 minutes.

4) Freeze mixture in an ice cream maker according to manufacturer's directions. Transfer to a large bowl, and fold in peanut butter until ice cream is swirled. Use immediately, or freeze for up to 1 week.



Wednesday, February 25, 2009

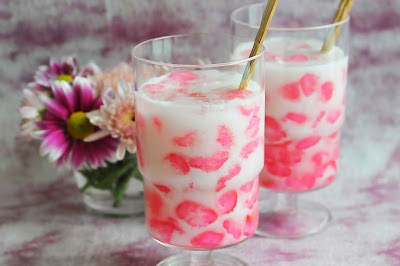
Rubies in Coconut Milk - Tub-tim Grob

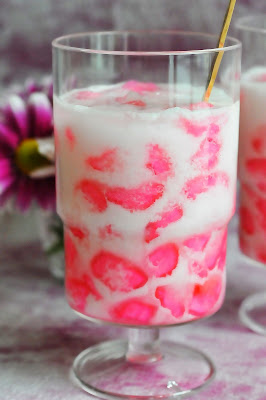
"Tub-tim" when translated means ruby in Thai . Tub-tim grob means crunchy ruby, thus the name Rubies in Coconut Milk. This dessert originates from Thailand and is probably something you would see on the dessert menu in most Thai eateries. I particularly love this dessert due to the crunchiness of the water chestnuts and the chewiness of the tapioca flour coating.

I decided to make this dessert to coincide with my upcoming trip to Bangkok this weekend .... oh I'm so looking forward to this. I promise to post up pictures when I get back. This is a really simple dessert to prepare and the only hard part for me was peeling the fresh water chestnuts. This task was assigned to my hubby! I guess sometimes I'm mean in the sense that I'll complain from the kitchen and make excuses that a particular job is difficult, and that's when he'll step in. This was one of the many occassions. There are three part to this dessert, the ruby, the syrup water and the coconut milk. If you have kids, you can get them involved in this as it's quite a fun activity.


Rubies in Coconut Milk ("Tub-Tim Grob")

(Serves 2)

About 12 - 14 pieces of fresh water chestnuts (or use about 1/2 can of water chestnuts)
1/4 cup water
1/2 cup tapioca flour
1/3 cup sugar
4 - 5 drops red food coloring
1/3 cup fresh or canned coconut milk/cream (mixed with a bit of water)

Method:

1) Slice each chestnut into half, making two round disks as far as possible.

2) Make two cuts into the two disks to make 6 equally sized pieces. Set chestnut pieces into a bowl and drop the red food coloring and a teaspoon of water and mix well.

3) Drain the chestnuts of any juice. Put tapioca flour in a big bowl. Drop the chestnuts in and shake the bowl around to coat the chestnuts with flour.

4) Scoop the chestnuts into a strainer to get rid of the excess flour. Put it into another bowl. Sprinkle the chestnuts with a bit of water and then coat them with flour again. If you want bigger rubies, repeat the spraying and flouring. Thus the coating outside the ruby would be thicker.

5) Boil a pot of water. When boiling, dump the coated rubies in. The cooked rubies will float up. Scoop them up in a strainer and dump them in ice water to quickly cool them down.

6) To make the syrup. In a small cup add sugar and water and microwave the cup for 3-4 minutes. Divide the rubies into equal amounts and set in two bowls. Pour out water from the bowls. Add half of the coconut milk and half of the syrup to make one serving. Serve with crushed ice in the summer time as it makes for a delicious dessert.

Saturday, February 21, 2009

Vongole Sauce

My husband always says to me, "give me any pasta and I'll be a happy man". That's almost his precise words and it is true! His favourite Italian food has to be pasta and pizza - the 2 basic Ps. So this particular weekend I decided I'll cook his first favourite dish, pasta. I had quite a few bottles of white wine lying around (it's the cheap white wine) which would be just nice to be added into a pasta sauce.

The only sauce that I could think of that would use white wine was vongole. It's a pretty simple pasta dish to put together and is certainly tasty enough. Vongole is basically small clams served in a rich tomato sauce and tossed with pasta. It makes up the classic southern Italian dish, sphaghetti vongole. Just be sure to boil your pasta with plenty of salt to flavour it and also remember never to rinse your cooked pasta after that. (Long time ago, I used to do this until I saw some cook shows which advises you against it. Why not, well the starch in the cooked pasta will help the sauce to stick to the sphaghetti).


Vongole Sauce
Adapated from "Pasta" by Joanna Farrow
(serves 4)

Ingredients:

1 kg small fresh clams
150 ml dry white wine
4 Tbsp olive oil
1 small onion, finely chopped
2 garlic cloves, crushed and minced
2 x 400g cans chopped tomatoes
1 tsp caster sugar
2 bay leaves (fresh or dried)
Small handful of flat leaf parsley chopped
Finely grated rind and juice of 1/2 lemon
1 tsp dried mixed Italian or spaghetti herbs
Salt and black pepper, to taste

Method:

1) Scrub the clams, discarding any damaged ones or open ones that do not close when tapped with a knife.

2) Bring the wine to the boil in a large. heavy-based saucepan. Tip in the clams cver with a tight-fitting lid and cook for 3 - 4 minutes. shaking the pan frequently until the shells have opened. Remove the clams, reserving the liquor, and sheel about half of them. discarding any that remain closed.

3) Heat the oil in a clean pan. Add the nion and cook gently for 5 minutes. Add the garlic and cook for a further 1 minute. Add the tomatoes, sugar, bay leaves and the reserved clam liquor and bring to the boil. Reduce the heat and simmer gently for about 10 minutes until the sauce is thickened and pulpy. Add the mixed herbs, salt and pepper to taste.

4) Stir in the clams, parsley and lemons rind and juice. Heat through for 1 minute. Check the seasoning and serve.


Wednesday, February 18, 2009

Classic Ceasar Salad

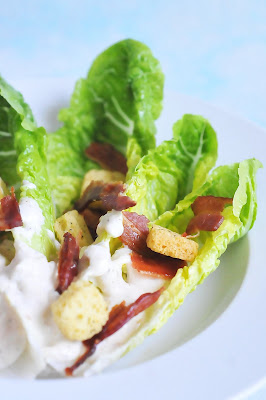
One of our favourite salads would have to be ceasar. Every time we go out to a restaurant, this would be one of the salads which we would order. And if we have it at home, the dressing would be something from a bottle purchased from a supermarket. However I've yet to come across a delicious bottled dressing - the ones that I've purchased in the past were either too sour, too watery and somehow never up to a "restaurant" standard. So it was with glee when I came across this recipe from a cookbook by Karen Martini. Her picture of a plated ceasar salad looked so delicious that I was immediately drawn to try out the recipe.

All I can say is it's so delicious that I'm never going to look at a bottled ceaser salad dressing again. (Guess what ... I made another batch again the week after!) Furthermore it's so easy to whip up and you will be done in no time at all. Both my hubby and I are great garlic fans, so for us, the more garlic the better. Guess you could say that even a vampire would have stayed clear of us that evening! Another plus point about home-made salad dressing is that you can control what goes into it and balance out the flavours as you go along.


Classic Ceasar Salad
Recipe adapted from Karen Martini "Where the Heart is"
(serves 4)

Ingredients:

1 bulb garlic
1 cup egg mayonnaise
2 Tsp sour cream
8 anchovy fillets, finely chopped
1/2 lemon, juiced
1/2 clove garlic, finely chopped
splash of white wine vinegar
3 baby cos lettuce, very outer leaves removed and each cut into 6 wedges
1 red onion, finely sliced (optional)
3 Tsp small capers
10 slices of streaky bacon, either fried till crispy or roasted in 170C oven for about 10 to 12 mins, till crispy and brown
150g shaved parmesan (optional)
extra lemon juice
freshly ground black pepper
A handful of croutons
Olive oil, to serve

Method:

1) To make the dressing, roast the garlic buib at 150C for 30 mins, then cut and squeeze out the flesh.

2) Combine roasted garlic flesh, mayonnaise, sour cream, anchovies, lemon juice and chopped garlic in a food processor and process until smooth. (I just mixed everything into a bowl). If mixture is too stiff, add a little lemon juice until dressing is sauce-like. Set aside.

To Assemble:

Arrange lettuce on plates and drizzle over dressing. Break the bacon over the salad and top with croutons. Shave over some parmesan, sprinkle with some black pepper and finish off with a drizzle of olive oil. (I added a sprinkle of dried garlic flakes as well)


Saturday, February 14, 2009

Guinness Chocolate Cupcakes

I was very intrigued by this recipe as it called for the addition of stout as one of its key ingredients. Who would have thought of using beer in a cupcake! I guess for beer drinkers, they would probably consider this as a sheer waste of good stuff!

Instead of using Guinness as stated in the original recipe, I bought a can of ABC stout. For those of you who are not familiar with this, it's a beer manufactured for Asian market. The fact that it cost much less than a can of Guinness prompted me to pick it up from the supermarket shelf. For your info, beer plus all other alcoholic beverages are very expensive here in Singapore. The government truly does not encourage it's citizens to drink, thus such beverages are slapped with a very high import duty. This can of ABC stout put me back by SGD3.70 (USD2.50). Thus economies of scale had to be applied here (I knew my 101 Economics would come in useful one day) as a Guinness would have set me back by another SGD1.00.


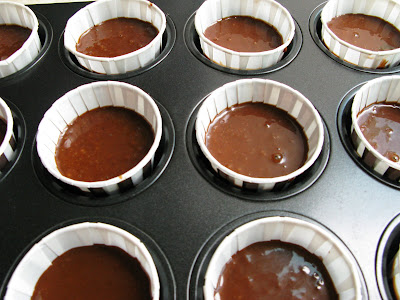
I halfed this recipe and it nicely produced me with 12 cupcakes, which is neat in my books as it just required me to use one cupcake pan only, plus one baking rack. Any more I would have to think of who to "off-load" it to since my hubby doesn't eat cake at all. Surprisingly there is no whiff or taste of the stout at all once the cupcakes were baked. My hubby did comment that it smelt "like bread" when it was in the oven. The cupcakes were extremely moist and soft, with a hint of chocolate. To sum it, it was yummy!


Guinness Chocolate Cupcakes
(makes 24 cupcakes)

Recipe from Nigella Lawson

Ingredients:

1 cup stout (such as Guinness)
1 cup (2 sticks) unsalted butter
3/4 cup unsweetened cocoa powder (preferably Dutch-process)
2 cups all purpose flour
2 cups sugar (I reduced the sugar slightly)
1 1/2 teaspoons baking soda
3/4 teaspoon salt
2 large eggs
2/3 cup sour cream

Method:

1) Preheat oven to 180°C. Line 24 cupcake cups with liners.

2) Bring 1 cup stout and 1 cup butter to simmer in heavy large saucepan over medium heat. Add cocoa powder and whisk until mixture is smooth. Cool slightly.

3) Whisk flour, sugar, baking soda, and 3/4 teaspoon salt in large bowl to blend.

4) Using electric mixer, beat eggs and sour cream in another large bowl to blend.

5) Add stout-chocolate mixture to egg mixture and beat just to combine.

6) Add flour mixture and beat briefly on slow speed. Using rubber spatula, fold batter until completely combined.

7) Divide batter among cupcake liners, filling them 2/3 to 3/4 of the way. Bake cake until tester inserted into center comes out clean, rotating them once front to back if your oven bakes unevenly, about 17 - 20 minutes. Cool cupcakes on a rack completely before icing it with creme chantilly which I had used in another cake recipe. This icing is light and not sweet at all. The cupcakes can be kept in the fridge for 2 - 3 days.

Crème Chantilly:

2 cups heavy cream
3 Tbsp icing sugar
1 1/2 tsp vanilla extract

Combine the cream, sugar and vanilla in a chilled bowl and whip until the cream is stiff but not too thick or buttery.

Photobucket


Photobucket

Wednesday, February 11, 2009

Baked Red Snapper Fillet

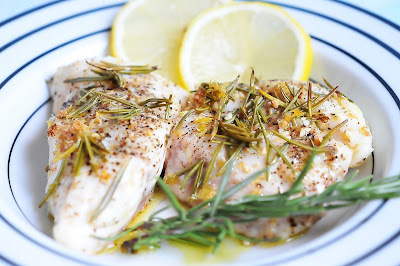
I picked up two packets of pre-packed fresh red snapper fillets in the supermarket on Saturday with the intent of cooking it the next day. We haven't had baked fish for quite a while now or fish for that matter. I must confess, I don't cook fish often but after all the eating sessions over the recent Chinese New Year holidays, something light sounded ideal.

For this meal, I didn't even bother to follow any recipe whatsoever. I just threw together a few ingredients which in my mind seems to go pretty well with baked fish. I served the fish with a warm potato salad which I had posted up last week.

If you are looking for a precise recipe, you'll not going to find it in this post. However if you are looking for a quick, no frills and a delicious meal, I'll ask that you give this a try ... in my books no regrets that's for sure!


Baked Red Snapper Fillet
(serves 2)

Ingredients:

2 fresh red snapper fillet, cleaned (you can use other white fish eg. dory)
Zest from 1 lemon
3 - 4 sprigs of fresh rosemary
3 Tbsp of unsalted butter
Extra virgin olive oil
Sea salt (I used Maldon) and black pepper to taste

Method:

1) Pre-heat your oven to 180C

2) Line a baking sheet with foil and drizzle it with some olive oil.

3) Sprinkle the fillets on both sides with salt and black pepper. Lightly pan fry the fillets skin-side down first for about a minute on each side. Then transfer the fillets onto the baking tray.

4) Add the lemon zest and fresh rosemary leaves (removing the stalk) on top of the fish. Drizzle generously with olive oil. Finally break the butter into small pieces and pile on top of the fish.

5) Bake for about 15 to 20 minutes until cooked and brown (depending on the thickness of your fillet).

6) Serve immediately with slices of lemon and your favourite salad.


Sunday, February 8, 2009

Raspberry Mille-Feuille

Mille-feuille is actually French and translated to English, it means a dessert of a thousand layers. I do believe it is also called "Napolean" in the States and "Custard Slice" in some countries in Europe. The name "mille-feuille" itself conjurs up images of sophistication and the very first time I tried this dessert, I fell thoroughly in love with it. The dessert which I had many years ago, had custard cream in-between layers of puff pastry with a topping of lemon glaze icing. Simple but absolutely delicious! Thus I'm somewhat surprised that this dessert is not found in most coffee shops or bakeries.

I've been thinking of trying this for some time now and this seems the right opportunity. This is my first attempt at mille-feuille and I was quite pleased with the end result. You should have seen my husband clean up his dessert plate (shucks if only I had a video camera!). For a "non-dessert" person, he certainly enjoyed this one! Definitely something that I'll be making again.


Raspberry Mille-Feuille
Recipe Adapted from Desserts by James Martin
(serves 8)

Ingredients:

250g puff pastry (see recipe below) or packet of fresh or frozen ready rolled all butter puff pastry
Flour for rolling out pastry
About 2 1/2 cups of lemon custard see recipe below)
1 egg beaten
2 cups fresh or frozen raspberries (substitute with other fruits/berries if preferred)
Icing sugar for dusting

Method:

1) Prepare the custard cream and set aside to cool. Once cool, refrigerate for about 30 minutes before using.

2) Preheat the oven to 180C.

2) Roll the pastry on a lightly floured surface and cut out a rectangle measuring 12cm x 45cm. Place on a non stick baking tray and brush the top with the egg wash.

3) Bake in the oven for 15 - 20 minutes until well risen and golden brown. Remove from the oven, transfer to a wire rack and allow to cool. Once cooled cut the pastry in 3 rectangles of equal size.

4) Spread half of the lemon custard on the first layer. Then sprinkle 1 cup of the raspberries on top the of the custard, spread each fruit apart to get an evenly distributed layer. Then add the 2nd layer of puff pastry on top of the 1st layer and repeat with the remaining custard and raspberries. Place the final layer of puff pastry and dust the top with icing sugar. Serve immediately.


Simple Rough Puff Pastry:
(Makes 350g)

200g plain flour
1/4 tsp salt
150g butter
1 tsp lemon juice

1) Mix together the flour and salt. Cut the butter into small cubes and mix the butter into the flour without breaking up the lumps. Mix to a stiff doug with 100ml cold water the lemon juice.

2) On a floured board, roll the dough into rectangle three times as long as it is wide - about 30cm x 10cm.

3) Fold the top third down and bottom third up. Turn the pastry sideways and seal the edges. Continue to roll adn fold four times, leaving the pastry to rest for 15 minutes between each folding and rolling. Wrap in clingfilm and leave to rest and chill in the fridge for 30 minutes before using. (Left over pastry can be frozen in the freezer.)


Lemon Custard
(makes 750ml)

8 egg yolks
75g castor sugar
300ml milk
300ml double cream
zest of 1 large lemon
1 Tbsp lemon juice (I added a bit more as I prefer it to be a bit more tart)
1 tspn lemon extract

1) Beat egg yolks and sugar together in a bowl until well blended.

2) Place the milk and cream in a saucepan. Add the lemon zest, lemon juice and lemon extract Bring mixture to a slight boil over medium fire.

3) Once the milk and cream starts to boil, remove from heat and pour a little into the egg mixture and mix well. Then pour back into the pan. Return to the heat and using a whisk, lightly stir the mix to thicken, do not boil.

4) As the egg yolks warm, the cream will thicken to create a custard. Keep stirring until it coats the back of the spoon. Remove from the heat and pass through a sieve and leave to cool. Refrigerate for 30 minutes before using. Remaining custard can be frozen in the freezer for about one month.


Wednesday, February 4, 2009

Warm Potato, Dill, Caper & Mustard Salad

It was one of those Sunday evening dinners which I had wanted to keep it simple. Something along the line of fish and potatoes. Something that wouldn't take me ages in the kitchen, easy to whip up and not much cleaning to do after that. I wasn't too keen on a mash as it would bave been quite blend, so I thought I'd try out this new recipe. It seemed to have the right ingredients which would go with a baked fish fillet, so why not give it a try. The recipe does however call for quite a number of ingredients, two thirds of which I already have. Just need to get the white wine vinegar, grained mustard and the most important of all, potatoes. It was easy to put together and the salad was very tasty, a bit of heat from the mustard, a tinge of sourness from the lemon, capers and vinegar and the smoothness of the olive oil. Absolutely great accompaniement with the fish.


Warm Potato, Dill, Caper & Mustard Salad
Recipe from Karen Martini "Where the Heart is"
(Serves 8)


Ingredients:

8 desiree potatoes (4 peeled. 4 scrubbed) (I used russet potatoes)
100ml extra virgin olive oil
1 Tbsp Dijon mustard
1 Tbsp seeded mustard
4 Tbsp white wine vinegar
1 lemon, juiced and zested
3 red shallots, peeled and sliced thinly
3 Tbsp tiny capers
2 sprigs fresh dill, chopped
2 sprigs flat leaf parsley, coarsely chopped

Method:

1) Cut potatoes diagonally into 2 cm-thick slices. Place in a medium-sized saucepan of boiling water and cook over medium heat until tender. Drain well and set aside.

2) In a separate bowl, mix oil, both mustards, vinegar, lemon juice and zest and shallots.

3) Add hot potatoes and stir to coat. Add capers, dill and parsley and toss gently to combine. Serve warm.


Sunday, February 1, 2009

Thai Red Curry with Chicken

Both my husband and I love Thai food, not because it's spicy but because of its flavours. Thai food is known for its balance of many flavors in one dish: spicy, sweet, sour, salty and bitter. It is the art of cooking that creates harmony amongst a variety of flavors.

Did you know that each region of Thailand has it's own distinct style of cooking and flavours such as:

•Kon Isarn: People in the northeast region of Thailand like to eat spicy and salty dishes.

•Kon Pak Klang: People in the central region like sweet and mild tasting.

•Kon Nua: People in the northern part of Thailand love mild but slightly spicy.

•Kon Tai: Southern region, are the only people who eat really spicy food.


The common Thai dishes which most of us would have tried are likely to be green curry, red curry, mango/papaya salad and tom yam. It's not really difficult to cook any of these dishes at home but it is essential that you get the freshest ingredients and your paste (to work off from) is good.


Thai Red Curry with Chicken (Gaeng Phed Kai Sai Nawmai)
(Serves 4 - 5)

Red Curry Paste

Prepare this authentic Thai curry paste to make the Thai Red Curry with Chicken recipe below. You can freeze any leftover paste up to 2 months in a zip lock bag, in tablespoon size portions, making it easy to add to future soups or curries as needed.

Ingredients for the Paste:

5 dried whole red chilies, seeded and soaked
5 shallots, sliced
10 cloves garlic
1 tsp galangal, finely sliced
1 tbsp lemon grass, sliced
1 tbsp kaffir lime rind, finely sliced (optional)
2 tsp chopped fresh coriander root
5 black whole peppercorns
1 tbsp ground roasted coriander seed
1 tsp roasted cumin (find out how to dry-roast spices)
1 tsp sea salt
1 tsp shrimp paste

Method:

1) Pound together coriander seeds, cumin, and peppercorns to obtain a fine paste in a mortar and pestle. Spoon into a bowl and put aside.

2) Pound dried chilies and salt together, add galangal, lemon grass, kaffir lime rind, coriander roots, garlic, shallots and pound well. Add the cumin mixture, follow with shrimp paste. Pound until everything is well-combined.

This authentic spicy coconut milk based red curry uses homemade red curry paste. Flavored with both fresh and dried spices, kaffir lime leaves and fresh sweet basil leaves it is a harmonious dish with chicken. Finish the cooking with the addition of fish sauce to taste and serve with steamed jasmine rice.

Ingredients for the Curry:

1 lb boneless chicken breast
1 can bamboo shoots, sliced
3 tbsp red curry paste
2 cups coconut milk
2 fresh red chili, sliced diagonally
1/2 cup Thai sweet basil leaves (bai horapah), torn
2 tbsp fish sauce (nam pla)
1/4 tsp sea salt
1 1/2 tsp palm sugar
Thai sweet basil leaves (bai horapah) for garnish **

Method:

1) Wash the chicken, slice diagonally into 1/2 cm thick, 3 cm wide and 3 cm long pieces. Thinly slice the bamboo shoots (if not already sliced).

2) Pour 1 cup of coconut milk into a wok. Bring to a boil over medium high heat, stirring constantly. Add the curry paste, stir until red oil comes to the surface. Add the chicken and saute until it turns white and is cooked through.

3) Add the remaining coconut milk, follow with the bamboo shoots. Season with fish sauce, sugar, and salt and bring back to a boil. Sprinkle with kaffir lime leaves, chilies, and sweet basil leaves. Turn off the heat. Arrange on a serving dish and garnish with sweet basil leaves before serving.

** If Thai sweet basil is not available, either omit or substitute other fresh herbs such as coriander or European basil.


Related Posts with Thumbnails