Wednesday, January 14, 2009

Chinese New Year in Chinatown, Singapore

On the 26 and 27 Jan all Chinese around the world will be ushering Chun Jie (Spring Festival) or Chinese New Year. It is one of the most anticipated celebrations on the Chinese lunar calendar. Just before midnight of 26 Jan, the Rat (current calendar year is the year of the Rat, which is also the first animal sign in the Chinese zodiac calendar) will depart and the Ox will be ushered in by the Chinese community. The Chinese New Year celebrations run for 15 days with the 1st day starting this year on 26 Jan, 2009.

The first day of the Lunar New Year is "the welcoming of the gods of the heavens and earth. "Many people abstain from meat on the first day of the new year because it is believed that this will ensure long and happy lives for them. On the second day, the Chinese pray to their ancestors as well as to all the gods. They are extra kind to dogs and feed them well as it is believed that the second day is the birthday of all dogs.

The third and fourth days are for the sons-in-laws to pay respect to their parents-in-law. The fifth day is called Po Woo. On that day people stay home to welcome the God of Wealth. No one visits families and friends on the fifth day because it will bring both parties bad luck.

On the sixth to the 10th day, the Chinese visit their relatives and friends freely. They also visit the temples to pray for good fortune and health. The seventh day of the New Year is the day for farmers to display their produce. These farmers make a drink from seven types of vegetables to celebrate the occasion.

The seventh day is also considered the birthday of human beings. In Cantonese this is called "Yun Yat". Noodles are eaten to promote longevity and raw fish for success. On the eighth day the Fujian people have another family reunion dinner, and at midnight they pray to Tian Gong, the God of Heaven.

The ninth day is to make offerings to the Jade Emperor. The 10th through the 12th are days that friends and relatives should be invited for dinner. After so much rich food, on the 13th day you should have simple rice congee and mustard greens (choi sum) to cleanse the system. The 14th day should be for preparations to celebrate the Lantern Festival which is to be held on the 15th night.

If you are not familiar with Chinese New year, there are many more
customs and traditions
that resolve around the New Year celebrations.

We visited Chinatown over the weekend just to soak in the atmosphere of the upcoming celebrations. Several side streets in Chinatown will be closed in the evenings right up to the eve of 26 Jan and stalls will be displaying all sorts of goodies such as new year household decorations, flowers, Chinese dried meats, sweets, food stalls, cookies and many more. You wouldn't believe how crowded it was and would anticipate that the next two weekends would be even more packed. I thought I'd share some of the photos that we took during our visit.


Saturday, January 10, 2009

Fresh Mango Tart

Before I get into my post proper, I would like to thank Abby of Blissful Bites for giving me a "Passionate Foodie Blog Award". It certainly came as a surprise and a very nice one at that.

Okey, now back to my post. I came across this tart dough recipe from one of my favourite blogs Deb of Smitten Kitchen. She has such a fantastic blog and comes with equally amazing and delicious recipes. This particular recipe caught my eye because she mentioned that it was "unshrinkable" and I thought I'd try it out to see if it's really true. Most of the sweetcrust dough (and the same goes for puff pastry as well) tends to shrink upon baking. So instead of having a 2" high pie side lining I'm short-changed and end up 1/4 to 1/2" shorter. Sometimes it's a bummer especially if my filing is pastry cream and my pie would look like an over-flowing "mud" pit!

As all the ingredients are mixed up in a food processor, this is the only electrical appliance you would need. Deb said that you could either roll out the dough or alternatively if lazy, just press it into a pie pan. Furthermore you don't require any pie weights when baking. How much easier could it get! I tried this recipe out over a Sunday and invited some friends over to taste it. I made this into a fresh mango pastry cream tart with a sprinkling of chopped pistachio over the top. Yum!

Fresh Mango Tart
You will Need:

One 9-inch pie tart shell
1 cup vanilla pastry cream
2 ripe mangoes
Crushed pistachio nuts for decoration

Pie Tart Shell
Recipe Adapted from Dorie Greenspan
(Makes enough for one 9-inch tart crust)

Ingredients:

1 1/2 cups all-purpose flour
1/2 cup confectioner’s sugar
1/4 teaspoon salt
1 stick (113g) plus 1 tablespoon (9 tablespoons; 4 1/2 ounces) very cold (or frozen) unsalted butter, cut into small pieces
1 large egg yolk

Method:

1) Pulse the flour, sugar and salt together in the bowl of a food processor. Scatter the pieces of butter over the dry ingredients and pulse until the butter is coarsely cut in. (You’re looking for some pieces the size of oatmeal flakes and some the size of peas.)

2) Stir the yolk, just to break it up, and add it a little at a time, pulsing after each addition. When the egg is in, process in long pulses–about 10 seconds each–until the dough, which will look granular soon after the egg is added, forms clumps and curds. Just before you reach this stage, the sound of the machine working the dough will change–heads up.

3) Turn the dough out onto a work surface and, very lightly and sparingly, knead the dough just to incorporate any dry ingredients that might have escaped mixing. Chill the dough, wrapped in plastic, for about 2 hours before rolling. (I found the dough to be too hard to roll after chilling for 2 hours, so had to let it rest at room temperature for about 15 minutes before I attempted rolling it)

4) To roll the dough: Butter a 9-inch fluted tart pan with a removable bottom. Roll out chilled dough on floured sheet of parchment paper to 12-inch round, lifting and turning dough occasionally to free from paper. (Alternately, you can roll this out between two pieces of plastic, though flour the dough a bit anyway.) Using paper as aid, turn dough into 9-inch-diameter tart pan with removable bottom; peel off paper. Seal any cracks in dough. Trim overhang to 1/2 inch. Fold overhang in, making double-thick sides. Pierce crust all over with fork.

5) Alternately, you can press the dough in as soon as it is processed: Press it evenly across the bottom and up the sides of the tart shell. You want to press hard enough that the pieces cling to one another, but not so hard that it loses its crumbly texture.

6) Freeze the crust for at least 30 minutes, preferably longer, before baking. (I left my unbaked crust in the refridgerator (not freezer section) for 2 nights before baking it straight from the refrigerator)

7) To fully bake the crust: Center a rack in the oven and preheat the oven to 190C (375F). Butter the shiny side of a piece of aluminum foil (or use nonstick foil) and fit the foil, buttered side down, tightly against the crust. And here is the very best part: Since you froze the crust, you can bake it without weights. Put the tart pan on a baking sheet and bake the crust for 25 minutes.

8) Carefully remove the foil. If the crust has puffed, press it down gently with the back of a spoon. Bake the crust about 10 minutes longer, or until it is firm and golden brown, brown being the important word: a pale crust doesn’t have a lot of flavor. Transfer the pan to a rack and cool the crust to room temperature, and proceed with the rest of your recipe.

Do ahead: The dough can be wrapped and kept in the refrigerator for up to 5 days or frozen for up to 2 months. While the fully baked crust can be packed airtight and frozen for up to 2 months, the flavor will be fresher bake it directly from the freezer, already rolled out.

To Assembly Tart:

1) Cut the cheeks off both mangoes. Using a large spoon, carefully scoop out the flesh. Cut the mango cheeks into thin slices.

2) Fill the cold pastry case with the pastry cream, ensuring the filling is smooth.

3) Artfully arrange the mango slices over the pastry cream. Sprinkle the chopped pistachios on top of the tart.

4) The tart can be chilled in the fridge for a few hours before serving. It is best eaten on the day it is made as the pastry can become soggy from the pastry cream.


Wednesday, January 7, 2009

Cappuccino Cupcakes

I made these cupcakes in a rush yesterday evening after work (I can guarantee it'll just take you about 15 minutes minus baking time to whip this up) and thus I wasn't really creative with my photo-taking and the lighting was quite bad as well.

So much for the photos but the cupcakes were absolutely delicious. That's why I wanted to share this recipe. I also didn't have time to ice the cupcakes as well, so they look somewhat "naked". Even without any icing, they were great as the coffee taste came out nicely and was not disguised under a dollop of cream. Although the recipe indicated that I would get 12 cupcakes from this recipe, I only managed 8 normal sized ones. It's probably because I filled them 3/4 full and as they were baking, they started to puff up quite a bit and crack in the center. I guess I should have filled 2/3 instead and could probably get 10 cupcakes in total. Once cooled, they settled back a bit, so not so bad!


Cappuccino Cupcakes

Ingredients:

3/4 cup self-raising flour
113g unsalted butter
100g caster sugar
2 large eggs
1 tsp vanilla extract (I replaced this with 1 1/2 tsp coffee extract)
1 heaped Tbsp instant expresso (I replaced this with 1 heaped Tbsp instant coffee)
3 Tbsp milk

Method:

1) Preheat oven to 180C

2) Put all the ingredients except for the milk into a food processor and blitz to combine. Pulse again, adding the milk down the funnel to form a batter with a soft dropping consistency.

3) Spoon batter into the cupcake liners and bake for about 20 - 22 minutes or check if they are ready by inserting a cake skewer into the center. If the skewer comes out clean, then the cupcakes are ready. If not, bake for a couple more minutes.

4) Cool cupcakes on a wire rack and ice them using your favourite frosting recipe.


Sunday, January 4, 2009

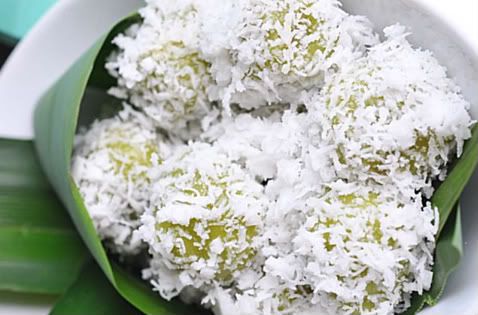
Onde-onde (Stuffed Glutinous Rice Balls)

I do believe that onde-onde first originated from Indonesia but it had been adopted by both the Malay and Peranakan cultures. I remembered when young my mother would buy kuih-kuih (local Malay cakes/desserts)for us kids to eat during tea times. And more often than not, onde-onde would be included. I love eating these chewy little balls of rice flour as the centers would contain palm sugar. I'll pop the whole ball into my mouth and bite down into them in anticipation of the palm sugar squirting out into my mouth. It was such a "rush" ... and believe it or not, I still do it now!


This is my first time making these and I found that it's really simple to do so. It's just a bit time consuming waiting to cook each rice ball. I figured out that I could get a whole lot of onde-onde from Four Singapore Dollars (S$4) if I made it myself as compared to buying S$4 worth of onde-onde from shops which would only give me 6 to 8 pieces maximum.


Onde-onde (Stuffed Glutinous Rice Balls)
(Makes about 20 balls)

Ingredients:

200g (1 3/4 cups) glutinous rice flour
150ml (2/3 cup) pandan juice *
3 Tbsp and 1 tsp water
200g (1 1/3 cup) palm sugar, finely chopped
1/2 tsp fine salt
75g (3/4 cup) grated young coconut

Pandan Juice *
(Makes 1/2 cup)

6 - 8 large pandan (pandanus) leaves
150ml (2/3 cup) water

Rinse pandan leaves and using a kitchen scissor or a sharp knife, cut leaves into 2cm (3/4") length. Place leaves and water in a chopper or blender and process until pulveried. Pour through a fine strainer and discard solids. Measure out the required amount of juice for this recipe.

Method:

1) Combine the glutinous rice flour, pandan juice and water together in a medium-sized bowl, kneading well to form a smooth, pliable dough. Cover dough with a damp towel to prevent it drying out.

2) Bring a pan of water to the boil, then lower heat so that the water simmers gently. Pinch out a ball of dough about the sixe of a lime, flatten it into a disk and drop it into the simmering water. When the disc is cooked and rises to the surface, lift it out with a slotted spoon, shake off any excess water and knead the cooked dough evenly back into the main ball of dough.

3) Mix salt and grated coconut together and place on a plate.

4) Pinch off small balls of dough the size of calamansi limes (about 20g each) and roll in your palms to form smooth balls. Carefully make a small well in the centre of the dough andfill with chopped palm sugar. Pinch dough together to enclose, roll them gently to smoothen and, as you make them, drop them into the simmering water.

5) When the dough balls float to the top, carefully remove them with a slotted spoon and allow any excess water to drip off. Drop the balls into the grated coconut and roll them around to coat evenly. Transfer to a serving plate.

Thursday, January 1, 2009

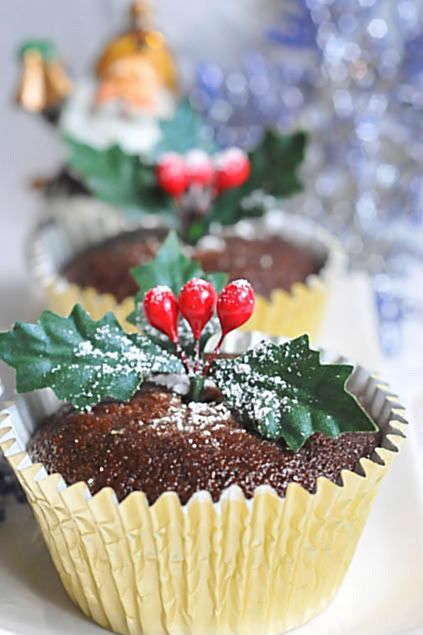
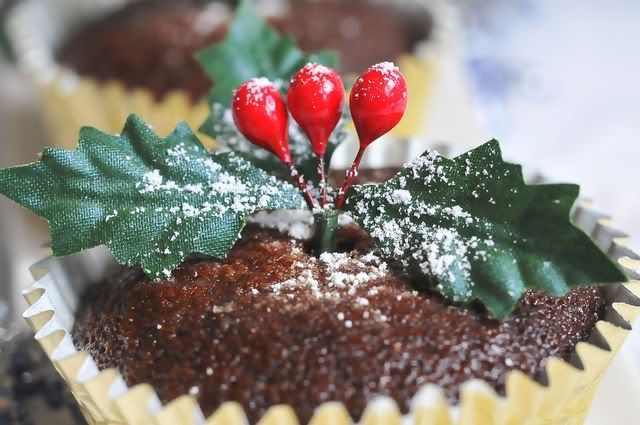
Chocolate Gingerbread Cupcakes

I do believe there is an affinity between ginger and Christmas. And everyone seems to be baking cookies, cakes and cupcakes with ginger and spices. I guess you can say I'm no different as well as I not only made these gingerbread cupcakes, I baked gingerbread cookies as well. This is originally a cake version but I adapted it for cupcakes as I think it's easier to serve it this way. I also baked these gingerbread cupcakes as Christmas presents for friends in addition to the apricot and ginger chutney I had made earlier (recipe in previous post).


Chocolate Gingerbread Cupcakes
(Recipe adapted from Dorrie Greenspan's Baking from My Home to Yours)

Ingredients:

1 1/2 Tbsp ground ginger
1 tablespoon sugar
2 cups plain flour
1 tsp baking soda
1 tsp ground cinnamon
1/4 tsp ground cloves
1/4 tsp nutmeg
1/2 tsp salt
1 stick plus 3 tablespoons unsalted butter, at room temperature
3/4 cup packed, light brown sugar
3 large eggs
1/2 cup molasses (I used bear rabbit brand)
6 oz bittersweet chocolate chips or finely choped chocolate
1 cup buttermilk

For the icing (optional):

3 ounces bittersweet chocolate, chopped
1 Tbsp strong coffee
3 Tbsp unsalted butter, at room temperature
3 Tbsp shifted icing sugar

Method:

1) Oven preheated to 180C, rack in center

2) Whisk flour, baking soda and spices and set aside. If you're using a stand mixer, fit it with the paddle attachment, set on medium, and cream the butter and brown sugar together until smooth, about 3 minutes. Add the eggs in one at a time, beating for 1 minute after each addition. The mixture will look curdled at this stage, but don't worry - it's suppose to look like this.

3) Add the molasses and continue beating until the mixture is smooth.

4) Reduce speed to low. Add the dry ingredients in three stages, alternating with the buttermilk. Begin and end with the dry ingredients. Do not over mix the batter. Fold in the chopped chocolate and pour the batter into your 9-in square baking pan. (I made this version as cupcakes - you should get about 12 - 14 cupcakes depending on the size of your cupcake liners)

5) For cake, bake for 40 minutes until the sides start to pull away from the pan. If you are making a cupcake version, bake between 17 - 20 minutes. Check to ensure that your cake is cooked by inserting a skewer into the center. If it comes out clean, it is ready.

6) Cool in the pan on a rack for 10 minutes, then take it out of the pan and cool to room temperature before icing.

For the Icing (optional):

1) Melt the chocolate together with the coffee in a double boiler. Once the chocolate is melted, remove it from the heat and stir in the butter one tablespoon at a time. Sift the confectioner's sugar over the mixture and stir it in. Transfer the mixture to a bowl and let it set for 10 minutes.

2) Pour the icing over the center of the cake and spread it to the sides. Let the iced cake sit for 30 minutes before cutting into 9 pieces.


Sunday, December 28, 2008

It's Christmas with a Daring Baker's French Yule Log

It's Christmas time and to usher in the spirit of yuletide, this month's Daring Baker's challenge is a French Yule Log.

You'll probably thinking huh .. yule log! Isn't it something that most families would have for Christmas, so where's the challenge! Well, that's where you are wrong! This log being called a "French Yule Log" must come from France. This is correct! In France you can buy two kinds of Yule log, either the Genoise and Buttercream type, or what is more commonly purchased, a frozen Yule Log which is very reminiscent of an ice cream cake, only often it’s not made of ice cream but rather frozen mousse of some sort. In French this is called an entremets which is sometimes loosely translated in English simply as a cream dessert. This recipe comes from Flore of Florilège Gourmand (by the way, the website is totally in French). Our darling hostesses for this month's challenge, which also happens to the last challenge to close off 2008 calendar, are Hilda of Saffron and Blueberry and Marion of Il en Faut Peu Pour Etre Heureux.

This challenge is really going to challenge us all - would you believe that it comes in 6 parts. The instructions itself when posted up was more than 15 pages long! You can say it freaked me out! I read, and re-read and re-read the recipe over the next 2 days before it finally sank in. Talk about a challenge, this certainly takes the cake - it was that daunting! However I did realize that a number of variations (which added to the somewhat lengthy instructions) had been provided by Hilda and Marion so as not to make the majority of us swim in quicksand.

I for one have never made any one of the 6 elements required for this log before, let alone eaten a French Yule Log is (unless you can count an ice-cream cake as a close semblance). The more well known type of yule logs that we get here are the genoise or swiss roll types.

The recipe below is based on the flavours I had chosen for this challenge. I also did not have a half pipe mould and thus made mine using two 4" cake pans. I've also posted the elements based on the order I had tackled the 6 elements (you can opt to make the elements over a 2-day period instead of doing everything in a day.) I made all first five elements over the Sunday and did the final icing on Monday.


FRENCH YULE LOG OR ENTREMETS
(Recipe by Flore of Florilège Gourmand)
(makes one 8" cake pan dessert or a 9" x 4" loaf pan dessert)

Element #1 Dacquoise Biscuit (Almond Cake)
Preparation time: 10 mn + 15 mn for baking

Ingredients:

80g almond meal (you can use hazelnut meal as substitute)
50g icing sugar
2 Tbsp (15g) all-purpose flour
3 medium egg whites (about 100g)
4 Tbsp (50g) granulated sugar

Method:

1) Finely mix the almond meal and the caster sugar. (If you have a mixer, you can use it by pulsing the ingredients together for no longer than 30 seconds).

2) Sift the flour into the mix.

3) Beat the eggs whites, gradually adding the granulated sugar until stiff.

4) Pour the almond meal mixture into the egg whites and blend delicately with a spatula.

5) Grease a piece of parchment paper and line your baking pan with it.

6) Spread the batter on a piece of parchment paper to an area slightly larger than your desired shape (circle, long strip etc...) and to a height of 1/3 inches (8mm).

7) Bake at 350°F (180°C)for approximately 15 minutes (depends on your oven), until golden.

8) Let cool and cut to the desired shape.

Element #2 Chocolate Creme Brulée Insert
Preparation time: 15mn + 1h infusing + 1h baking

Ingredients:

1/2 cup + 1 2/3 Tbsp (140g) whole milk
2/3 cup + 1tsp (140g) heavy or thickened cream
1/3 cup (25g) unsweetened cocoa powder
4 medium-sized (72g) egg yolks
3 Tbsp (40g) granulated sugar

Method:

1) Heat the milk and cream to just boiling. Add the cocoa powder.

2) Whisk together the sugar and egg yolks (but do not beat until white).

3) Pour the cocoa milk over the sugar/yolk mixture. Mix well.

4. Wipe with a very wet cloth and then cover your baking mold (whatever shape is going to fit on the inside of your Yule log/cake) with parchment paper. Pour the cream into the mold and bake at 210°F (100°C) for about 1 hour or until firm on the edges and slightly wobbly in the center.

5) Let cool and put in the freezer for at least 1 hour to firm up and facilitate the final assembly.

Element #3 Coconut Crisp
Preparation time: 10 mn

Ingredients:

3.5 oz (100g) white chocolate
1 oz (1/3 cup/25g) dessicated coconut
1 2/3 Tbsp (25g) unsalted butter
2.1 oz (60g) rice krispies (you can use cornflakes instead)

Method:

1) Spread the coconut on a baking tray and bake for 5-10 minutes at 375°F (190°C) to toast (a different temperature might work better for you with your own oven).

2) Melt the white chocolate and butter in a double boiler. Stir until smooth and add the toasted coconut.

3) Add the coarsely crushed lace crepes. Mix quickly to thoroughly coat with the chocolate. Spread between two sheets of wax paper to a size slightly larger than your desired shape. Refrigerate until hard.


Element #4 Mango Mousse
Preparation time: 20mn

Ingredients:

2 medium-sized egg yolks
2 Tbsp (17g) cornstarch
1/3 cup (80g) whipping cream
7 oz (200g) mango puree
1/2 cup (100g) granulated sugar
36g water
5g (2 1/4 tsp) powdered gelatin
100g (about 3 medium eggs) egg whites

Method:

1) Beat the egg yolks with the cornstarch until thick, white and fluffy.

2) Heat the cream in a medium saucepan and once hot, pour a small amount over the egg yolks while whisking vigorously.

3) Pour the egg yolk mixture back into the rest of the cream in the saucepan, add the mango puree and cook, stirring constantly, until it thickens considerably, at least 3-5 mn. Let cool to lukewarm temperature.

4) Make an Italian Meringue: Cook the sugar and water on medium heat until temperature reaches 244°F (118°C) when measured with a candy thermometer. If you don’t have a candy thermometer, test the temperature by dipping the tip of a knife into the syrup then into a bowl of ice water. If it forms a soft ball, you’ve reached the proper temperature.

5) Beat the egg whites until foamy. Pour the sugar syrup into the whites in a thin stream while continuing to whisk vigorously (preferably with a mixer for sufficient speed). Whisk/beat until cool (approximately 5 minutes). The meringue should be thick and glossy.

6) Soften the gelatin in cold water and let sit for about 3 minutes. Then zap the gelatin mixture in the microwave for 1 or 2 seconds.

7) Put the melted gelatin in a mixing bowl and, while whisking vigorously, pour the lukewarm mango cream over the gelatin.

8)Carefully blend the Italian meringue into the mango mixture. Cool the mousse and put it into the fridge.

Element #5 Dark Chocolate Ganache Insert
Preparation time: 10mn

Note: Because the ganache hardens as it cools, you should make it right before you intend to use it to facilitate piping it onto the log during assembly. Please be careful when caramelizing the sugar and then adding the cream. It may splatter and boil.

Ingredients:

4 Tbsp (50g) granulated sugar
2/3 cups less 1 Tbsp (135g) heavy or thickened cream
135g dark chocolate, finely chopped
45g unsalted butter softened

Method:

1) Make a caramel: Using the dry method, melt the sugar by spreading it in an even layer in a small saucepan with high sides. Heat over medium-high heat, watching it carefully as the sugar begins to melt. Never stir the mixture. As the sugar starts to melt, swirl the pan occasionally to allow the sugar to melt evenly. Cook to dark amber color (for most of you that means darker than last month’s challenge).

2) While the sugar is melting, heat the cream until boiling. Pour cream into the caramel and stir thoroughly. Be very careful as it may splatter and boil.

3) Pour the hot caramel-milk mixture over the dark chocolate. Wait 30 seconds and stir until smooth.

4) Add the softened butter and whip hard and fast (if you have a plunging mixer use it). The chocolate should be smooth and shiny.


Element #6 Dark Chocolate Icing
Preparation time: 25 minutes

Note: Because the icing gelifies quickly, you should make it at the last minute.
For other gelatin equivalencies or gelatin to agar-agar equivalencies, look at the notes for the mousse component.

Ingredients:

1/2 Tbsp (4g) powdered gelatin
1/4 cup (60g) heavy or thickened cream
5 Tbsp (60g) granulated sugar
1/4 cup (50g) water
1/3 cup (30g) unsweetened cocoa powder

Method:

1) Soften the gelatin in cold water for 15 minutes.

2) Boil the rest of the ingredients and cook an additional 3 minutes after boiling.

3) Add to the chocolate mixture. Mix well.

4) Let cool while checking the texture regularly. As soon as the mixture is smooth and coats a spoon well (it is starting to gelify), use immediately.

How to Assemble the Log:

Depending on whether your mold is going to hold the assembly upside down until you unmold it or right side up, this order will be different.

Your assemble of the log will depend on the mould you are using. As I was using a cake pan, my assemble would be in the below order:

1) Cut the Dacquoise into a shape fitting your mold and set it in there. If you are using an actual Yule mold which is in the shape of a half-pipe, you want the Dacquoise to cover the entire half-pipe portion of the mold.

2)Pipe one third of the Mousse component on the Dacquoise.

3) Take the Creme Brulee Insert out of the freezer at the last minute and set on top of the mousse. Press down gently to slightly ensconce it in the mousse.

4) Pipe second third of the Mousse component around and on top of the Creme Brulee Insert.

5) Cut the Crisp Insert to a size slightly smaller than your mold so that it can be surrounded by mousse. Lay it on top of the mousse you just piped into the mold.

6) Pipe the last third of the Mousse component on top of the Crisp Insert.

7) Freeze for a few hours to set. Take out of the freezer.

8) Pipe the Ganache Insert onto the frozen mousse leaving a slight eidge so that ganache doesn’t seep out when you set the Dacquoise on top.

9) Close with the last strip of Dacquoise (you can omit the dacquoise on the top if you wish).

10) Freeze until the next day.

If you are doing the assembly UPSIDE DOWN (eg using a loaf pan or a half pipe tube, your assembly would be in the below order:

1) Mousse
2) Creme Brulee Insert
3) Mousse
4) Praline/Crisp Insert
5) Mousse
6) Ganache Insert
7) Dacquoise
8) Freeze the assembled log over night before applying the icing.

THE NEXT DAY...

1) Unmold the cake (or log) and set on a wire rack over a shallow pan. Cover the cake with the icing. Let set. Then return to the freezer for a couple of hours.

2) Decorate your cake however you wish. The decorations can be set in the icing after it sets but before you return the cake to the freezer or you may attach them on top using extra ganache or leftover mousse, etc...

3) Transfer to the refrigerator no longer than ½ hour before serving as it may start to melt quickly depending on the elements you chose.


Wednesday, December 24, 2008

We would like to wish you and your family a very blessed Christmas holiday and a Happy New Year!


zwani.com myspace graphic comments


Related Posts with Thumbnails