Saturday, December 26, 2009

A Gingerbread House to Celebrate the Holidays

The December 2009 Daring Bakers’ challenge was brought to you by Anna of Very Small Anna and Y of Lemonpi. They chose to challenge Daring Bakers’ everywhere to bake and assemble a gingerbread house from scratch. They chose recipes from Good Housekeeping and from The Great Scandinavian Baking Book as the challenge recipes.

I was extremely keen to participate in this month's challenge especially as we were asked to do a gingerbread house. I've never done anything like this before so it would be really something as far as I was concerned. Both Anna and Y had posted their own gingerbread dough recipe. However we were also allowed to use any other recipe of our own choosing. I randomly picked a recipe from BBC Good Food and also used their gingerbread house template.

I really had great fun putting the entire house together. The house templates were baked and kept in the fridge a week ago. During the mid week, I scouted around for different candies, cookies, etc that would be used to decorate the house. My niece and nephew who happened to be in town this week helped out by putting up the wood pile and fence around the gingerbread house. They in turn had their own pieces of gingerbread cookie to decorate whilst I was assembling mine. I think for every piece of candy that went onto their cookie, one piece would be popped into the mouth .... that's kids for you!

Anyway I also wish everyone of you a happy New Year and hope you have a great kick start to usher in 2010.


Gingerbread House

For the Gingerbread Dough

Ingredients:

250g unsalted butter
200g dark muscovado sugar
7 tbsp golden syrup
600g plain flour
2 tsp bicarbonate of soda
4 tsp ground ginger

Method:

1) Heat oven to 200C/fan 180C/gas 6. Melt the butter, sugar and syrup in a pan. Mix the flour, bicarbonate of soda and ground ginger into a large bowl, then stir in the butter mixture to make a stiff dough. If it won't quite come together, add a tiny splash of water.

2) Cut out the template. Put a sheet of baking paper on your work surface and roll about one quarter of the dough to the thickness of 1/4". Cut out one of the sections, then slide the gingerbread, still on its baking paper, onto a baking sheet. Repeat with remaining dough, re-rolling the trimmings, until you have two side walls, a front and back wall and two roof panels. Any leftover dough can be cut into Christmas trees, if you like.

3) Bake all the sections for 12 mins or until firm and just a little darker at the edges. Leave to cool for a few mins to firm up, then trim around the templates again to give clean, sharp edges. Leave to cool completely.

4) Put the egg whites in a large bowl, sift in the icing sugar, then stir to make a thick, smooth icing. Spoon into a piping bag with a medium nozzle. Pipe generous snakes of icing along the wall edges, one by one, to join the walls together. Use a small bowl to support the walls from the inside, then allow to dry, ideally for a few hours.

5) Once dry, remove the supports and fix the roof panels on. The angle is steep so you may need to hold these on firmly for a few mins until the icing starts to dry. Dry completely, ideally overnight.

6) Decorate the gingerbread house with a variety of candies, sweets and chocolates. For the roof, I used oat bran crackers for a more realistic effect.


Sunday, December 20, 2009

White Chocolate Layer Cake

I guess the season to be jolly has come around again and it has been a breezing fast one in my opinion. I am still reeling as to where the last 12 months have gone to? Amongst many things that I do know is that I have diligently blog posted in 2009, baked and baked some more, tried out new recipes which I have never done in my entire life and met many, many good virtual friends through my blog and gotten to know them better through their own blogs. Thus, I would like to wish each and everyone of you happy holidays and good tidings.

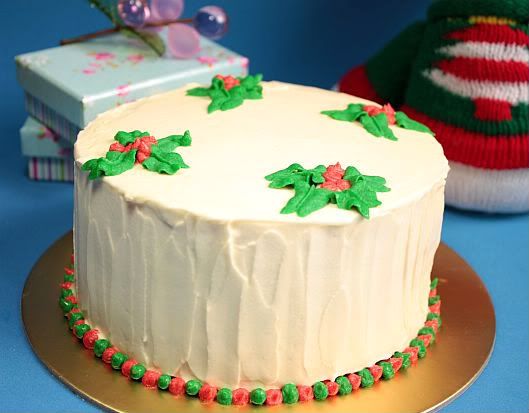
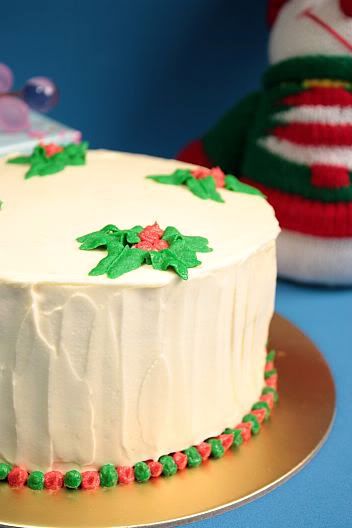
So in this month of festivities, the Cake Slice Bakers have selected a very appropriate cake to finish off the year with. It is a White Chocolate Layer Cake and we were encouraged to decorate it with a Christmas theme. I decided to keep this simple, yet elegant, so fancy santa clauses or christmas trees, etc are OUT!

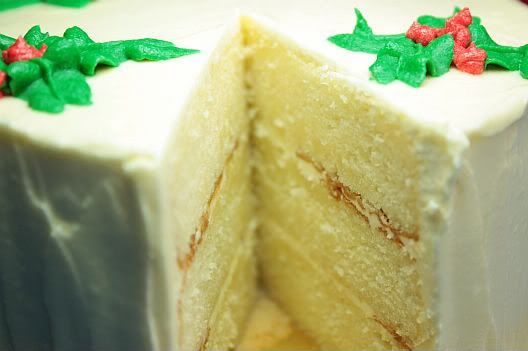
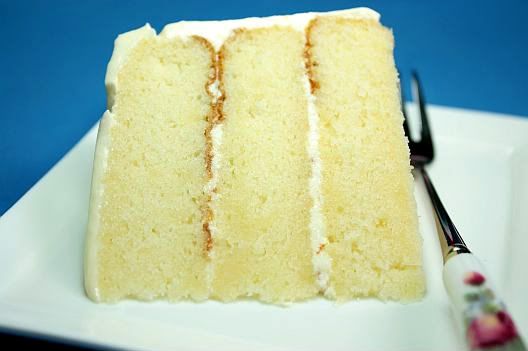
I just piped my version of holly leaves on the top and decorated the bottom edges with alternating red and green balls. Unfortunately the red Wilton colour that I had used didn't exactly turn out Christmas red - it sort of came out reddish pink. I also substituted the original frosting in below recipe with a white chocolate buttercream frosting. I took a slice to taste (official tester that is me!) and didn't think too much of the entire ensemble. But the next day, wow .... it was a different thing altogether. In fact I think this cake tasted so much, much better a day or 2 after sitting in the fridge. It defiitely got the thumbs up from everyone! This is one recipe that I would do again. I would truly recommend that you use a very good white chocolate (like valhora) if you are planning to bake this cake.


Cake: White Chocolate Layer Cake
(Recipe from Southern Cakes by Nancie McDermott)
Makes an 8" triple layer cake
(Halfing the recipe will give you 6" triple layer cake - which is what I did)


For the White Chocolate Cake:

2 ½ cups sifted cake flour
1 tsp baking soda
½ tsp salt
4 ounces white chocolate, finely chopped
½ cup boiling water
1 cup (2 sticks) butter, softened
2 cups sugar
4 eggs, separated
1 tsp vanilla extract
1 cup buttermilk (see note below)

For the White Chocolate Frosting:

6 ounces white chocolate, finely chopped
12 ounces (1 ½ cups) cream cheese, softened
3 tbsp butter, softened
¾ tsp vanilla extract
3 cups confectioners sugar

Method for the Cake:

1) Heat the oven to 350F and grease three 8 inch round cake pans. Line the bottom of each pan with a circle of waxed paper or kitchen parchment and flour the pan.

2) Combine the flour, baking soda and salt in a medium bowl, and stir with a fork to mix them well.

3) Bring 3 inches of water to an active simmer in the bottom of a double boiler or a saucepan that will accommodate a medium heat proof bowl so that it sits snugly over the water. Melt the white chocolate in the top of the double boiler or in the bowl over the simmering water. Stir often, and then pour in the ½ cup of boiling water and stir to mix well. Remove from the heat.

4) In a medium bowl, combine the butter and the sugar and beat with a mixed at medium speed to mix them together well. Add the egg yolks, one by one, beating each time to keep the mixture smooth. Add the white chocolate and the vanilla, and stir well to mix.

5) Add about a third of the flour mixture, and then about half of the buttermilk, beating with a mixer at low speed just long enough after each addition to make the flour or buttermilk disappear. Mix in another third of the flour, remaining buttermilk and then the last of the flour.

6) In a medium bowl, beat the egg whites at medium speed until they are foamy and opaque. Continue beating at high speed until they swell into thick, pillowy mounds and hold peaks that are stiff, but not fry. Add one third of the egg white mixture to the bowl of batter, and fold it in gently using a spatula. Add the remaining egg whites and continue to fold with a light touch, until the egg whites are blended in well, with only a few streaks showing.

7) Transfer the batter to the prepared pans and bake at 350F for 25-30 minutes until the cakes are golden brown, spring back when touched gently in the centre and are beginning to pull away from the sides of the pans.

8) Cool the cakes in the pans on wire racks or folded kitchen towels for about 30 minutes. Turn them out onto the racks and peel off the paper and turn them back the right way up to cool completely.


Method for the White Chocolate Frosting

1) In the top of a double boiler or a heatproof bowl, melt the white chocolate over hot, not simmering, water, stirring often. Remove from the heat once melted and let cool to lukewarm. Transfer the melted white chocolate to a large bowl, and add the cream cheese, butter and vanilla. Beat together at medium speed until you have a smooth sauce. Add the confectioners sugar and beat until smooth.

To Assemble:

Place one layer, top side down on a cake stand or serving plate and spread it with about a fourth of the icing. Continue stacking and frosting each cake layer in the same way. Cover the sides of the cake with any remaining frosting.

Cover the cake and refrigerate for at least 1 hour. Set the cake out about 30 minutes before you want to serve it.

NOTE: If you can’t find buttermilk, stir 1 tbsp lemon juice into 1 cup of milk and leave to stand for 10 minutes before using.


Thursday, December 17, 2009

Spinach Quiche

I simply love making tarts and when I do make up a batch of tart dough, I would usually have an extra one to freeze up. So whenever I get cravings for tarts, I would just pull out the frozen tart shell for a simple lunch or over tea-time. Only problem then would be to figure out what to fill it with. This was one of those occassions where I had a spare tart shell sitting in the freezer and left over mozarella cheese from a previous pizza making venture. And what comes out of it ... a spinach quiche. Not bad I would say.

My fridge and freezer, plus my larder, is always jam packed with food stuff. I always tell friends that if they get confined indoors in my apartment, they don't have to worry about food for at least a month. If you think I'm kidding .... I'm truly not!


Spinach Quiche
Makes one 9" tart

For the pate brisee:

250g all purpose flour
150g cold unsalted butter, cut into small pieces
1 tsp fine salt
pinch of superfine sugar
1 medium egg
1 Tbsp cold milk

Method:

1) Sift flour into a bowl. Add salt and sugar.

2) Add in the butter.

3) Using a pastry cutter, cut the butter into the flour until it resembles rough breadcrumbs.

4) In a separate bowl, lightly beat the egg with the milk and drizzle it onto the flour mixture.

5) Using your hands, blend the mixture together and lighly knead to bring together. Try not to handle the dough too much.

6) Roll the dough into a ball, wrap in plastic wrap, flatten it into a disk and chill for about 45 minutes to an hour.

8) To line your tart tray, I find it easier to roll the dough between two pieces of clingwrap plastic. Roll to about 3" wider than the base of your tray. Remove the top wrap.

9) Lift the dough using the clingwrap plastic and gently flip it into your tart tray. Press the dough onto the tray and trim off the excess.

10) Dock the base of the tart shell with a fork and then place it into the fridge for another hour.

11) Preheat oven to 190C. Bake the shell blind, for about 15 minutes. Then remove the parchment paper and bake for another 5 minutes. Remove from oven and let it cool before pouring in the filing.


For the Quiche Filing:

Ingredients:

1/2 cup of diced onion
1 tsp olive oil
3/4 cup spinach (defrosted and squeeze out the excess water)
1/4 cup diced tomatoes
3 large eggs
1 cup heavy cream
1/2 cup whole milk
pinch of freshly ground nutmeg
salt and pepper to taste
2/3 cup of mozarrella cheese (you can use any other cheese or a mixture of cheeses such as cheddar and parmesan)
3 Tbsp grated parmesan to sprinkle on the top

Method:

1) Heat olive oil in a small frying pan and sautée onions gently until starting to brown, about 8 minutes. Set aside to cool.

2) Preheat the oven to 180C.

3) Beat together the eggs, cream, milk, salt, pepper and nutmeg. Leave on counter during the rest of the preparation to allow it to come to room temperature.

4) Add in the onions, spinach, diced tomatoe and mozarella into the batter and stir well.

5) Pour the mixture into the tart casing. Then sprinkle the parmesan on the top of the quiche.

6) Place on a baking sheet and bake for 35 - 40 minutes. Allow to cool a bit before serving.


Sunday, December 13, 2009

Fondant Handbag Cake

As you may already know, I had recently done a fondant cake for my colleague's two year old son's birthday party. As I had some cake layers left over, I decided to make a mini fondant handbag cake.

This is definitely much easier than the jungle cake that I had made a couple of weeks ago. The fondant handbag is made of one layer 6" chocolate cake. I sliced the cake into half, sandwiched the two pieces with some buttercream and then trimmed off a bit of the rounded edges at both ends. I then crumb-coated the entire cake with a bit of buttercream, not too much, just enough so that the fondant will stick to the sides of the cake.


Instead of using store bought fondant, I made a homemade marshmallow fondant. It is really, really easy. What you need is:

Homemade Marshamallow Fondant:

100g white marshmallows
1 Tbsp water
200 - 250g of icing sugar sifted
Crisco
Flavouring optional (use a no-colour flavouring )

Note: if you are using flavouring, use about 1/2 tsp and reduce the water by the same amount of flavouring used)

Method:

Place the marshmallows and water (flavouring) into a microwavable bowl. Heat the marshmallows on high for about 1 minute (until it melts). Remove and using a spoon, mix the marshmallows until it becomes a gooey mess.

Pour the melted marshmallows into the sifted icing sugar and stir to mix. Once incorporated, this is the time to get messy with the hands. Take some crisco and lather one hand with it.

Then proceed to knead the fondant until it becomes smooth and palleable. Add more icing sugar if required. Store the fondant in a plastic bag and into an air-tight container if not using immediately.


Thursday, December 10, 2009

Caterpillar Bread

I seriously do not know why this particular bread is called "Caterpillar Bread". Maybe because of the shape that looks like the bumps on the top of a caterpillar or maybe it looks like the legs of a caterpillar! Whatever it is, this particular bread seems to be sold in almost every other local bakery, be it a small neighbourhood one or the larger franchise. Some bakeries will sell this bread with a pork or chicken floss topping that has been drizzled with mayonnaise and tomatoe sauce. I know some of you will probably think what the heck is this! Honest to goodness, this particular style of bread is extremely popular not only in Singapore but also in Malaysia, Taiwan and Hong Kong.

Since discovering this recipe, I've made it twice already and everytime it has been enjoyed by my hubby. Why? Well firstly it has one of his most fav ingredients .. cheese. Secondly, it has his other fav ingredient ... sausage. They do say a way to a man's heart is through his stomach - this is absolutely true in my case where this bread is concerned.

The bread is not dense at all, in fact it is quite light and it makes a great snack either for tea time or morning breakfast. Since there is only the two of us in the household, I halfed the recipe, thus having to bake the bread in two batches only.


Caterpillar Bread
(makes about 22 pieces of bread)

For Basic Sweet Bun Dough:

3 cups (480g) bread flour, shifted
1 1/2 cups (120g) all purpose flour, shifted
1 pack rapid rise yeast (I used normal dried yeast)
8 tablespoons (110g) granulated sugar
4 tablespoons (20g) dry milk powder
300ml warm water (about 105F)
1 egg
1 tablespoon salt
5 tablespoons (60g) of unsalted butter, at room temperature

Sausages (I used frozen chicken sausage pack which I defrost)
Shredded cheese (a mixture of white and yellow cheddar cheeses)


Method:

1) Add yeast to warm water in a medium bowl, and set aside for 10 minutes.

2) In your mixing bowl, add the bread flour, all purpose flour, granulated sugar and dry milk powder. Attach your dough hook to your mixer and turn the speed to the lowest to combine all the dry ingredients.

3) Then slowly mix in the water + yeast mixture, with the mixer still on low. Mix for about 1 minute.

4) Beat an egg lightly in a small bowl. Add it to the softened butter. Then add in the egg and butter mixture to the dough. Mix well for about 8 - 10 minutes on low speed until the dough no longer sticks to the side of the bowl. The dough should be smooth and elastic. (If the dough seems a bit too wet, add a little bit of bread flour and mix in)

5) Remove dough from the mixer. Shape into a ball and place into a lightly oiled bowl. Turn the dough around to ensure that is is coated with the oi. Cover bowl with clingwrap and set aside to proof for 1 hour or until it doubles in size.

6) Once ready, try pressing a finger into the dough. It should leave a clear mark when it's ready. The dough can now be shaped.

To Shape the Dough:

1) Divide the dough into 70g pieces and mould them into balls. Let them rest for 10 minutes, then roll them into a flat oval shape with a rolling pin.

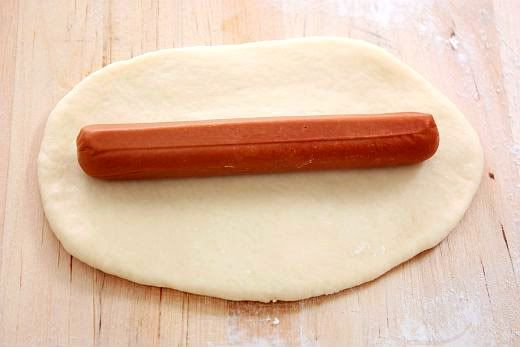
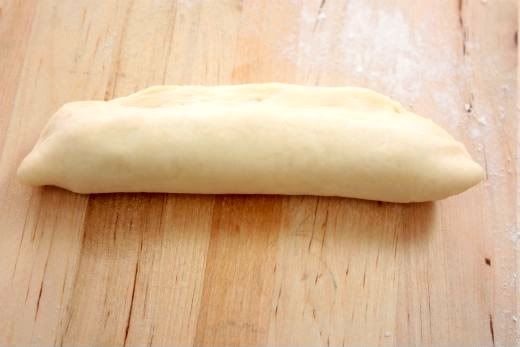
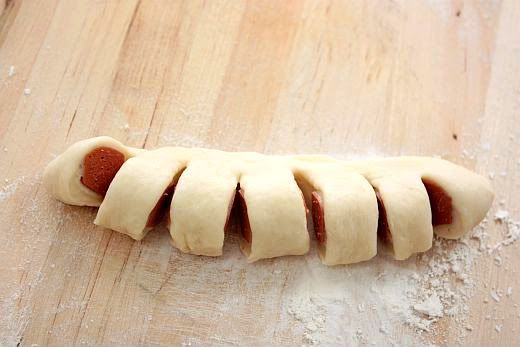
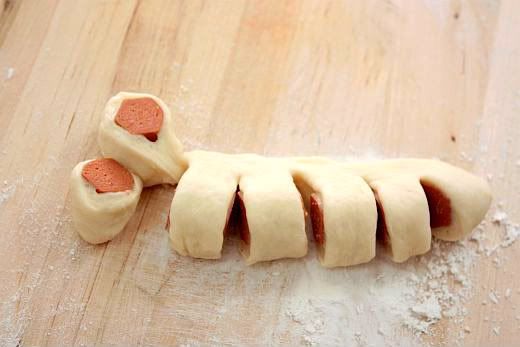
2) Put the sausage on the center of the dough and fold the dough into half. Lightly pinch to seal. Cut each folded dough into 7 - 8 small portions, leaving 1/3 from the sealed edges uncut. Ensure that the cuts are right across the sausage. (The dough should resemble a comb at this point.)


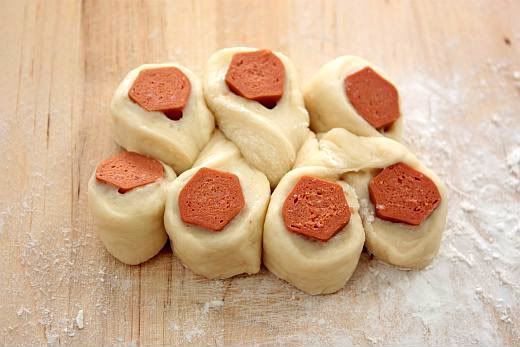
3) Twist first cut portion to the left, and second to the right, repeat this for the rest of the portions. Place the shaped dough onto a greased baking sheet and press each lightly. Place a clingwrap over the dough and let it proof for 45 minutes.


4) Brush with egg wash, and sprinkle the top of the dough with shredded cheese.

5) Bake in a preheated oven of 375F for 15-20 minutes or until the bread turns golden brown.

Sunday, December 6, 2009

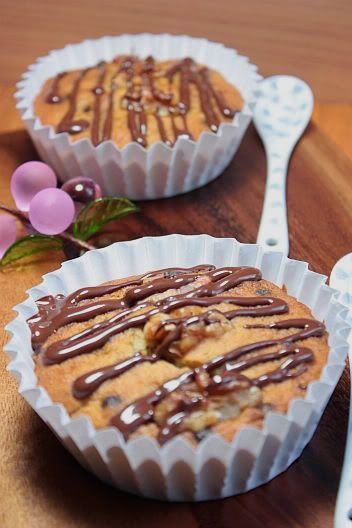
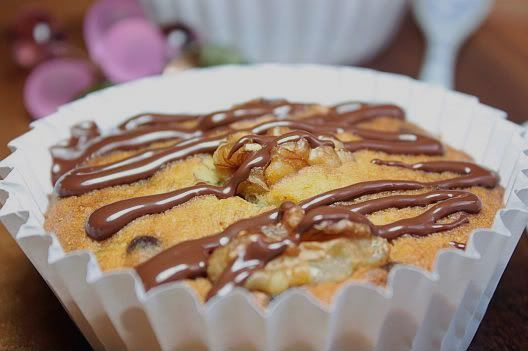
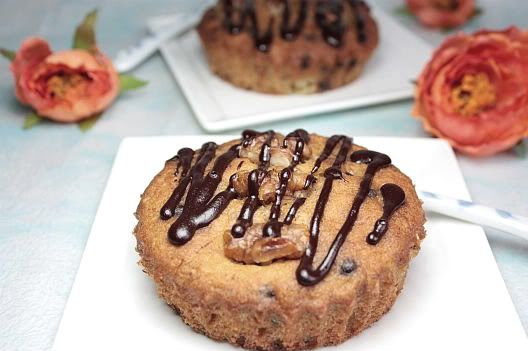
Chocolate Chip Banana Cake

I think most of us in Asia would take a banana for granted. Mainly because we are blessed with so many types and varieties in this part of the world. Furthermore it is about one of the cheapest fruit sold. In Malaysia and Singapore, bananas are eaten as it is, added to desserts, curries or stir fried. The bananas that are usually added to curries or stir fried would be unriped ones.

I like using a particular type of banana in my cakes and desserts. Locally we call it "pisang emas" (translation to English means "golden banana"). It is grown in Malaysia and is exported out to neighbouring ocuntries. These bananas are short, fat and kinda stubby looking. When ripe, the fruit itself is amazingly sweet and gives out a wonderful flavour. It's extremely, extremely great over pancakes or waffles - just add some brown sugar, pinch of cinnamon and lightly brown the slices of bananas over a low heat. Yum and I'm wishing I'm having some right now. Sorry for the digression!

Anyway I've made bananas cakes, cupcakes and muffins before and some of the recipes have been posted in this blog. However I am always game to try out new recipes and this is another one to the addition. Again for this particular cake (which I downsized to "mini cakes") uses "pisang emas". You can use any other riped bananas you can get your hands on. By the way, if you have any left over riped bananas (and you are contemplating on throwing them out), mash them and store it in the freezer. They will keep until your next banana bread, cake or muffin recipe. I added a melted chocolate drizzle to the top as bananas go absolutely well with chocolate.


Chocolate Chip Banana Cake
Makes a 8" cake or six 3 1/2" mini cakes

Ingredients :

125g unsalted butter
3/4 cup sugar (reduced from original 1 cup)
1 egg
1 1/2 cups plain flour
2 tablespoon milk
1 teaspoon baking soda, dissolved in the milk
1 teaspoon baking powder
4 - 5 lightly mashed ripe bananas
1/3 cup chocolate chip (I used valharo chocolate pearls)
1 teaspoon vanilla essence
1 pinch salt
1/4 cup walnuts for decoration
melted chocolate for drizzling

Method:

1) Cream butter and sugar until smooth and pale in colour.

2) Then add the egg and soda that which has been dissolved in the milk. Mix until incorporated.

3) Then add in the bananas and vanilla essence until it has mixed into the batter.

4) Shift the flour, baking powder and salt into a bowl. Add half of the dry ingredients into the batter and stir together. Add the remaining and mix until incorporated - do not overbeat your mixture.

5) Transfer the cake batter into a lined pan (or cupcake/cake liners) and bake in a preheated oven of 350F or 180C. Top the batter with whole walnuts as decoration. For cake bake for about 30-40 minutes, for mini cakes it should take about 25 minutes and for cupcakes about 18 - 20 minutes. Bake until the skewer comes out clean.

6) Remove from oven and set aside to cool complete.

7) Melt (in 15 second bursts so as not to burn your chocolate) some bittersweet chocolate in a microwave and then drizzle it on top of your cooled cakes.


Wednesday, December 2, 2009

Siew Pau (Baked BBQ Pork Buns)

I came across this recipe for Siew Pau (to be precise Seremban Siew Pau) when Ellie of Almost Bourdain was doing a guest post at Bee's Rasa Malaysia . Like myself, both Ellie and Bee are fellow Malaysians, living abroad and away from home. Although both are so much further away from home than I am, Ellie and Bee have come out with the most amazing Malaysian dishes ever. If you haven't visited their blogs yet, what are you waiting for .... go do it right now!

This particular baked pastry originates from a state in Malaysia called Seremban - thus the name "Seremban" Siew Pau. I have been eating this pastry since I was young and although we didn't travel from Kuala Lumpur (my home town) to Seremban, they are readily sold in Kuala Lumpur as well. My mum would buy them from this particular coffee shop (really old Chinese style coffee shop) in Chinatown and we would enjoy these treats whenever she brings them home. So when I saw this recipe posted up, I knew I had to give it a try.

Many months ago, I had tried out a water dough and oil dough recipe for baked flaky mooncakes. The result was disasterous. The dough turned out hard like rock buns. So when I went about making the dough for the Siew Pau, I could only hope that it would be successful. You can already guess from the photos, that this venture turned out great. In fact it taste exactly like the ones sold back home! However if you are planning to make this, I do recommend that you eat it on the same day it is baked! If you do have left overs, pop them into the oven to warm them up .. otherwise the pastry tends to be soften up the next day.


Siew Bao (烧包) Recipe

Ingredients:

Water Dough (水皮)

200g all-purpose flour, sifted
100g water
50g vegetable shortening
50g icing sugar

Oil Dough (油皮)

200g all-purpose flour, sifted
100g vegetable shortening

For the Filling:

300 g BBQ pork (Char Siew), diced (you can replace this with BBQ chicken)
1 medium onion, finely chopped
1/3 cup of green peas
1 tbsp oyster sauce
1 tbsp soy sauce
1 tbsp water
1/2 tbsp corn flour
1/2 tbsp sugar

1 egg yolk, lightly beaten
sesame seeds

Method:

To Make Filling


1) Add oyster sauce, soy sauce, water, corn flour and sugar in a small bowl and stir to mix well.

2) Heat 1 tbsp of oil in a frying pan. Stir fry BBQ pork, onion and green peas until fragrant. Add the oyster sauce, soy sauce, water, corn flour and sugar mixture and stir well.


To Make Pastry

1) Put all the ingredients of water dough in a food processor and pulse until it forms a soft dough. Cover it in a bowl and let it rest for 30 minutes.

2) Repeat the same with oil dough.

3) Divide the water dough and oil dough into 18 equal portions.

4) Roll out a piece of the water dough into a flat circle.

5) Place a piece of the rounded oil dough in the centre of the flat circle.

6) Gather the outer edges of the water dough circle and wrap up the oil dough ball. Pinch and seal the edges.

7) With the heel of your palm, gently press the dough down to flatten it lightly.

8) Using a rolling pin, roll out the dough into rectangle shape.

9) Roll up the dough Swiss-roll style. Turn the rolled dough 90 degrees.

10) Repeat steps 8 and 9. The pastry is now ready for filling and shaping.

To Assemble

1) Preheat the oven to 180 degree C.

2) With the heel of your palm, gently press the pastry down to flatten it lightly.

3) Roll out the pastry into a flat circle. Place 1 tbsp of filling in the centre.

4) Gather the outer edges of the dough circle and pleat and pinch to seal.

5) Brush egg wash on the surface and sprinkle with sesame seeds.

6) Bake in the oven for 25-30 minutes or until golden brown.


Saturday, November 28, 2009

A "Jungle" Birthday Theme

I've now found a new love which is called Fondant. I've just started making fondant flowers as decoration to cupcakes and the most recent venture was decorating the cupcakes for the Burnt Sugar baked by Cake Slice Bakers group a week and half ago. My colleagues in the office found the cupcakes beautifully done. So much so, that a colleague of mine actually asked me to bake some cakes for her son's two year old birthday party which was held yesterday evening.

I said I would and after giving some thought for an idea to the cake and cupcakes, I decided I would do a jungle animal theme. Just right for a two year boy who was fascinated with animals. As the birthday party was on Friday (lucky for me it was a public holiday here in Singapore), I had to plan ahead early in the week. The 6" cake layers were baked on Tuesday night and I managed to come up with 6 layers in total. The cake required the height to make it stand out. And the cupcakes were baked on Wednesday night. I dedicated Thursday evening after dinner to decorate the cake and cupcakes. Initially I had wanted to split the decoration over Thursday night and Friday morning, but once I was into the project on Thursday night, I decided to complete everything in one-go. Would you believe that I finally finished the cake and cupcakes at 2am on Friday morning!

The end result was a fondant 4-layer chocolate cake sandwiched with buttercream and chocolate ganache. The entire cake was covered with a chocolate fondant. Tall trees wrapped the sides of the cake with a snake going around one of the trees. Eyes of animals peered out between the trees and two elephant trucks appear to be coming out from the depth of the forest. Above the tree foliage pops the heads of two giraffes. The giraffes are made of gumpaste and I hand painted the spots and drew out the eyes, mouth and nose.


To complement the cake, the cupcakes were decoated into a variety of jungle animals -tigers, zebras and lions.

I was extremely pleased to hear that the birthday boy enjoyed his birthday cake very much and the rest of the kids loved the cupcakes. This really makes my weekend!


Chocolate Butter Cake
Recipe Adapted from Joy of Baking
(Serves 8 - 10)


Ingredients:

4 ounces (150 grams) unsweetened chocolate, chopped
1/3 cup (30 grams) unsweetened cocoa powder (not Dutch-processed)
1 cup (240 ml) boiling water
2 1/4 cups (315 grams) all purpose flour
2 teaspoons baking powder
1 teaspoon baking soda
1/4 teaspoon salt
1 cup (226 grams) unsalted butter, room temperature
370 grams granulated white sugar
3 large eggs
2 teaspoons pure vanilla extract
1 cup (240 ml) milk

Frosting:

5 ounces (140 grams) unsweetened chocolate, chopped
1/3 cup (80 ml) milk
1/2 cup (113 grams) unsalted butter, softened and cut into pieces
4 cups (1 pound) (454 grams) confectioners (powdered or icing) sugar, sifted to remove lumps
1/8 teaspoon salt
2 teaspoons pure vanilla extract

Method:

1) Preheat oven to 350 degrees F (177 degrees C) and place rack in center of oven. Butter, or spray with a nonstick vegetable spray, and line with parchment paper, two - 9 x 2 inch deep (23 x 5 cm) round baking pans. Set aside.

2) In a stainless steel or heatproof bowl place the chopped unsweetened chocolate and cocoa powder. Pour the boiling water over the chocolate and cocoa powder and stir until they have melted. Set aside to cool while you make the batter.

3) In a separate bowl, whisk to combine, the flour, baking powder, baking soda, and salt. Set aside.

4) In the bowl of your electric mixer, or with a hand mixer, cream the butter. Gradually add the sugar and continue beating until the mixture is fluffy (this will take about 3-5 minutes). Add the eggs, one at a time, mixing well after each addition. Add the vanilla extract and melted chocolate mixture and beat to combine.

5) Add the milk and flour mixtures in three additions, beginning and ending with the flour mixture. Beat only until the ingredients are incorporated.

6) Divide the batter evenly between the two prepared pans and smooth the tops. Bake for about 35 - 40 minutes or until a toothpick inserted in the center comes out clean and the tops spring back when lightly pressed. Remove from oven and place on a wire rack to cool for about 10 minutes. Butter or lightly spray a wire rack with Pam before inverting the cakes onto the rack to prevent the cakes from sticking. Cool the cakes completely before frosting.

Frosting:

Melt the chopped chocolate in a stainless steel bowl placed over a saucepan of simmering water. Remove from heat and let cool. Then place the melted chocolate, milk, confectioners sugar, salt, and vanilla extract in the bowl of your electric mixer, fitted with the paddle attachment. (Alternatively, you can use a hand mixer.) Add the pieces of softened butter and beat on low speed for about 2 minutes. When the frosting starts to come together increase the speed to medium and beat for about 2 to 3 minutes or until smooth. Scrape down the sides of the bowl with a rubber spatula. Increase the speed to high and beat the frosting for 1 - 2 minutes more or until it is of spreading consistency. If necessary, add more milk or sugar.

To Assemble:

Place one layer of cake, top side down, on your serving plate and cover with a layer of frosting. Then place the second layer of cake, top side down, onto the first cake layer and then frost the top and sides of the cake with the remaining frosting. Can garnish with fresh fruit or shaved chocolate.

Wednesday, November 25, 2009

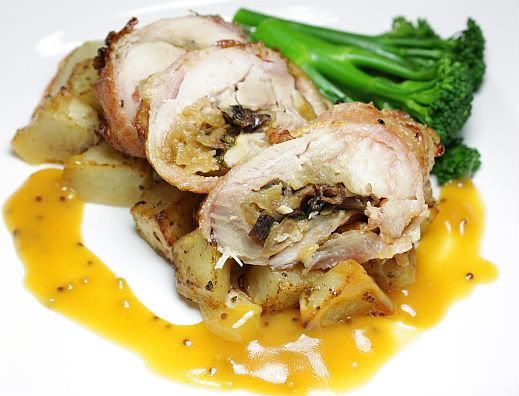
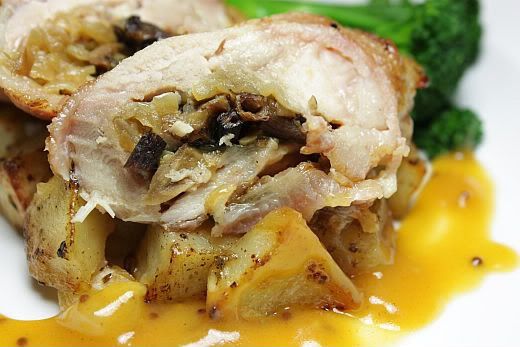
Bacon Wrapped Chicken

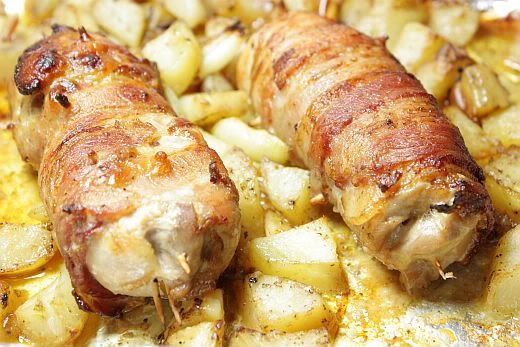
It was one of those week-ends that seem to zip past in a flash. I always wonder what happened to my Saturday and Sundays when Monday comes. Moan, groan .. is it Monday already! I'll usually complain about my "flash past weekends" to my other half and he'll say that I tend do too much over the two days. Basically not taking enough rest like what other normal people would do. I guess it's somewhat true. Week-ends is also when I try to cramp in some cooking and baking.

We weren't terribly fussed about what to have for dinner on Sunday. So I decided we'll have chicken instead, something easily put together and without much bother at all. Guess what, I didn't even look up any recipe book! And before I forget .. it was really delicious.


Bacon Wrapped Chicken
(Serves 2)

Ingredients:

2 pieces skinless, deboned whole chicken leg (you can substitute with boneless skinless chicken breast)
1/4 cup mozarella cheese, grated
2 Tbsp thinly sliced brown mushroom
1/4 cup carmelized onions (which I had left over)
6 streaky bacon strips
3 medium sized potatoes, cubed to about 1" square
1 large onion, cut into 8 pieces
1 Tbsp butter
Salt and black pepper to taste
Oil for browning the chicken

Method:

1) Flatten chicken to 1/2-in. thickness.

2) Spread the mozarella, mushroom and carmelized onions over each chicken. Dot the filing with some butter, sprinkle with salt and pepper.

3) Wrap each piece of chicken with 3 strips of bacon. Then roll up the chicken like a sausage and use toothpicks to secure the roll.

4) Preheat the oven to 200C.

5) Heat some oil in a frying pan. On medium heat, brown the chickn rolls for about a minute. Remove from pan and set aside.

6) In a baking tray, place the potatos and onion on the bottom of the tray. Sprinkle with salt and black pepper. Drizzle the potatoes and onion with a bit of olive oil and add about 1 Tbsp of butter.

7) Place the bacon wrapped chicken rolls on top of the potatoes.

8) Bake in oven for about 40 minutes or longer until cooked.

9) Serve with broiled vegetable and your favourite gravy. (I made a honey mustard dressing to go with the chicken)


Friday, November 20, 2009

Burnt Sugar Cake

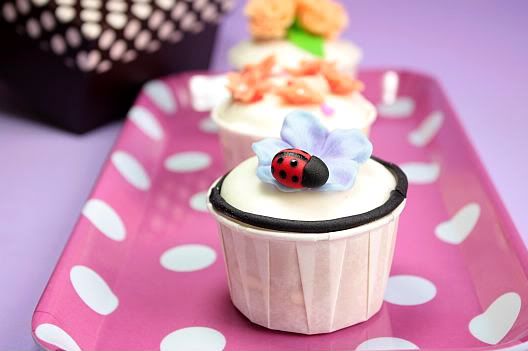
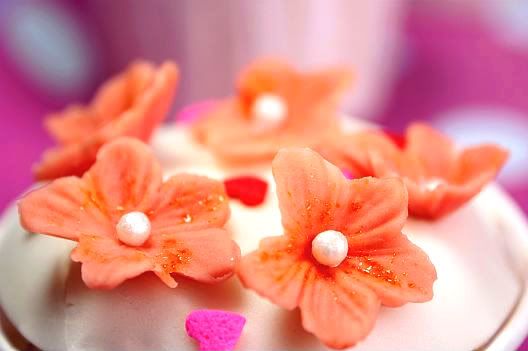
Based on popular voting, the November cake for Cake Slice Bakers is a Burnt Sugar Cake. When the recipe was posted up in the forum, I shuddered to think of the amount of sugar I would be consuming in each slice. I even delayed baking this cake until the very last weekend before actual post date. Then when I read some of the comments posted by my fellow Cake Slice bakers, I quickly decided that I would cut back on the amount of sugar used in the original recipe. In addition I also made some minor alternations. Well, firstly I reduced the recipe by half. Secondly I decided that it would be kinda cute to turn these into cupcakes instead. The halfed reciped resulted in a dozen cupcakes for me. I used the burnt sugar frosting for only half of the cupcakes and for the rest, I decorated them with fondant. In fact it is homemade marshmallow fondant that I had used. It's been a while since I dabbled in using fondant, so it's high time I dusted the cobwebs off my fondant tools and took them out from storage.


The cupcakes came out extremely moist (a little denser than a vanilla cupcake) but it kept extremely well even after 3 days in the fridge. I think it was due to the sugar content that kept the crumbs from drying out. The reduced sugar amount that I had used seem about right. However the frosting was way, way too sweet for my taste! And this is even after I had reduced the amount of burnt sugar syrup that was added to the frosting. The burnt sugar gave the frosting a slight distinct maple syrup taste. So if you are not a sweet-tooth I would strongly encourage that you find an alternative frosting for this cake.

By the way, would you believe I had my first rejection to my cakes! However it was not because they taste horrible or anything like that. The recipient said that she had been putting on so much weight since I started bringing baked goodies to the office that she'll have to change her entire wardrobe soon.

Lastly don't forget to check out my fellow bakers at Cake Slice Bakers for more beautiful creations.

Burnt Sugar Cake
Recipe from Southern Cakes by Nancie McDermott
Makes One 9" cake


For the Cake:

3 cups all purpose flour
1 tbsp baking powder
½ tsp salt
1 tsp vanilla extract
1 cup milk
1 cup (2 sticks) butter
1¾ cups sugar (I reduced this to 1 1/4 cups of sugar and still found the cake to be a little bit sweet)
4 eggs
½ cup Burnt Sugar Syrup (recipe below) (I used only 1/3 cup of burnt sugar)

For the Burnt Sugar Syrup:

1 cup sugar
1 cup boiling water

For the Burnt Sugar Frosting:

3¾ cups confectioners sugar
½ cup Burnt Sugar Syrup (above)
¼ cup (½ stick) butter
½ tsp vanilla extract
2 – 3 tbsp evaporated milk or normal milk

Method – Burnt Sugar Syrup:

1) Heat the sugar in a cast iron skillet or another heavy bottomed pan with high sides. Heat over a medium-low heat, stirring occasionally, until the sugar melts into a clear brown caramel syrup. It should be the colour of tea.

2) Gradually add the boiling water, pouring it down the sides of the pan so that if the syrup foams and bubbles up, you should be protected.

3) Continue cooking, stirring often, until the water combines with the syrup and turns a handsome brown syrup. Remove from the heat and set aside to cool. Store the cooled syrup in a sealed jar if not using straight away.

Method - Cake:

1) Heat the oven to 350 degrees F. Grease and flour two 9 inch round cake pans.

2) In a medium bowl, combine the flour, baking powder and salt and stir with a fork to mix well. Stir the vanilla into the milk.

3) In a large bowl, beat the butter and the sugar with an electric mixer at high speed for 2 – 3 minutes, until they are well combined. Stop now and then to scrape the bowl down. Add the eggs, one by one, beating well each time. Pour in half a cup of the burnt sugar syrup and beat well. Add a third of the flour mixture and about half of the milk, beating at a low speed, until just incorporated. Mix in another third of the flour and the rest of the milk. Finally, add the remaining flour.

4) Divide the batter between the cake pans and bake at 350F for 20 to 25 minutes until the cakes are golden brown, spring back when touched gently in the centre and begin to pull away from the sides of the pan. (For cupcakes, fill the cup liners to 3/4 full and bake for about 20 minutes.) Let the cakes cool in the pans on a wire rack for 15 minutes. Turn out the cakes into the wire rack to cool completely.

Method – Burnt Sugar Frosting:

1) In a large bowl, combine the confectioners sugar, the burnt sugar syrup, butter and vanilla. Beat with a mixer at medium speed for 2 to 3 minutes, scraping down the bowl now and then to bring the ingredients together. Add 2 tablespoons of the milk and continue beating until the frosting is thick, soft, smooth and easy to spread. Add a little more sugar if it is thin, and a little more milk if it is too thick.


To Assemble:

Place one layer, top side down, on a cake stand or serving plate. Scoop about ¾ cup of the frosting onto the cake. Spread to the edges and place the second cake layer over it, top side down. Frost the sides of the cake, and then the top until it is evenly covered.


Wednesday, November 11, 2009

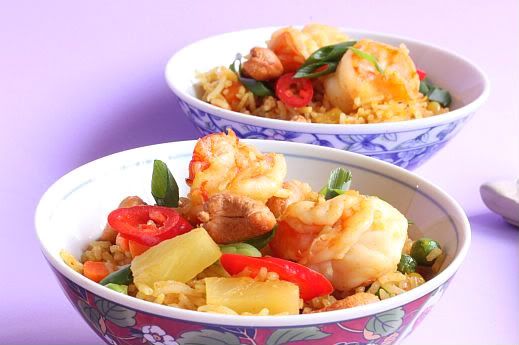
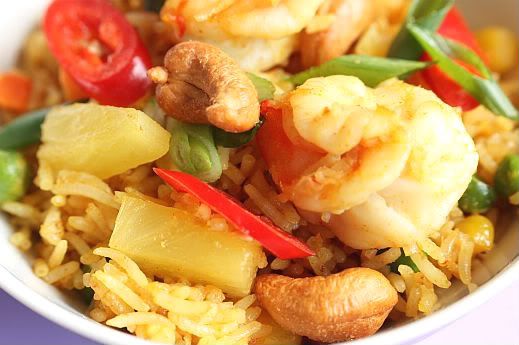
Pineapple Fried Rice with Prawns (Khow Pad Supparod Goong)

Have you ever thought that the simplest meal is sometimes the best meal you've ever had. I've had moments like this. It's often the something that you would throw together in a pot would bring the cosiest warm feelings. Would you believe that fried rice falls into this category for me? Well it does!

When we were young kids (god knows that was donkey years ago), my mum would cook fried rice and her main ingredients were diced onions, diced char siew (chinese roast pork), frozen vegetables and eggs. These were one of the moments we enjoyed the most and I still remember the big pot of fried rice placed in the middle of the dining table. All of us would swoop down onto the pot with a spoons and heaped up huge helpings onto our dinner plate. I loved eating char siew fried rice with Maggie (that's the brand of the sauce) chillie sauce.

Would you believe when I first worked in Hong Kong many years ago, I could never find this particular brand of chillie sauce any where in town. So every time I go back to Singapore (which was about 4 times a year), I would take the opportunity to pack a few bottles back with me. Hah ... I should have recorded the customs officer's face when he opened my luggage at HK airport.


Pineapple Fried Rice with Prawns (Khow Pad Supparod Goong)
Serves 2
Print Recipe

Ingredients:

50g boiled shrimp
1/3 cup frozen mixed vegetable
1/4 cup cubed pieces of fresh pineapple
2 cups cold plain rice (break up any clumps)
3 Tbsp oil

For the Paste:

100g blended pineapple pulp
1 Tbsp tumeric powder
2 Tbsp seafood curry powder
2 Tbsp oyster sauce
2 Tbsp Thai fish sauce
1/2 tsp sugar (or more to taste)
Water to moisten rice
Salt and white pepper to taste

Method:

1) Heat oil in a wok or a pan and stir fry the paste until fragrant and mixture thickens.

2) Add in the rice and frozen vegetables and fry until well mixed. Adjust seasoning and then stir in the boiled shrimp and pineapple pieces.

3) Serve rice warm. Garnish with roasted cashew nuts, fresh coriander and red chillies.

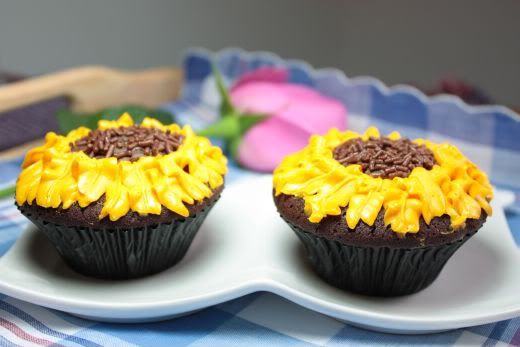
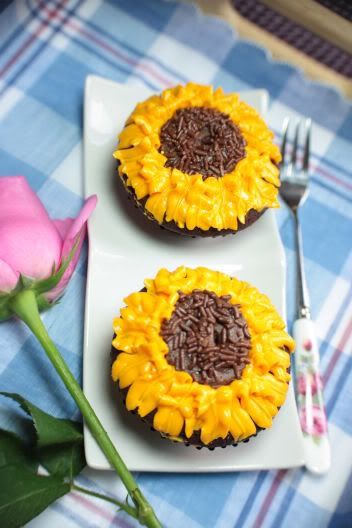
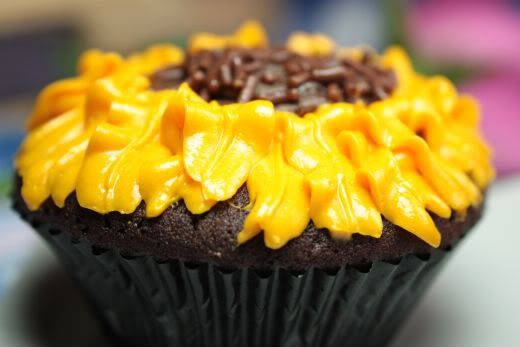
Sunflower Cupcakes

These cupcakes were made on the speer of the moment. I really had no intention on baking anything over the weekday - you could say I wanted to take a break! So I'm not sure how this happened. Anyway I ended up with 12 cupcakes that needed some decoration on them. So I decided to take out my piping tips which I have not used for a long while now (if you need to know this) and turned these chocolate cupcakes into sunflowers. Just right for a sunny bright Sunday afternoon as well. As my other half is really not into cakes at all, these went to other willing "hungry" mouths - and they sure weren't complaining at all!


Sunflower Cupcakes
Adapted from "Favourite Cupcakes & Cheesecakes"
Makes 12 cupcakes


Ingredients:

3 eggs
1 cup unsalted butter, softened
1 cup caster sugar
1/2 cup milk
1 1/2 cups self-raising flour, sifted
1 tsp coffee extract
1/4 cup cocoa powder

Method:

1) Preheat oven to 160C. Line a 12 cupcake pan with paper liners.

2) Beat butter and sugar until light and fluffy.

3) Add in the eggs, one at a time and beat until mixed thoroughly. Then add in the the coffee extract.
4) Add the flour in 3 batches, alternating with the milk.

5) Divide the batter into the paper lines and bake for about 18 - 20 minutes. Immediately transfer to a wire rack once baked to allow the cupcakes to completely cool before icing with your favourite frosting.

6) Using a round piping tip #8, fill up a circle with chocolate butter (about 1") in the middle of your cupcake. Dip the cream into a bowl of chocolate rice. Next using a leaf tip #352, fill your piping bag with yellow buttercream and pipe leafs from the edge of the chocolate circle towards the outer edge of your cupcake. You can overlap the leafs to give it a more realistic petal look.


Sunday, November 8, 2009

Gyoza or Potstickers

We love eating dumpling .. any sort, steamed, fried, baked, etc. So I thought it was high time, as well as fun (this is a first for me) to post up an pictorial post on how to make up a batch of gyoza.

For my gyoza I used store-made wrappers which are easily available (ok I cheated). Use the wrappers that are meant for gyoza or dumplings (not wanton cause these would be a pale yellow colour).

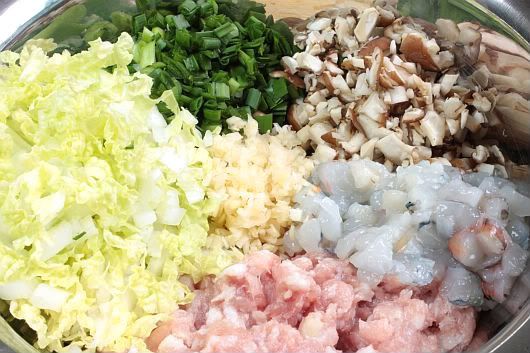
You start off with chopping, more chopping and some more chopping. Great thing about gyoza is that you can use any type of filing you fancy. If you are a vegetarian, replace all the meat with different types of vegetables, include some water chestnut (heh great idea, and I'll add this for my next batch) for extra crunch!


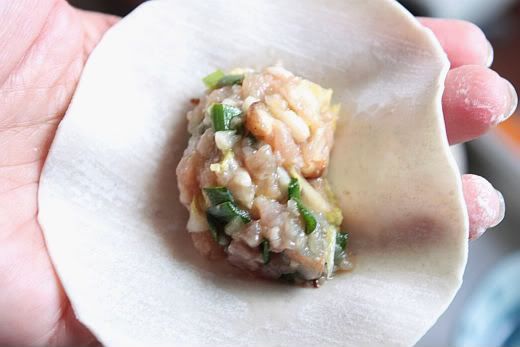
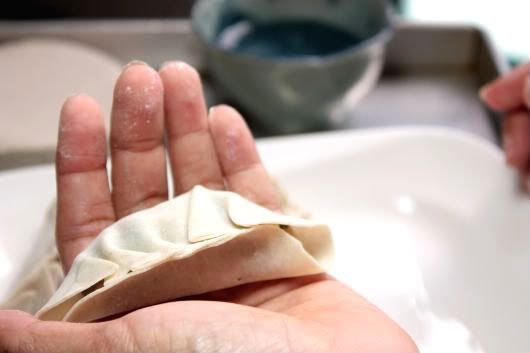
Firstly, place a piece of wrapper on the palm of your hand. Place about 1 rounded teapoon of the filing onto the center of the wrapper. Shape the filing into an oval shape.


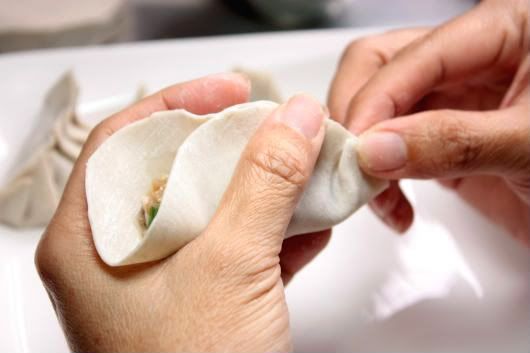
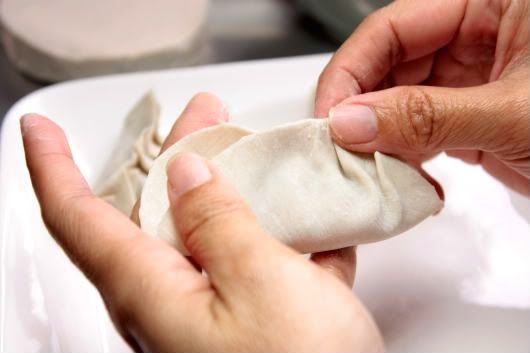
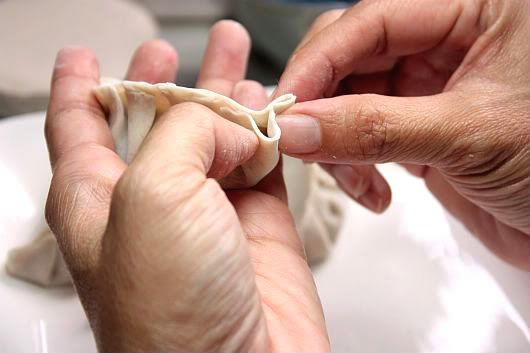
Then fold the wrapper in half. Sight an imaginary center line on the wrapper. What you want to do is to make 3 small pleats to the right and to the left of your imaginary line. Start doing one small pleat from the end and follow it with 2 more pleats, working your way from the end to the center. Make sure you pinch the pleats tighly together as you don't want your gyoza opening up and the filing oozing out whilst it's being cooked.


Once you have done the first 3 pleats, turn the gyoza around so that the 3 pleats you have already made, is now facing away from you. Instead of starting the first pleat from the end, pleat from the center and work your way to the end.


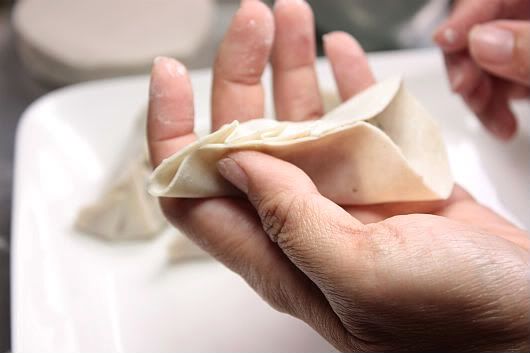
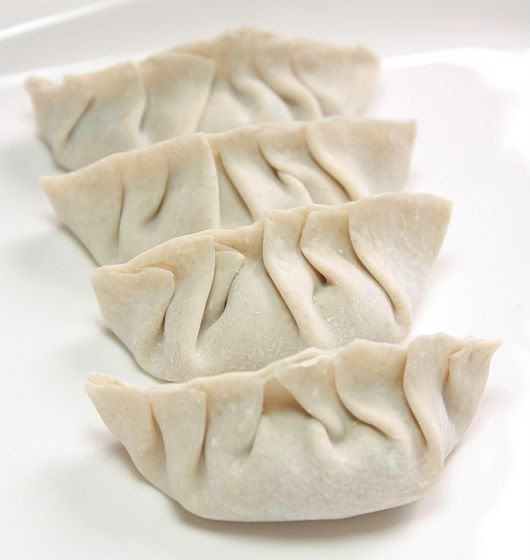
Once you have done the 6 pleats, tuck in each ends and pinch tightly. If the edges are not sealing properly, dab the ends with a little bit of water. The gyoza should now resemble a crescent shape. Continue shaping the rest of the wrappers. You may want to place the gyoza onto a lightly dusted (with plain flour) plate or tray to ensure that they don't stick to the surface.


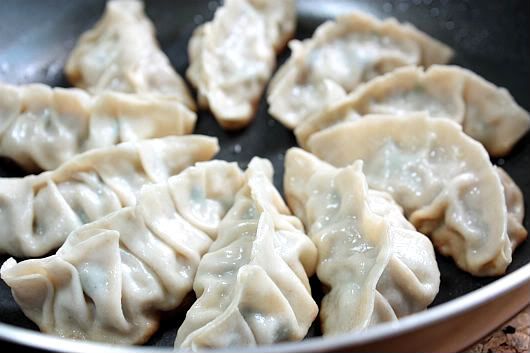
You can either fry or steam the gyoza. I took the unhealty route ... and pan-fried them. Heh, before you say no to frying, read the instructions first. What is great about this method is that there is hardly any splattering of oil onto your walls. I can attest to this cause I hate frying because of the cleaning up thereafter.


I used a non-stick frying pan with slightly higher sides to it plus a see-through glass cover, of course. Add a couple of tablespoon of oil to your pan, place the gyozas into your pan and then turn on the fire to medium high. When the bottom of the gyoza starts to get golden brown (and you have to watch this closely cause you don't want charred "bottoms"), add the water and then quickly put on the lid. Once the water evaporates and disappears, remove the lid, reduce the fire to low and continue cooking for about minute and half to two. The gyozas will dry out and crisp up. Serve immediately with your favourite dipping sauce.

Gyoza or Potstickers
For the filing:

200g minced pork, not too lean (you can substitute with minced chicken)
5 medium sized prawns, minced
1/2 cup finely minced chinese cabbage or napa cabbage
3 stalks green onions, minced
5 fresh shitake mushrooms, minced
2 cloves garlic, minced finely
1 tsp young ginger, finely minced
2 Tbsp soy sauce
2 Tbsp sesame oil
1 Tbsp corn starch
1 Tbsp chinese cooking wine
1/4 tsp white pepper

Combine all filling ingredients in a large mixing bowl and mix thoroughly. Cover and refrigerate until ready to use.

To pan fry: Place gyoza in a frying pan with 2-3 tbsp of vegetable oil. Heat on high and fry for a few minutes until bottoms are golden. Add 1/2 cup water and cover. Cook until the water has boiled away and then uncover and reduce heat to medium or medium low. Let the dumplings cook for another 2 minutes then remove from heat and serve.

To steam: Place gyozas on a single layer of chinese cabbage or on a well-greased plate and steam on high for about 6 - 8 minutes.

To freeze: Assemble dumplings on a tray so they are not touching. Freeze for 20-30 minutes until dumplings are no longer soft. Place in ziploc bag and freeze for up to a couple of months. Prepare per the above instructions, but allow extra time to ensure the filling is thoroughly cooked.

To serve: Serve dumplings or potstickers hot with thinly sliced fresh young ginger and chinese black vinegar or chinese red vinegar sauce.


Related Posts with Thumbnails