Wednesday, February 24, 2010

Rosewater Macarons with White Chocolate Buttercream

After a week and a half of baking pineapple tarts I was left with a fair amount of egg whites. I had managed to freeze some of them and honestely have no clue as to what to do with this batch. The rest I had just thrown them into a container, put the lid on and placed them into the refrigerator.

I contemplated between baking an Angel Food Cake which would be a first for me or a batch of macarons. I finally settled on macarons. It has been a long while since I made these delicate french cookies - the last time round was for a Daring Bakers challenge.

This recipe has been somewhat tweaked from the original one. I decided on using an unopened bottle of rosewater extract which I had purchased about a year ago. Okey I confess ... I have food stuff that are unopened for this long! In addition I also had some white chocolate buttercream which I had made using more left over egg whites. The macarons came out great - zero spoilage. The only thing that was really off was that after baking, the macarons turned a shade darker with the end result colour being rose pink rather than a baby pink. I'm not complaining though!


Rosewater Macarons with White Chocolae Buttercream
Adapted from "Ottolenghi - The Cookbook"

Ingredients:

110g icing sugar
60g hazelnut, very finely ground (you can also use almond)
60g egg whites, (about 2 eggs) aged 3 days in the fridge, then for about 3 hours at room temperature. You can also use 24 hour aged egg whites left open and unrefrigerated.
30g castor sugar (this is reduced from the original recipe)
1/2 teaspoon rosewater extract
Black sesame seeds, dried lavender flowers and pink sugar crystals for sprinkling on top of shells
Wilton pink gel colouring

Method for the Macaron Shells:

1) Line two baking trays with parchment paper.

2) In a large mixing bowl mix the egg whites with an electric hand beater (alternatively you can use a stand mixer with the whisk attachment) until it is frothy. Gradually add the granulated sugar, whisking all the while, until the mixture turns into a thick glossy meringue (soft peak). Then add in 1/2 teaspoon of rosewater and pink gel colour and mix a couple of times. Make sure the meringue is not over-beaten or else it will be too dry.

3) In a food processor pulse together icing sugar and hazelnut until finely ground and powdery. Sift the mixture to make sure there are no lumps.

4) Add 1/3 of the dry ingredients into the meringue. Give the mixture a quick fold to ensure that everything is combined. Add the remaining 2/3 dry ingredients and gently fold the mixture (about 50 folds altogether). Fold a few times to break the air. Continue until you get a smooth and supple mixture, thick in consistency so that when you lift the spatula it flows back in thick ribbons. Test a small amount on a plate – should the tops fall back and flatten by themselves then it is ready, if not give it a few more folds.

5) Fill a large piping bag with a plain tip with the batter and pipe small rounds (2 cm in diameter) on your prepared baking paper. Sprinkle the top of each macaron with the black sesame seeds, dried lavendar flowers and crystal sugar. Leave the macarons to rest and dry for 30 minutes.

6) Preheat the oven to 160C. When the macarons are ready, bake the shells for 12-15 minutes. Remove from the oven and allow to cool. Use a flat offset spatula to gently remove the shells from the baking paper and allow to cool further on a rack.


To Assemble:

Using a spoon place a small dollop of the buttercream on one of the shells and gently cover with another shell. Do not press. Continue to do this with the rest of the shells.

Storing Macarons:

If you are not going to be eating them right away you can store the shells in an airtight container at room temperature for 2-3 days. Fill the macarons just before serving.

They freeze well too but it is recommended to freeze them unfilled. To fill them take the shells out of the freezer 48 hours prior to serving and without defrosting fill them. This way the flavors will be allowed to blend as they thaw.

White Chocolate Buttercream
(Makes about 6 cups)

Ingredients:

10oz good quality white Chocolate
4 Egg whites
1 cup granulated Sugar
1 lb Butter, at room temperature

Method:

1) Place the chocolate and into a bowl and place the bowl over a pan of simmering water. Be careful not to let any water get into the chocolate or it will bind up. You may also place the chocolate into a microwave safe bowl, cover it with plastic wrap and microwave for 10 seconds at a time in order not to burn the chocolate. Removing it after each 10 seconds and stir.

2) Beat the egg whites until soft peaks form. Now start to gradually add the sugar a little at a time. When all the sugar has been incorporated beat on high till stiff peaks form.

3) Add the butter a little at a time.

4) Now add the melted white chocolate while beating slowly and then beat till smooth. The buttercream can be made ahead of time and kept in the refrigerator. To use, let it thaw and then rewhip it again to smooth consistency. Left over buttercream can be frozen for up to a month.

Sunday, February 21, 2010

Mississippi Mud Cake

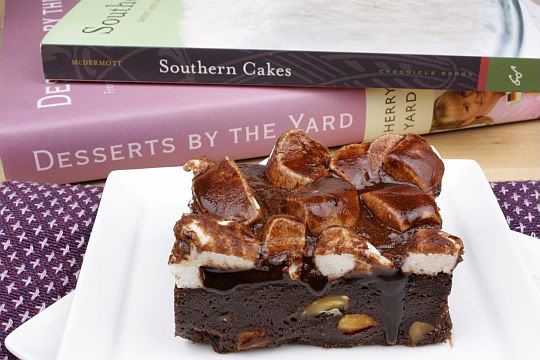
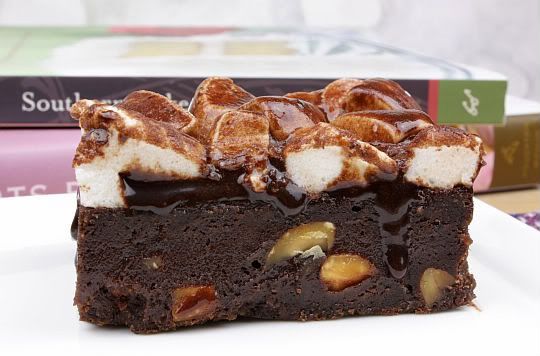
I have to apologize to my other fellow Cake Slice Bakers for posting this challenge a day late. I had been thorough caught up with the recent Chinese New Year holidays and only managed to bake this cake last night.

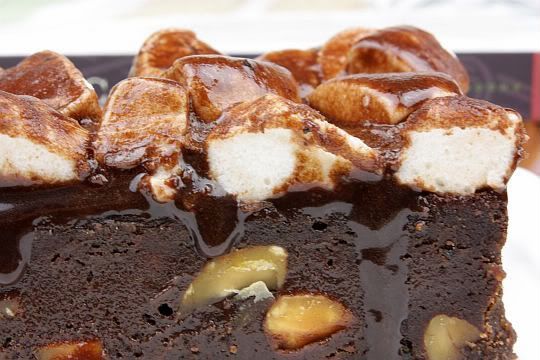
Having read what had been posted in the Cake Slice Bakers forum, this cake would be extremely, extremely sweet if the original recipe was followed true and true. So having been forewarned, I went about reducing the recipe in half to a loaf size cake. In addition I also reduced the frosting and made only 1/3 of the recipe below. It was more than sufficient to frost the entire cake. In fact I wouldn't even call this a cake. To most of us who had baked it, the texture resembled more of a chocolate brownie - to be more precise a rocky road brownie. Even with the reduction of sugar which I had adapted I found this cake to be a tadd too sweet for my liking. Heh, I'm not a "sweet" girl, so you have to forgive me if I am to say that this is one recipe that I'm not bookmarking for future! One thing though, it was really, really easy to put together and I was done with this month's challenge in no time at all.


Mississippi Mud Cake
Recipe from Southern Cakes by Nancie McDermott
Makes one 13 x 9 inch sheet cake


For the Cake:

226g unsalted butter, cut into biug chunks
½ cup cocoa powder
4 eggs, beaten well
1 tsp vanilla extract
2 cups sugar (I reduced the sugar to 1 1/3 cups)
1½ cups all purpose flour
¼ tsp salt
1 cup chopped pecans or walnuts (I used roasted almonds instead)

For the Mississippi Mud Frosting:
(Suggest you reduce this by 1/3 as there is more than sufficient frosting to frosting this cake)

3¼ cups confectioners sugar (I reduced the sugar to 2 2/3 cups)
½ cup cocoa powder
113g unsalted butter, melted
½ cup milk or evaporated milk
1 tsp vanilla extract
4 cups mini marshmallows or 3 cups large marshmallows quartered

Method for the Cake:

1) Heat the oven to 350F. Grease and flour a 13x9 inch pan. In a medium saucepan combine the butter and cocoa powder and cook over medium heat, stirring now and then, until the butter is melted and the mixture is well blended, about 3 – 4 minutes. Stir in the beaten eggs, vanilla, sugar, flour, salt and pecans and beat until the batter is well combined and the flour has disappeared.

2) Quickly pour the batter into the prepared pan and bake for 20 to 25 minutes until the cake springs back when touched gently in the centre and is beginning to pull away from the sides of the pan.

3) While the cake bakes, prepare the frosting so it is ready to pour over the hot cake.

Method for the Mud Frosting:

1) In a medium bowl combine the confectioners sugar and the cocoa powder and stir to mix well. Add the melted butter, milk and vanilla and beat everything together well. Set aside until the cake is done.

To Serve:

1) Remove the cake from the oven, scatter the marshmallows over the top and then return the cake to the hot oven for about 3 minutes to soften the marshmallows.

2) Place the cake, still in the pan, on a wire rack. Pour the frosting all over the marshmallow dotted cake and eat straight away or allow to cool to room temperature. Cut the cake into squares and serve.


Thursday, February 18, 2010

Bang Bang Chicken Salad

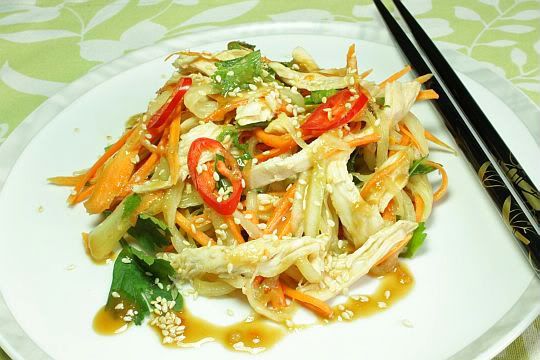
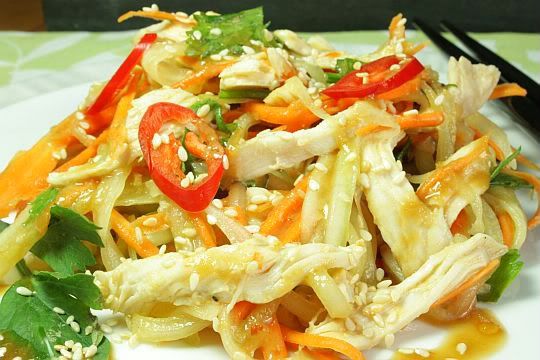
A lazy Sunday usually means a quick and easy to prepare dinner for me. This particular Sunday was one of those and as we had already been stuffing ourselves the day before I decided to whip up something light. So I decided that I would mix up a salad and this particular recipe looked just right. It had simple to find ingredients and easy enough method.

Would you believe that this is just what we had for dinner that night? It's a really refreshing salad and the dressing reminded me of "Yee Sang". For those who have not heard of this dish, yee sang or yuu sahng (simplified Chinese: 鱼生; pinyin: yúshēng), also known as lo hei (Cantonese for 撈起 or 捞起) is a Teochew-style raw fish salad. It usually consists of strips of raw fish (most commonly salmon), mixed with shredded vegetables and a variety of sauces and condiments, among other ingredients. Yee Sang literally means "raw fish". To the Chinese community in Malaysia and Singapore, eating this dish during the Chinese New Year symbolises abundance, prosperity and vigor.


Bang Bang Chicken Salad
Recipe Adapted from "Good Cooking" by Jill Dupleix
Serves 4


Ingredients:

2 chicken breast halves
2 slices peeled fresh ginger
4 stalks of green onion or spring onion
2 stalks chinese celery leaf, cut into 1" length
1 carrot peeled
1 cup thinly sliced iceberg lettuce
1 cucumber peeled
1 teaspoon toasted sesame oil
1 tablespoon rice wine vinegar (or white vinegar)
1 teaspoon toasted sesame seeds
1 tablespoon toasted crushed peanuts
1/4 teaspoon white pepper

For the Dressing:

1 tablspoon sesame oil
2 tablespoon peanut butter
1 tablespoon sweet chili sauce (I used bottled Thai sweet chili sauce)
2 tablespoon soy sauce
2 tablespoon sugar
1 tablespoon rice wine vinegar
1 small, finely sliced fresh red chili (seeds removed)

Method:

1) Put the chicken into a pan with 1 teaspoon salt, giner and enough cold water to cover. Finely shred the green onion and add half to the pan. Bring to a simmer and poach gently for 15 mins. Remove from the heat and leave for 30 mins, then drain.

2) Cut the cucumber, carrot into matchsticks or you can use a grater and grate it into long strips.

3) Finely shread the chicken and combine with cucumber, carrot, lettuce, remaining green onion and celery leaf. Add the sesame oil, vinegar and pepper and toss to mix. Arrange in four bowls or plates.

4) To make the dressing, mix the sesame oil, peanut butter, chili sauce, soy, sugar and vinegar to a paste. Gradually whisk in up to 1/2 cup water until running but still quick thick. Add in the chili and mix well.

6) Spoon the dressing over the chicken salad, sprinkle with toasted sesame seeds and peanuts, and serve as a starter or as part of a Chinese meal.

Sunday, February 14, 2010

Mezze Platter - a Daring Cooks Challenge!

The 2010 February Daring Cooks challenge was hosted by Michele of Veggie Num Nums. Michele chose to challenge everyone to make mezze based on various recipes from Claudia Roden, Jeffrey Alford and Naomi Dugid.

I really had fun with this month's challenge and am really glad I decided to sign up as a Daring Cook. I've had middle eastern food before at Turkish/Lebanese restaurants in Singapore and also had a chance to visit Turkey many years ago. To me Turkey was such an experience - the country, the people and the food. I loved it whilst there and hope to have the opportunity to visit again.

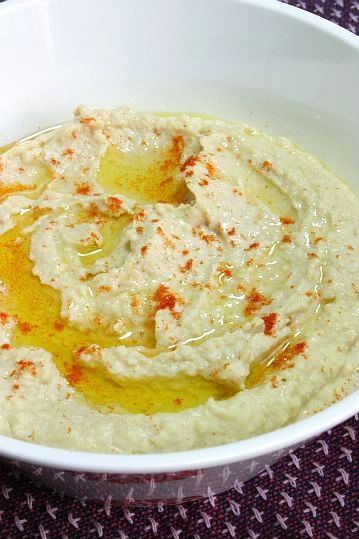
Having said that cooking middle eastern food is totally new to me. Had it not been for this challenge, I can rightfully say that I would not even attempt it. I managed to dedicate one Sunday afternoon to prepare this for our Sunday dinner. My husband has never tasted hummus before and he simply loved it. I also made a separate dip made of basil pesto and macadamians which he loved as well. I don't suppose this is a middle eastern dip?


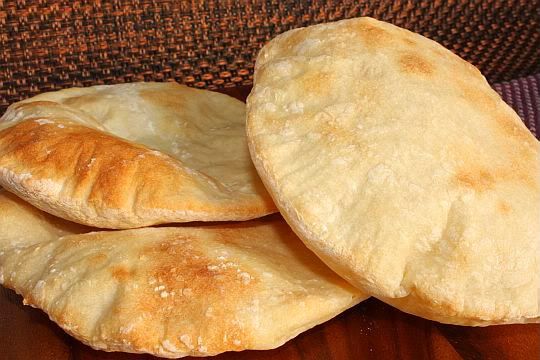
Pita Bread
Recipe adapted from Flatbreads & Flavors by Jeffrey Alford and Naomi Duguid
Prep time: 20 minutes to make, 90 minutes to rise and about 45 minutes to cook


Ingredients:

2 teaspoons regular dry yeast (.43 ounces/12.1 grams)
2.5 cups lukewarm water (21 ounces/591 grams)
5-6 cups all-purpose flour (may use a combination of 50% whole wheat and 50% all-purpose, or a combination of alternative flours for gluten free pita) (17.5 -21 ounces/497-596 grams)
1 tablespoon table salt (.50 ounces/15 grams)
2 tablespoons olive oil (.95 ounces/29 ml)

Method:

1) In a large bread bowl, sprinkle the yeast over the warm water. Stir to dissolve. Stir in 3 cups flour, a cup at a time, and then stir 100 times, about 1 minute, in the same direction to activate the gluten. Let this sponge rest for at least 10 minutes, or as long as 2 hours.

2) Sprinkle the salt over the sponge and stir in the olive oil. Mix well. Add more flour, a cup at a time, until the dough is too stiff to stir. Turn it out onto a lightly floured surface and knead for 8 to 10 minutes, until smooth and elastic. Rinse out the bowl, dry, and lightly oil. Return the dough to the bowl and cover with plastic wrap. Let rise until at least doubled in size, approximately 1 1/2 hours.

3) Place a pizza stone, or two small baking sheets, on the bottom rack of your oven, leaving a 1-inch gap all around between the stone or sheets and the oven walls to allow heat to circulate. Preheat the oven to 450F (230C).

4) Gently punch down the dough. Divide the dough in half, and then set half aside, covered, while you work with the rest. Divide the other half into 8 equal pieces and flatten each piece with lightly floured hands. Roll out each piece to a circle 8 to 9inches in diameter and less than 1/4 inch thick. Keep the rolled-out breads covered until ready to bake, but do not stack.

5) Place 2 breads, or more if your oven is large enough, on the stone or baking sheets, and bake for 2 to 3 minutes, or until each bread has gone into a full balloon. If for some reason your bread doesn't puff up, don't worry it should still taste delicious. Wrap the baked breads together in a large kitchen towel to keep them warm and soft while you bake the remaining rolled-out breads. Then repeat with the rest of the dough.


Hummus
Recipe adapted from The New Book of Middle Eastern Food by Claudia Roden
Prep Time: Hummus can be made in about 15 minutes once the beans are cooked. If you’re using dried beans you need to soak them overnight and then cook them the next day which takes about 90 minutes.


Ingredients:

1.5 cups dried chickpeas, soaked in cold water overnight (or substitute well drained canned chickpeas and omit the cooking) (10 ounces/301 grams)
2-2.5 lemons, juiced (3 ounces/89ml)
2-3 garlic cloves, peeled and crushed
a big pinch of salt
4 tablespoons tahini (sesame paste) OR use peanut butter or any other nut butter—feel free to experiment) (1.5 ounces/45 grams)

Method:

1) Drain and boil the soaked chickpeas in fresh water for about 1 ½ hours, or until tender. Drain, but reserve the cooking liquid.

2) Puree the beans in a food processor (or you can use a potato masher) adding the cooking water as needed until you have a smooth paste.

3) Add the rest of the ingredients and mix well. Adjust the seasonings to taste.


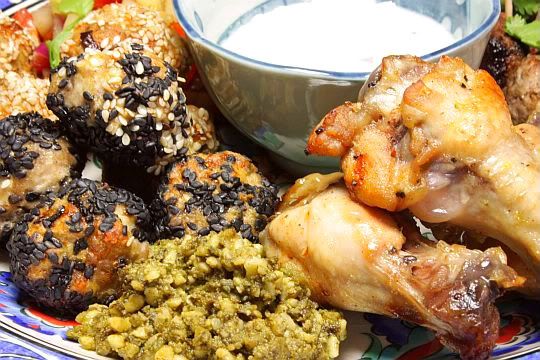
Mezza Platter with everything on it


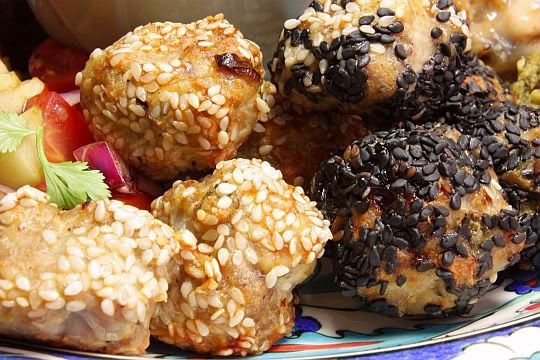
Middle Eastern Sesame Lamb Meatballs With Cucumber Yogurt Dip
Recipe "Arabesque: A Taste of Morocco, Turkey, and Lebanon" by Claudia Roden
Makes about 32 meatballs


Ingredients:

1/3 cup minced onion
1 large garlic clove, minced
1 1/2 teaspoons olive oil
1/2 teaspoon dried mint, crumbled
1/2 teaspoon salt
1/4 teaspoon ground allspice
a pinch cinnamon
1 pound ground lamb (10% fat)
1 cup fine fresh bread crumbs
1 large egg, beaten lightly
2 tablespoons dried currants
1/4 cup black sesame seeds*
1/4 cup white sesame seeds, toasted lightly

*available at Asian markets and some specialty foods shops and supermarkets

To make the meatballs:

In a small non-stick skillet cook onion and garlic in oil over moderately low heat, stirring, until softened. Transfer mixture to a bowl and stir in mint, salt, allspice, and cinnamon. Add lamb, bread crumbs, egg, and currants and combinewell. Form level tablespoons of lamb mixture into 1 1/4-inch meatballs, arranging on a tray as formed.

In a small bowl roll half of meatballs, 1 at a time, in black sesame seeds until coated, transferring to a rack set in a shallow baking pan. Coat remaining meatballs with white sesame seeds in same manner, transferring to rack. Meatballs may be prepared up to this point 1 day ahead and chilled, covered loosely.

Preheat oven to 450°F.

Bake meatballs in upper third of oven 8 to 10 minutes, or until golden and just cooked through.

Cucumber and Yogurt Sauce
Yields about 1 cup

1/2 cup peeled, seeded, and finely diced English cucumber
2 tablespoons finely chopped red onion
Kosher salt
1/2 cup plain whole-milk or lowfat yogurt, preferably Greek
2 tablespoons finely chopped fresh cilantro


Aromatic Lamb/Beef Meatballs
Recipe adapted from Nigella Lawson
Makes approximately 78 lamb meatballs


Ingredients:

1 pound ground lamb/beef
1/4 cup finely chopped cilantro
½ teaspoon ground cinnamon
1 teaspoon ground cumin
1 teaspoon ground allspice
1/2 teaspoon freshly ground black pepper
1 teaspoon salt
2 tablespoons breadcrumbs
1 egg
Vegetable oil, for frying

Method:

1) Put the lamb into a bowl and add the scallions. Sprinkle over the spices, salt, and semolina, and then beat the egg adding to the bowl. Work everything together thoroughly with your hands, and then cover with plastic wrap and leave in the refrigerator for half an hour.

2) Line a baking sheet with plastic wrap and scoop out a scant teaspoon of the mixture. Roll in your hands to form the meatball and place on the lined baking sheet. Have a bowl of cold water beside you to dampen your hands with; this helps them not get too sticky for rolling the meatballs.

3) When you are ready to cook them, heat about 1/2-inch of oil in a frying pan. Line another baking sheet with kitchen towel, and when the oil is hot, fry the meatballs in batches without overcrowding the pan. Cook them for about a minute a side, or until golden brown all over.


Chicken wings are a popular mezze item. These chicken wings are quite lemony and garlicky, and therefore makes great finger food.

Jawaneh (Grilled Chicken Wings with Lemon and Chicken)

Ingredients:

3 Tablespoons extra virgin olive oil
Juice of 1 lemon
Salt and black pepper
2 to 4 garlic cloves, crushed
16 chicken wings
2 Tablespoons chopped flat-leaf parsley

Method:

1) Mix the olive oil, lemon juice, salt, pepper, and garlic, and place the chicken wings in the marinade. Leave for 1 hour, covered with plastic wrap, in the refrigerator.

2) Remove the wings from the marinade and place them on a piece of foil on a baking tray and cook them under a preheated broiler for 7 minutes, turning them over once. Or barbecue them over glowing embers for the same amount of time. Serve them sprinkled with chopped parsley.


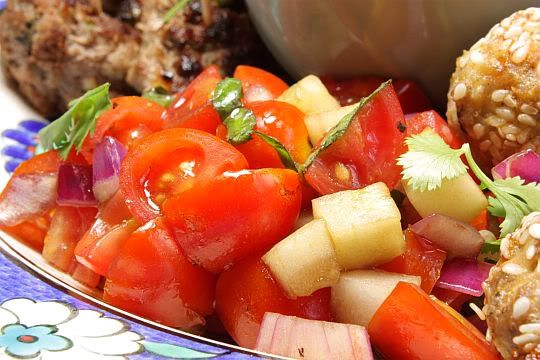
Cherry Tomato & Onion Salad

I also included a quick salad made of cherry tomatoes, diced small red onions, cucumber, fresh cilantro mixed with lemon juice, olive oil and seasoning.

Thursday, February 11, 2010

Kuih Bangkit

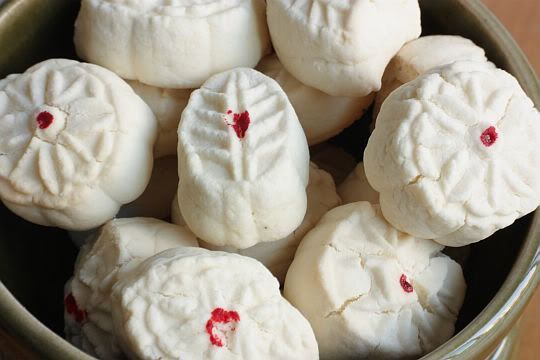
I have never made Kuih Bangkit before but I do so love these cookies. You cannot imagine what it'll taste like just by looking at the pictures. It's like eating a melting moments that has the aroma and taste of coconut cream but oh so much better! Kuih Bangkiit can be found in almost every Chinese household during the Chinese New Year which happens to fall on Valentine's Day this year. The perfect kuih bangkit is dry and crispy. At the same time it should also be light (and I mean in weight that is) and has a somewhat hollow sound. They should also be "pop" size - meaning you can pop the whole cookie into your mouth.


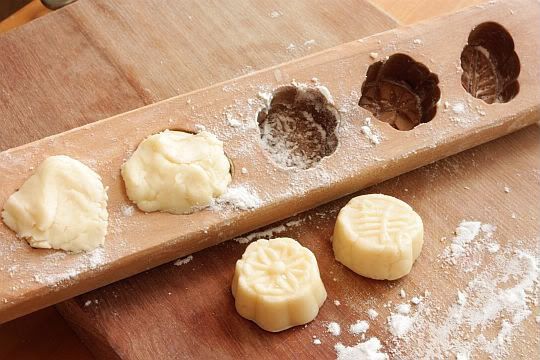
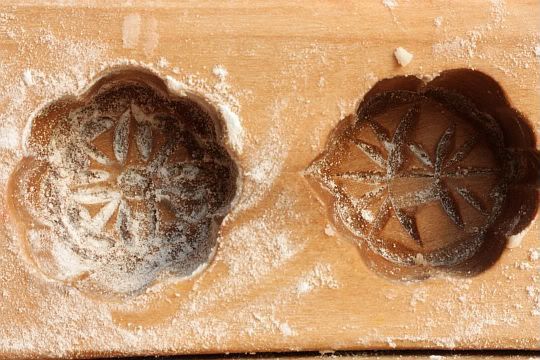
So over this Chinese New Year period, I decided that I will attempt making Kuih Bangkit for the first time. I even went to buy the wooden moulds in order that they are more authentic. And boy, these moulds were quite expensive (as compared with the plastic ones) and this is probably due to the fact that each cookie shape has to be carved into the wood. So last Sunday I put aside some time and tried out a recipe which I had chanced upon. In fact I had printed out several Kuih Bangkit recipes and each one was somewhat different. One called for icing sugar whilst another used castor sugar. And another recipe used arrowroot flour instead of tapioca flour. I decided on the easiest of the lot. Unfortunately that recipe totally "bombed" out. the cookies turned out hard like rock cakes. I threw the rest of the dough away and not wanting to give up as yet, I picked up a different recipe and started once again. The second recipe "bombed" out as well. By this time, I was totally exhausted and fed up as well. I decided to give myself a week's break before attempting to make Kuih Bangkit again.


I chanced upon a recipe from Zurin of Cherry On A Cake which look as if it would logically work. And it did! Well three times lucky it surely is. The Kuih Bangkit turned our perfectly and I could not help myself pinching a few cookies even before they had cooled. No worries I still have left overs to be served to guests over the Chinese New Year holidays.

To all my blogger friends who would be celebrating Chinese New Year, I would like to take this opportunity to wish you Gong Xi Fa Cai.


Kuih Bangkit

Ingredients:

420 gm tapioca flour (fry about 500g of flour)
50 gm shortening
100 gm icing sugar
2 egg yolks
150- 200 ml coconut milk (I used 180 ml, a mixture of coconut cream and coconut milk)
4 or 5 pandan leaves

Method:

1) Sift the flour into a deep pot. Cut up the pandan leaves into 3" lengths and stir them into the flour. Fry the flour over low heat for about 25 - 30 minutes until the pandan leaves have dried up and crisp.

2) Sift flour again and leave to completely cool over night. You can do this a few days ahead of time as well.

3) Cream the shortening with icing sugar till light and creamy and the sugar is totally dissolved. Then add in the egg yolks and cream to combine completely. Pour in slowly 100 ml of the coconut milk and beat until well mixed and creamy.

4) Put 420g of the tapioca flour into a bowl, add a pinch of salt and add in the creamed mixture. Add in about 80ml more of the coconut milk and mix until the dough comes together. If dry add in some more coconut milk until you get a nice lump of dough. (If the dough is still wet, add a bit more of the flour and if it is too dry, add a bit more coconut milk. The dough should look matte and not glossy). Cover with a damp cloth.

5) Flour the wooden mould well with the extra flour and then press a small mound of dough into it. Keep the remaining dough covered to prevent it from drying out. Press down and cut off excess with a knife or spatula. Then knock the mould face down on the baking tray and the cookie should fall out easily. If it doesn't then you have not floured the mould well.

6) If you don't have a cookie mould , roll out the dough onto a floured board and use a cookie cutter.

7) Mix some gel red colouring with a bit of water. Using a toothpick, dot each cookie.

8) Bake the cookies for 20 minutes in a 170C oven.

9) Allow to cool and store in an airtight container.


Monday, February 8, 2010

Pineapple Tarts

Is it really just a week before we celebrate Chinese New Year? It must be because the decorations in Chinatown (Singapore) is already up. People are bustling around to buying goodies, shopping for new clothes, sprucing up their homes to make sure that it is spic and span. And my blogger friends are all posting up Chinese New Year cookies.

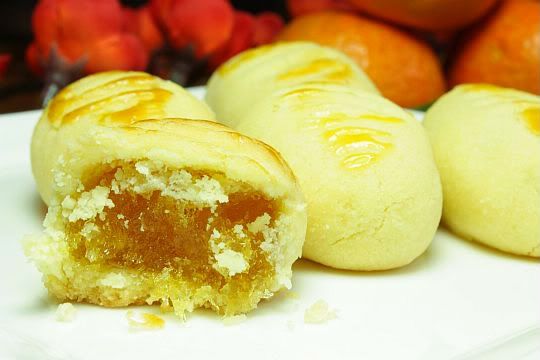
In the Chinese communities of Singapore and Malaysia, the pineapple tart is the ultimate Chinese New Year dessert. The word "pineapple" in the Hokkien dialect resembles the word for prosperity, so eating the pineapple tarts is said to help bring luck and money in the coming year. I guess I should be eating more then! Pineapple tarts now come in a variety of shapes and sizes such as “open-faced” flower shape tarts (the jam is exposed), rolled like logs, mini tangerine and even tarts that are shaped like pineapples. A good pineapple tart should have an ultra-flaky dough which crumbles into buttery powder in your mouth. The pineapple jam should still have a bit of fibre to it, soft, not overly sweet and flavored with spices - cinnamon, star anise and cloves.

This is my first attempt at making this festive cookie. Initially I tried making the “open-faced” tart but the dough kept sticking to the cutter and I ended up having to ply it from the mould. After a few attempts at it, I gave up completely. It was taking up too much time. I brought some of the tarts to my workplace and passed it around. I had really good feedback on the pastry and guess what, I ended up taking orders from my colleagues. So over the last two weekends, my time was taken up baking pineapple tarts and I still have a bit more of baking to day over the next few days.


Pineapple Tarts

Ingredients for the Pastry:

220g unsalted butter, at room temperature
375g all purpose flour
1/4 teaspoon salt
2 egg yolks
50g confectioners' sugar/icing sugar (I reduced my icing sugar to 45g)
2 tablespoons cornstarch
1 egg yolk, for egg wash

Ingredients for the Pineapple Jam:

2 pineapples
250 grammes granulated sugar
1 cinnamon stick
2 cloves
1 star anise
a dash of cinnamon powder
1 tablespoon lemon juice

Method for the Jam:

1) Skin pineapple and scrape out the flesh. Drain flesh on a sieve for 10 minutes to obtain 1½ cup of juice.

2) Place the scraped pineapple flesh in a non-stick pan and add granulated sugar, pineapple juice, lemon juice, cloves and cinnamon. Place pan over low heat and cook, stirring occasionally for about 1½ hour until pineapple jam is sticky and can easily be rolled into a ball. Set aside to cool.

Method for the Pastry:

1) Sieve all purpose flour, corn flour, salt and icing sugar into a medium bowl.

2) Beat butter in a mixer until it turns light in color and fluffy.

3) Add in egg yolks until well combined. Slowly beat in the flour mixture until just combined. Do not over-mix as it will result in a dry pastry.

To assemble the Tarts:

1) Roll pineapple filling into small individual rounds. Turn dough out and roll into small rounds. Flatten the rounds and use it to cover the prepared filling. You can either roll it back into a ball to resemble mini tangerine oranges. Alternatively roll it back into a round and shape it as a small log. Using a fork, indent the log to get a pattern.

2) Brush the unbaked rolls with egg wash. For the mini tangerine dough, stick a clove in the middle to resemble the stalk of the tangerine.

3) Bake in a preheated oven at 350F/180ºC for 10 to 15 minutes (I baked mine for 13 minutes) or till lightly brown.


Thursday, February 4, 2010

Quick and Easy Artisan Bread

Quite a number of bloggers seem to be baking Artisan Breads and its made me wonder what's all the fuss about! Having said that I was truly intrigued as the pictures of their creations were beautiful rustic looking loafs. This was how I ended up purchasing Artisan Bread in Five Minutes from Amazon (my favourite online bookshop).


This is my first recipe from this book and I even managed to find a video by Jeff Hertzberg demonstrating this recipe on a television talk show.

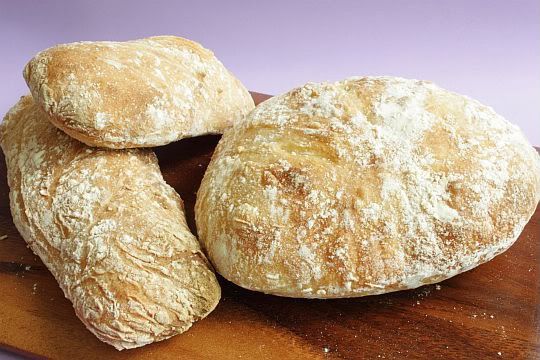
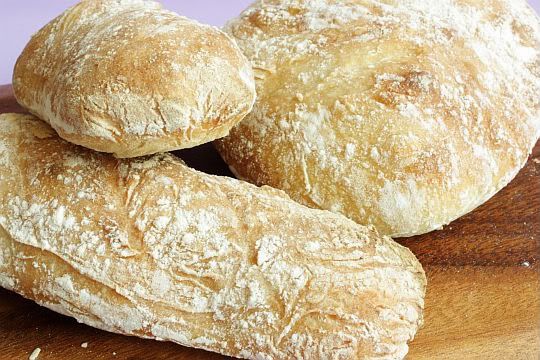
This a really, really easy recipe to do! And I'm not bluffing! If it's your first time attempting bread you may want to try this. No kneading is required. All the ingredients are dumped into one bowl, let the dough proof for a couple of hours and then chuck the whole thing into the fridge for one night. The next day remove the dough from the fridge, shape it, let it proof again and then bake. What more could a baker ask for! I even left the dough in the fridge for 3 nights before baking it. I shaped the dough into one large loaf and was proofing it for about 30 minutes before I realized that I was not satisfied with the shape. I grabbed the proofing dough, punched it down again and reshaped it into 3 separate loafs. I wasn't sure if the dough could take such treatment after this ... but guess what! It did! I was totally amazed and the loafs turned out exactly as they should have.

The crust is nice and crisp and chewy, and the longer the dough sits, the more it develops a sourdough flavor. The dough can be used for other types of bread by adding dried fruit, nuts or sprinkle oats on top for a farmer's loaf. You can even use the dough for pizzas or naans.


Quick and Easy Artisan Bread
Recipe from "Artisan Bread in Five Minutes"
(makes about 4 medium loafs)


Ingredients:

3 cups of lukewarm water
1 1/2 tablespoons active dry yeast
1 1/2 tablespoons coarse salt
6 1/2 cups all-purpose flour

Method:

1) Grab a very large mixing bowl, or a large container that you can cover. In it, mix the water, yeast, and salt. Just let that sit together for about 5 minutes. Then dump the flour all at once and stir with a wooden spoon. You don’t need to knead this, and you’re not looking to make it come together into a dough ball. You just want everything mixed well, with no streaks of flour left, and you’re done.

2) Leave it in your container, covered (but not airtight, or it’ll pop), for about 2 hours. When it has risen and then deflated a bit, your dough is done. It’s ready to be used or stored in the refrigerator.

To bake the Bread:

1) Just grab a chunk of dough (they recommend a chunk about the size of a grapefruit, but you can use larger chunks). Dust your hands with flour to help prevent sticking, dust the dough with flour and gently pull the sides of the dough toward the bottom, rotating the dough, until you get a roundish shape with a smooth surface. It should only take you about a minute or less to do this. The dough won’t be entirely in the bottom, where it may look bunched up, but don’t worry about it.

2) Put the dough onto a baking sheet or tray that’s been dusted with cornmeal to prevent sticking, and let it rest for at least 40 minutes. No need to cover it. If the dough has been refrigerated, it helps to let it rest a little more, until it’s no longer chilled.

3) Twenty minutes before you are ready to bake, put a pizza stone or baking sheet in the middle rack of your oven, and put a broiler pan in the bottom rack. Preheat your oven to 450 degrees. Dust some flour on the top of your loaf, and make some slashes on the dough, about 1/4-inch deep. (Unfortunately I didn't slash deep enough which is my the end result looks flat)

4) After twenty minutes of preheating, it’s time to bake. (You can put the bread in after 20 minutes, even if your oven hasn’t reached 450 degrees yet.) Slide the loaf onto the baking stone or sheet, and then quickly pour 1 cup of hot tap water into the broiler pan. Then quickly shut the oven door to keep the steam inside.

5) Bake for 30 to 40 minutes, until you get a nice brown crust. It tastes best when you let it cool completely. Don’t worry if your beautiful crust seems to soften a bit. It will harden again.


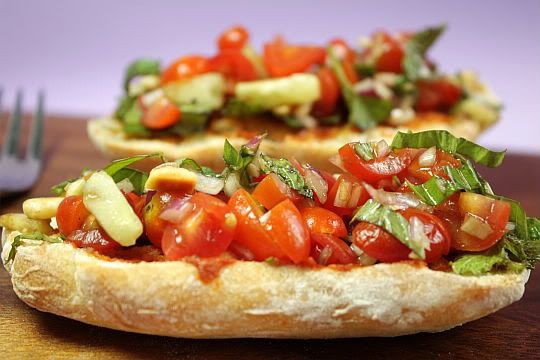
I served my slices of Artisan Bread with a smear of tapenade and topped it with a simple salad made of cherry tomatoes, diced red onions and cucumber and seasoned it with black pepper, salt, fresh basil, balsamic vinegar and olive oil. It made a great Sunday brunch!

Related Posts with Thumbnails