Showing posts with label Chinese. Show all posts

Sunday, August 25, 2013

Claypot Chicken Rice

An absolutely delicious one pot meal which is very popular in Malaysia and Singapore More often than not, the rice is cooked in the claypot first and cooked ingredients like diced chicken and Chinese sausage are added in later.

Traditionally, the cooking is done over a charcoal stove, giving the dish a distinctive flavour. However if you don't have a claypot, no worries, just do the cooking in your rice cooker.

Claypot 2 photo claypot2_zpsadf3fd57.jpg

Claypot 1 photo claypot1_zpsefd95de0.jpg

Claypot 4 photo claypot4_zpsef154845.jpg


Claypot Chicken Rice
Recipe Adapted from Kuali
Serves 3 - 4

Ingredients:

500g (2 pieces) boneless chicken maryland
300g long grain rice
420ml water

Marinade for the Chicken:

1 tablepoon dark soy sauce
1 1/2 tablespoon oyster sauce
1/4 teaspoon ground white pepper
1 tablespoon ginger juice
1 tablespoon Chinese wine
1 teaspoon sugar
2 teaspoon sesame oil
1 teaspoon cornflour
1/2 teaspoon salt

Garnish:

1 Chinese sausage (lap cheong), sliced
5 pieces Chinese mushroom, soaked and cut in half
Chopped spring onions and coriander for garnishing

Method:

1) Cut chicken into chunks, about 1.5" pieces. Combine the marinade ingredients and allow chicken to marinate in it for 1 hour in the refrigerator.

2) Heat a wok and add 1 tablespoon of oil.  Fry the Chinese sausage until lightly brown.  Remove and set aside.

3) Add the marinated chicken and Chinese sausages into the wok and stir fry for about 2 minutes.  Then add the mushroom and fry for another minute or two.  If the ingredients look a bit dry and a little bit of water (ingredients should have a little bit of sauce).  Add the Chinese sausage and mix.

4) Wash the rice in several changes of water and place into a claypot with 420ml water. Cook, covered, over medium heat, until water is almost absorbed.

5) Add the stir fried chicken over the rice. Drizzle 1 teaspoon of water over the meat/rice.

6) Lower the heat and cook, covered, until rice and chicken are cooked, about 15 to 20 minutes. Flake rice, cover lid and cook for further 5 minutes.

7) Remove from heat and top with spring onions and coriander. Serve immediately with sliced red chillies.

Claypot 3 photo claypot3_zps413ffffa.jpg

Claypot 5 photo claypot5_zpsc33e3667.jpg

Claypot 6 photo claypot6_zps98722b07.jpg

Friday, September 7, 2012

Soya Sauce Chicken

I have been meaning to make this dish for a long time now.  My mum used to make a similar version of this with chicken and also with beef.  However her beef version uses a lot more pepper ..... black pepper to be precise! 

There is a eatery shop directly opposite Hong Lim Market which is well-known for their delicious soya sauce chicken.  I used to frequent this shop when I was working around the corner many years ago.  It's not a fancy eatery and the shop front seems to have "stood still" in time.  The soya sauce chicken dish is either accompanied with white rice or egg noodles.   I was hoping that this recipe would come close to what this shop serves and how I remembered the dish's flavours.  And I was not disappointed at all ... it is really, really close!  Definitely a keeper's recipe and a dish that will be enjoyed by the whole family.

soyachix1


soyachix5

Soya Sauce Chicken
Serves 4 -5
Recipe Adapted from Rasa Malaysia.com

Ingredients:

1 medium size chicken (about 1.2kg), cleaned and cut into half 3-inch ginger, skin removed, sliced into thick pieces and lightly bruised
6 cloves garlic, peeled, whole and lightly bruised
2 stalks spring onions, tied into a knot
4 star anise
1 cinnamon stick (about 2-inch length)
1 cup light soya sauce (I used Lee Kum Kee’s less salted version)
1/2 cup dark soy sauce
2 tablespoon Shaoxing wine
1 tablespoon brandy or cognac
1 teaspoon white pepper
100g rock sugar (can be found in Asian grocery shop)
4 cups water

soyachix4

Ginger and Spring Onion Dip

Ingredients:

1 tablespoon ginger, minced finely and pounded
1 stalk spring onion, thinly sliced into rounds
1/2 teaspoon salt
2 tablespoons oil

Method for the Dip:

To prepare the ginger and scallion dip, place the ginger, salt and spring onion into a small bowl. Heat up 2 tablespoons of oil in a frying pan until it becomes really hot and starts to smoke. Pour the oil into the small bowl and stir until everything is combined. Be careful as the oil may splatter slightly when it touches the ginger mix.

Method for the Chicken:

1)   Add all ingredients (except the chicken) into a deep pot and bring it to a boil on high heat for 15 minutes. Add the chicken halfs into the pot and boil over high heat for about 10 minutes. Lower the heat to simmer for 30 minutes.

2) Then turn off the heat and let the chicken soak in the sauce until it has completely cooled. Chop the chicken up into bite size serving pieces. Place onto plate. Pour the sauce into a separate bowl to be served together with the dip. This dish is usually served at room temperature together with hot steaming bowl of rice.

Note:
 
Any left over sauce can be kept for other dishes such as soya sauce eggs. Add a few hard-boiled eggs into the sauce and let it sit overnight in the fridge. Alternatively you can use it as a marinade over deep fried beancurd.

soyachix3


soyachix2


soyachix6

Thursday, July 5, 2012

Steamed Minced Pork with Salted Duck Egg

I grew up eating steamed minced pork as it was a frequent dish on our dining table.  My mum would make it with different types of toppings such as salted duck egg (as with the recipe posted here), preserved vegetables or with salted fish.  I really looked forward to dinner time whenever this was served and could easily finish off two bowls of rice.

It is such a simple and easy dish but surely gives much joy and pleasure in eating it.  Steamed minced pork with salted duck egg is such a Hakka dish that many Malaysian Chinese would be familiar with.  The main ingredients is really the minced pork which should not be too lean otherwise you end up with a tough meat patty.  And of course the salted duck egg.  The dish has to be steamed correctly, not too short and not too long a steaming time and also it has to be eated when just cooked.  Cooking this dish again really brings back childhood memories.


porksaltedegg2


porksaltedegg4


Steamed Minced Pork with Salted Duck Egg

Ingredients:

250g pork mince (with fat included)
2 salted duck eggs
1 clove garlic finely minced
4  water chestnut, chopped
2 Tbsp chinese wine + 1 Tbsp water
1 tsp cornstarch
1 tsp white pepper
1 spring stalk cilantro, chopped
1 Tbsp sesame oil
Soy Sauce to taste

Method:

1)  Mix pork mince, garlic, white pepper, water chestnut, cornstarch, and chinese wine together until well combined. Add half of the egg white from the salted egg into the meat and mix well.  Use a shallow dish, spread the mince over the dish to an even thickness (do not press the meat patty down).

2)  Flatten the egg yolk slightly and place on top of the meat patty.

3)  Steam the dish in a wok on medium-high heat over simmering water for 20-30minutes or until it is cooked.

4)  Drizzle with sesame oil, and a splash of soy sauce, sprinkle with chopped cilantro and a dash of white pepper. Serve hot with steamed rice.


porksaltedegg1


porksaltedegg3

Wednesday, March 28, 2012

Savoury Lotus Leaf Steamed Rice

You may probably be more familiar with the version of this dish made with glutinuous rice in dim sum restaurants. It is presented in small little packets wrapped in lotus leaf and served pipping hot at your table. Well this particularly recipe is not that far off. I was not too keen on using glutinuous rice as it was way too filing (heavy to the stomach) so I opted on using jasmine white rice instead.

lotus rice 1


Lotus leaf used in steaming food gives out a fantastic dark tea-alike aroma and colour to the grains. In the old days, people would stuff all sorts of ingredients into the lotus steam rice as this dish would constitute an entire meal by itself. The dish is now much simple in comparison, with fewer ingredients and the recipe being less complicated. You can of course use the same recipe and substitute it with glutinuous rice instead.

lotus rice 2


lotus rice 5


Savoury Lotus Leaf Steamed Rice
Serves 4 to 5

Ingredients:

1/4 cup dried shrimp
5 dried black chinese mushrooms (soak in warm water until soften)
2 large dried lotus leaves
1 Tbsp vegetable oil
2 shallots, minced
1 clove garlic, minced
1/2 tsp finely minced fresh ginger
2 Chinese sausages, cut diagonally into 1/8-inch-thick slices
1 small can of braised peanuts, drained
1/2 cup of diced chinese roast pork or char siew
1/4 cup diced chinese celery
1 teaspoon chopped cilantro (Chinese parsley)
2 Tbsp light soy sauce (add more if required)
1 Tbsp dark soy sauce
1 tsp oyster sauce
1 Tbsp sesame oil
1/2 tsp white pepper
4 cups cooked medium-grain rice (cooled)

For Garnishing: Sliced fresh red chillies, fried shallots and chopped cilantro

Method:

1) Cut the stems off the mushrooms and thinly slice caps. Set aside.

2) Bring some water to a boil in a large pan. Then plunge the lotus leaves into boiling water and cook for 2 minutes or until softenen. Drain well and set aside.

3) Place a wok or large frying pan over high heat until hot. Add the vegetable oil, swirling to coat sides. Then add the shallots, garlic, ginger, sausage, roast pork and shrimp and stir-fry for about 2 minutes.

4) Then add the celery, cilantro, peanuts and mushrooms and stir-fry for another 1 minute.

5) Add in all the seasonsing and then stir in the cooked rice. Separate the grains with the back of a spoon and mix well. Remove from heat.

6) Spread one lotus leaf on work surface. Cover with second leaf. Then place the rice mixture in center of lotus leaves. Fold edges of leaves over rice so rice is completely covered.

7) Place steaming rack in a wok or a steamer pot. Pour water to just below level of rack and bring to a boil.

8) Once the water is boiling, place lotus leaf packet on a heatproof dish and set dish on rack. Cover and steam, adding additional water if neccessary, for 30 minutes. Garnish and serve immediately.

Note: If you are using glutinuous rice, soak the glutinous rice in water overnight. Drain away the water. Then fry it with the ingredients and seasoning. Steam for 45 minutes or longer until cook.

lotus rice 4


lotus rice 3


lotus rice 6

Tuesday, February 7, 2012

Chilled Tofu with Century Egg and Pork Floss

I regularly prepare chilled tofu dishes at home because it's easy to put together and it is delicious as well. There are in fact so many ways to prepare tofu and to me it is the perfect home-cooked comfort food.

Tofu used to be only cooked in Asian homes or restaurants but now it is found all over the world. Western restaurants are now even incorporating this ingredient into their fusion dishes.

tofu 4


Discovered over 2000 years ago by the Chinese, tofu has on occasions been described as the "Cheese of Asia" because of its physical resemblance to a block of farmer's cheese. It is highly nutritious and is protein-rich as it is made from soybean milk.

Tofu in fact is bland in taste and eaten on it's own is really not very tasty. Because it has such a mild taste it is most suitable for a wide variety of foods, from meat replacements in stir fry, stew or any other main dish to smoothies and desserts. Another great property is that it acts like a sponge and absorbs any seasoning or flavours you would add to the dish. That way you can marinade it and prepare it to taste any way you like. If you are a vegetarian or on a vegan free diet, tofu is the best possible food you could eat to obtain for your required protiens and nutrients.

tofu 1


Chilled Tofu with Century Egg and Pork Floss
Serves 2 to 3
Recipe Adapted from "Food & Travel" Magazine

Ingredients:

150g silken tofu, chilled
1/2 century egg, boiled and diced into small cubes (found in Asian grocers - you can omit this ingredient)
15g pork (or chicken) floss
1 small bunch of coriander, roughly chopped
1 Tbsp light soy sauce
1 Tbsp chilled water
1 1/2 tsp sesame oil
1/2 tsp chilli oil
Pinch of black pepper

Method:

1) Slice the tofu thinly and place on a serving plate.

2) Mix the seasoning together and pour over the tofu. Arrange the diced century egg over and around the tofu. Add a pinch of black pepper.

3) Then sprinkle the century egg, coriander and pork floss over the tofu. Serve immediately.

tofu 5


tofu 2


tofu 3

Friday, December 2, 2011

Red Bean Paste Pau (Azuki Bean Steamed Buns)

I was blog hopping a while back and came across a Pau recipe from my blogger friend, Shirley of Kokken69 . Timing was right as I was trying to find a simple and easy recipe for steamed buns. I guess what caught my eye too was the perfectly shaped bite-size morsels as well as the pretty "stamped" seal on top of each steamed bun.

pau 3


I thought to myself that this recipe would be the one to try out. I must confess that I did not make the red bean filling from scratch as I had left-overs from my Mooncake baking spree sitting in my refrigerator. The filling would be just sufficient for the amount of dough this recipe will create. The steamed buns turned out nicely but as with all steamed goodies, they are best consumed whilst hot. Once the buns turn cold, they turn a bit hard and dry. So always steam any remaining buns prior to consumption. My next project would be to try to nail down a recipe for fluffy steamed BBQ pork buns - like the ones served in Dim Sum Restaurants.

pau 1


Red Bean Paste Pau (Azuki Bean Steamed Buns)
Dough Recipe Adapted from "Dim Sum in Hong Kong"

Ingredients:

150g Hong Kong (or Pau) flour
2g dry yeast
2g baking powder
20g caster sugar
75g low fat milk
2g vegetable shortening

Method:

1) Place all ingredients into a mixer and blend until smooth at low speed.

2) Ferment for 10 mins at room temperature. Then blend in mixer again for 5 mins.

3) Divide the dough into pieces of 20g each. Roll out to form a round wrapping of about 2 inches in diameter. Try to make the edges a bit thinner than the center of the wrap.

4) Place filling (I used about 35g. Roll the filling to a tight ball before wrapping) in the center of the wrap and pull down the edges gently. Seal the edges tightly, tucking in so that the bun has a nice round top.

5) Proof Pau at room temperature for 45 mins.

6) Steam Pau over boiling water for 15 mins. Serve whilst still warm. Left overs can be refrigerated in a tightly sealed container. To consume, steam for about 5 mins.

pau 2


pau 4

Monday, September 12, 2011

Mooncakes - A Celebration of Mid-Autumn Festival

The Mid-Autumn Festival (中秋節), also known as the Moon Festival or Zhongqiu Festival is a popular harvest festival celebrated by Chinese and Vietnamese people, dating back over 3,000 years to moon worship in China's Shang Dynasty. It was first called Zhongqiu Jie (literally "Mid-Autumn Festival") in the Zhou Dynasty.[1] In Malaysia, Singapore, and the Philippines, it is also sometimes referred to as the Lantern Festival or Mooncake Festival.

It is celebrated on the 15th day of the 8th month of the Chinese calendar. In the Gregorian calendar this translate to September or early October. This year Mid-Autumn Festival will fall on 12 September. This is the time when the moon is at its fullest and roundest. To celebrate the festival, mooncakes symbolizing the moon, is eaten and enjoyed by many Chinese around the world. Other than eating mooncakes, carrying brightly lit lanterns, lighting lanterns on tower or floating sky lanterns is also practised.

mooncake 1


As a child, I remembered enjoying this period as we get to pester our parents to buy us paper lanterns. The lanterns would come in various shapes and myriad of colours representing animals such as rabbits, birds, butterflies and dragons. The lantern will have a wire to hold a lighted candle and we would parade with our lanterns around the neighbourhood after dinner. All the kids would congregate together playing and the adults would be sitting on the front porch munching on mooncakes and sipping tea. Such delightful times!

mooncake 2


mooncake 3


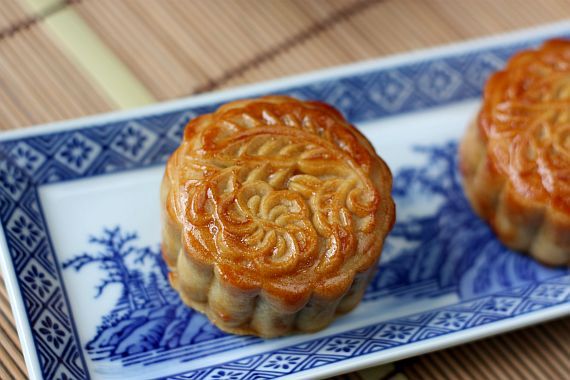
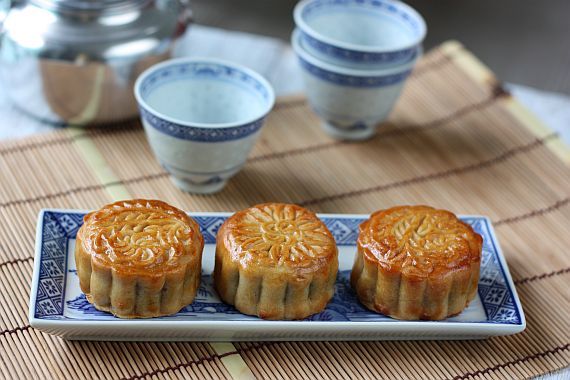
Lotus Seed Paste Mooncake with Yolk

Ingredients for the Mooncake Pastry:

200g Lyle's golden syrup
1/8 tsp baking soda
1/2 Tbsp alkaline ater
50g peanut oil
270g all purpose flour

Ingredients for Lotus Seed Paste:

300g lotus seed
1 Tbsp alkaline water
250g sugar
1 Tbsp maltose
200g oil
1 Tbsp potato starch
A few salted egg yolk (cooked in oven at 100C for 8 mins)

Method:

1) Lotus Seed Paste: Rinse lotus seeds and drain. Mix it with alkaline water. Pour adequate hote water over lotus seeds and cover it for 15 mins. Remove hot water and rub off the skin and rinse. Cook the seeds with enough water to cover the seeds until soft. Once soft, cool slightly and blend until smooth. Cook 30g sugar and 1 Tbsp oil in a pot until golden brown over low flame. Add blended lotus seeds, remaining sugar, maltose and oil and mix gradually until incorporated. Then add potato starch and mix well. Remove from heat to cool and leave outside overnight.

2) Mooncake Pastry: Mix golden syrup, baking soda and alkaline water with oil. Stir until well blended. Sift flour and add in 2 batches to the liquid. Mix well after each addition of flour. Set aside for half hour.

3) To Assemble: Weigh lotus paste into 140g each. Flatten into a round and place the egg yolk in the center. Wrap the lotus paste around the yolk and shape into a ball. Weigh mooncake dough into 40g each. Flatten into a round and place the lotus paste in the center. Shape into a ball. Dust the ball lightly with some flour to prevent it from sticking to the mold. Then press into the mooncake mold. Tape lightly to de-mold.

4) Arrange mooncakes on a baking tray lined with parchment paper. Bake in pre-heated oven of 180C for 15 mins. Remove from oven and brush all over with egg wash. Leave aside for 15 mins and then continue baking for another 8 - 10 mins until golden brown. Remove and set to cool.

5) Once cooled completed, place mooncakes in a container and leave for three days before consuming. The oil from the mooncake will slowly seep out resulting in a softer and shiny pastry.

mooncake 5


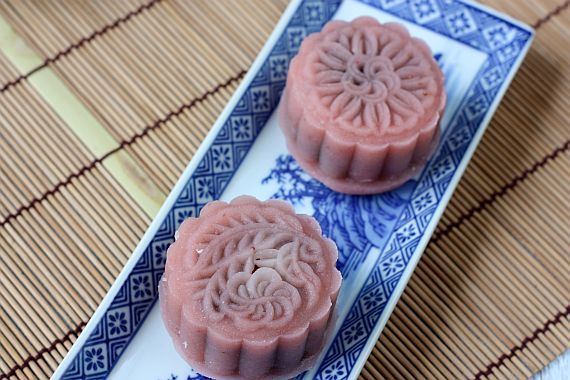
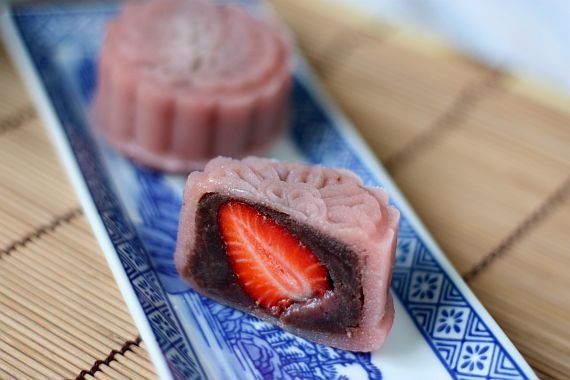
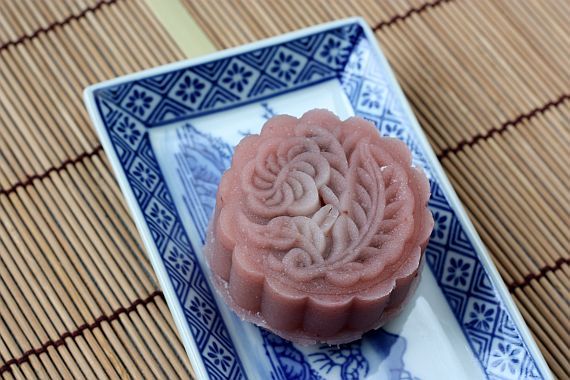
Strawberry Mini Snowskin Mooncake
Snowskin Recipe Adapted from Man Fu Yuen, Inter-Continental Hotel
Makes 4 Minis

Snowskin Ingredients:

37.5g dry fried rice flour (or glutinous rice flour), sifted
75g sifted icing sugar
30g strawberry puree (puree has been sieved through a fine siever)
30g warm water
10g olive oil

Filing:
Red bean paste, store bought
4 whole strawberries, stem removed

Method:

1) Add the flour and icing sugar into a clean bowl. Stir to mix.

2) Combine the puree, water and oil in another bowl.

3) Pour the liquids into the flour and mix well in one direction only. Do this quickly otherwise the snowskin will not be smooth enough. Knead for 20 seconds and form into a ball. Roll into a sausage shape.

4) Divide the snowskin into four equal pieces and set aside.

5) Divide the red bean paste into 45g each. Flatten each ball and place a strawberry in the center. Wrap the red bean paste around the strawberry and shape into a tight ball.

6) Flatten the snowskin and then place the red bean ball in the center. Wrap the snowskin around the red bean ball and roll into a smooth ball.

7) Dust the snowskin with a bit of the rice flour before placing into the mould. Press into mould. Tap lightly to remove. Chill for at least 3 hours before serving. Snowskin can be kept in the fridge for about 3 - 4 days. You can freeze for up to 2 weeks. Remove from freezer a day before serving and place in the fridge to defrost.

mooncake 4


mooncake 6

Wednesday, June 29, 2011

Chinese Roast Pork Belly (Siew Yoke)

Seriously this has got to be one of the most sinful foods on a Chinese menu. But then again it has got to be one of the most delicious as well ... of course if you are into eating fats! Just think of the taste of crispy pork crackling with layers of fat and moist, tender meat has gotten me going already. I know some of you will probably say urrghh ... look at the amount of fat and cholesterol, and simply shudder by just looking at it. I say indulge in some sinfulness once in a while is okay.

pork belly 1


In my childhood days, my mum would buy Siew Yoke (Chinese Roast Pork Belly) together with Char Siew (Chinese Roast Pork) when she did her weekly marketing. She would slice up both meats and we would have this included in our Sunday repetiore of dishes. Any left over meats would be used to fry rice or added into stir fried vegetable dishes. Those were the days when my family were into so-called "unhealthy" eating habits. These days my parents ever hardly buy Siew Yoke or Char Siew. Definitely not Siew Yoke that's for sure because they have stayed off eating fatty foods. I guess as we grow older, our bodies are unable to adapt so quickly to rich and fatty foods. We would have to make a choice between eating healthy and staying healthy.

I have always been intrigued as to how Siew Yoke was made and after seeing so many photos of it in other foodie blogs I decided to try it out one weekend. I was amazed as to how easy it really is and my first attempt turned out quite nicely. However I must confuse that I did not marinade my pork belly overnight. In my eagerness to make it, I just did a four hour marinade. When I posted up a picture of the cooked Siew Yoke up in my Facebook one of my girlfriends asked me who else had a share in enjoying it. My answer was "me, me and me"!

pork belly 2


Roast Pork Belly (Siew Yoke)

Ingredients:

1 kg pork belly (with skin on)
1 heaped tsp rock salt
1/2 Tbsp sugar
1 large or 2 small cubes nam yue (red fermented/preserved beancurd-available in jars or tins in Asian shops)
1 tsp five-spice powder
1/2 tsp ground white pepper
1 1/2 Tbsp rice vinegar (or ordinary vinegar)
1 Tbsp Shaoxing wine

Method:

1) In a bowl add on the ingredients with the exception of the rock salt and vinegar. Mix the ingredients until it becomes a paste.

2) Clean the pork belly and pat very dry with paper towels.

3) Score the flesh part (not the skin) of the pork belly lightly in diagonal lines and rub the joint with the paste marinade. Place the joint in a foil-lined roasting tin, marinated side down so it can sit and absorb the flavours.

4) Score the skin part this time, using a sharp knife and being as thorough as possible. Rub in the rock salt all over the skin making sure you get into the cuts.

5) Place the pork belly in the refrigerator uncovered to dry completely.

6) The next day remove the meat from the refrigerator. Line a baking dish with foil (to catch the drippings) and place the meat (skin facing up) on top of wire rack. Bake the meat in a 200C pre-heated oven for 30 mins.

7) After 30 minus, remove the tray and poke the skin using a fork. Then drizzle the vinegar over the skin.

8) Return the tray to the oven and change the settings 250C on grill function (upper heat only). You will see the crackling start to bubble and pop wherever you poked with a fork. Grill for a further 30 mins, opening the oven door intermittently to let smoke escape, until the skin gets slightly burnt and charred. (Any blackened bits can be removed after cooking).

9) Rest the cooked pork belly for 15 minues before slicing.

pork belly 5


pork belly 4

Saturday, December 4, 2010

Chinese Carrot Cake

The name of this dish is Chinese Carrot Cake. However contrary to its name, "carrot cake", this particular dish does not contain any carrots at all and is not a cake in the usual sense of the word. The "carrot" in this recipe is actually white radish or "lobak" in Chinese. It is a savoury dish rather than a sweet and you can usually find this in most dim sum eateries. It is also sold in hawker stalls in Singapore and Malaysia. I love this dish a lot and to me the ideal Chinese Carrot Cake should have lots of ingredients, be moist and soft and served with a delicious sauce.

lobak 2


lobak 3


Chinese Carrot Cake
Recipe adapted from "Our Favourite Recipes"

Ingredients:

1 kg white radish (white lobak), shredded finely
300g yambean (bangkuang), shredded finely
350g rice flour
3 Tbsp cornflour
3 1/3 cup water
40g Chinese dried mushroom, soaked for 15 minutes, steams removed and sliced finely
60g dried prawns, roughly chopped
90g Chinese sausage (lap cheung) diced
60g lean pork, boiled and diced
Vegetable oil

For Garnishing:
4 shallots, sliced adn fried until golden brown
1 sprig coriander leaves, chopped finely
2 chillies, chopped finely

Method:

1) Heat 2 Tbsp oil in wok until hot. Fry mushroom, dried prawns, sausage and pork until fragrant, about 6 minutes. Add salt to taste, remove and set aside.

2) Then add the shredded radish and yambean into the wok and fry, stirring continously, till dry.

3) Add the ingredients from (1) to radish and yambean mixture. Mix well and set aside.

4) In a large mixing bowl, mix rice flour and cornflour. Gradually add water to the mixture and stir well to form a paste.

5) Add all the fried ingredients from (3) to the paste.

6) Oil a round 10" tin. Pour mixture into the tin and steam for 1 hour. Test with skewer. When ready, the skewer should come out clean.

7) Sprinkle crispy shallots. chopped chillies and coriander leaves on top of the cake. Garnish immediately whilst still hot to allow the garnishing to stick to the cake.

8) Allow cake to cool slightly before cutting into slices or cubes. Serve warm with either chilli sauce or a sweet sauce. The remaining cake can be wrapped and refrigerated. Cut out serving portions as required and steam before eating.

lobak 4

Saturday, November 13, 2010

Creamy Curry Prawns

Having too much seafood is not good for your cholesterol level! That's what we always read in any health magazines. Well I say having it once in a while should be fine. The thing about having seafood is that you really, really must buy the freshest. Any seafood that isn't, be it fish, prawns or crabs, will end up totally destroying your entire dish.

So before you go out to buy your next batch of prawns, you should be looking out for:

* The shell of the prawns should be firm and glossy and not broken or slippery

* There should be no discolouration of the heads or the shells, as this is an indication that the meat is starting to go bad

* They should smell fresh and salty. Avoid if there is any hint of a smell of ammonia

* The eyes should be prominent and shiny and not shrunken inwards or missing

* If you are buying raw prawns, do not be put off if they are translucent or a different colour then the typical pink prawn. Prawns and shrimp only turn this colour once they have been cooked

Curry prawns 2


Creamy Curry Prawns
Recipe Adapted from "Women's Weekly - July 2010" Edition
Serves 4


Ingredients:

1 Tbsp vegetable oil
30g unsalted butter
2 cloves garlic, crushed and roughly chopped
1 red chilli, sliced
1 1/2 tsp seafood curry powder
500g medium sized prawns, shelled with tail intact and deveined
2 stalks spring onions, sliced (extra for garnishing)
300ml thickened cream
Salt to taste

Method:

1) Heat oil and butter together in a large fyring pan over high fire. When the butter starts to bubble, turn fire to medium.

2) Add in the garlic and chilli and fry for 2 minutes.

3) Stir in the curry powder and cook for 30 seconds, stirring. Add prawns and spring onion and cook for 3 mins until prawns change colour.

4) Pour in the cream and bring to a boil. Reduce fire and cook for 1 - 2 mins, until sauce has thickened and prawns are cooked through. Season to taste with salt.

4) Serve immediately with a bowl of steaming white rice.


Curry prawn 1


Curry prawns 3

Monday, November 8, 2010

Thai Fried Rice with Clams and Holy Basil

When it comes to left-over white rice, it is astonishing what type of ingredients you could add to it to turn this into a simple fried rice dish. I would usually cook a Chinese fried rice version using Chinese sausages, frozen mixed vegetables and eggs. However this time round I wanted to do something different and be a bit more adventurous.

I decided on a Thai version using fresh basil as one of the key ingredients. So when I happened to be at my local supermarket buying groceries, I came across fresh white clams. I thought to myself “heh, how about some clams to go with the Thai fried rice! I could add some long beans as well.” I must confess that I had concocting this recipe as I was walking through the aisle in the supermarket. So with this in mind, I started to throw packs of ingredients into my shopping basket. If you are not into clams, you can use prawns or even chicken meat as substitute. And again if long beans are not your “thing” substitute with frozen mixed vegetables, peas, carrots, corn … or just do your own thing! The dish will still come out delicious.

Basil fried rice 1


Basil fried rice 2


Thai Fried Rice with Clams and Holy Basil
Serves 2

Ingredients:

2 Tbsp vegetable oil
3 cloves garlic, roughly minced
1 ½ Tbsp of Thai chillie paste (found in local Asian groceries. Vary the chilli paste according to your taste)
2 cups heaped cold cooked rice
200g - 250g white clams, shell intact and thoroughly cleaned
1 ½ Tbsp fish sauce, or more to taste
¾ cup of long beans, chopped to ¼” thick
1/2 cup loosely packed Thai holy basil (regular basil ok)
2 medium sized eggs, lightly beaten
Dash of white pepper
1 Tbsp chopped fresh cilantro and extra sprigs for decoration

Method:

1) In a wok or large skillet over medium fire, heat up the oil. Add the garlic and fry until lightly browned

2) Then add in the chilli paste and stir fry for about a minute. Add in the clams and basil leaves, and fry for about 2 minutes. Add the long beans and fry until slightly soften (not too soft). Add the cold rice and fry for about 3 to 4 minutes.

3) Add fish sauce and pepper. Then drizzle the beaten egg onto the rice and stir to mix well. Fry for another 1 to 2 minutes.

4) Finally add in the chopped fresh cilantro. Dish out warm and serve with lime wedges, Thai chillie sauce and cilantro for decoration.


Basil fried rice 3


Basil fried rice 4
Related Posts with Thumbnails