Wednesday, November 24, 2010

Spiced Fish with Cucumber Yogurt Sauce

I am now on the look out for simple recipes that can be easily prepared after a hard day's work in the office. I think most of us who work and have no time to prepare meals would usually eat out (as this is relatively easy to do in Asia), grab a meal from a fast food restaurant or the easiest, instant cup noodles. However there are surely days when you just want something prepared at home!

So to kick start a series of quick after work recipes, I am posting here a spiced fish dish that can be prepared in 30 minutes. Simple and delicious, and of course absolutely healty too!

Photobucket


Spiced Fish with Cucumber Yogurt Sauce
Serves 6
Recipe Adapted from "After Work Cookbook"


Ingredients for the Fish:

6 x 180g firm white fish fillets (I used red snapper)
2 tsp ground cumin
2 tsp groud coriander
2 tsp finely grated lime zest (or lemon zest)
2 cloves garlic, crushed and finely minced
1/2 tsp grated fresh ginger
2 tsp vegetable oil
1 tsp salt (or to taste)

For the Cucumber Yogurt Sauce:

2 cucumber (remove center core and seeds),grated (squeezed out the juice)
1 1/2 cups plain yogurt
1 1/2 tsp lime juice (or lemon juice)

Method:

1) Clean and pat dry the fish fillets. Combine the seasoning with the exception of the oil and rub onto the fillets. Leave aside for about 10 minutes to marinate. Whilst waiting prepare the yogurt sauce.

2) Heat oil in non-stick frying pan and cook the fillets in batches until browned on both sides and cooked through. Serve with the yogurt sauce on the side.

3) To make the yogurt sauce, combine all the ingredients together. Serve fish hot with a side salad.

Spicy fish 1


Photobucket

Saturday, November 20, 2010

Peanut Butter Cookies

Who can resist a good old fashion peanut butter cookie .... and with chocolate chips as well! Not everyone that's for sure, unless you are allergic to nuts.

When I decided to make a batch of these cookies, I decided on a Western recipe instead. You'll probably stumped at this point of time .. huh Western recipe! I honestly think there are two versions to a peanut butter cookie. The Asian recipe which most of us associate with Chinese New Year. This recipe calls for unsalted roasted peanuts to be ground finely and then added to the cookie dough. It definitely does not have chocolate chips in the recipe. The Western recipe on the other hand just uses peanut butter straight from the jar. However the end result is pretty close in taste but I do think that the Chinese recipe does result in a more fragrant cookie.

PB Cookie 3


PB Cookie 5


Peanut Butter Cookies

Ingredients:

1 1/4 cups plain flour
3/4 tsp baking soda
1/2 tsp baking powder
1/4 tsp salt
113g unsalted butter, softened
1 cup chunky peanut butter (you can use smooth if you want)
1/2 cup loosely packed brown sugar
1 egg
1 Tbsp milk
1 tsp vanilla extract
3/4 cup chocolate chips
Coarse sea salt for sprinkling on top of the cookies

Method:

1) Preheat oven to 350 degrees. In a large bowl, sift flour, baking soda, baking powder and the salt. Set aside.

2) In another bowl, beat in the butter and brown sugar until light and fluffy. Then add in the the peanut butter and beat until smooth. Add egg and mix well. Then add the milk and the vanilla.

3) Slowly add the dry mixture into the batter in 2 or 3 additions. Beat until just mixed thoroughly (do not overbeat).

4) Gently fold in the chocolate chips. Drop by rounded teaspoonfuls of the cookie dough onto baking sheet lined with parchment. Leave about 1 inch between each cookie. Using a fork, lightly indent with a criss cross pattern. Sprinkle some coarse sea salt on top of each cookie.

5) Bake in pre-heated oven of 180C for about 10 to 12 minutes. Do not overbake. Cool the cookies on the sheets for 1 minute, then remove to a rack to cool completely.

PB Cookie 2


PB cookie 1


PB Cookie 4

Wednesday, November 17, 2010

Basic Butter Cake

Would you believe me if I told you that I've never baked a plain old basic butter cake before? Well it's true! So when my girlfriend asked me to bake two small cakes for her this coming weekend, I knew I had to hunt for a recipe that would give me a moist buttery cake. I tried two different recipes over the week which were from published cook books. I even bought french butter specifically for this particular cake. Unfortunately both recipes did not give me an end result which I had eagerly anticipated.

I decided to try again and when I came across this recipe I decided to give it a try. I adapted the recipe slightly and also halved the ingredients to bake a 6" cake. And guess what, I struck gold this time round and they do say that third time is lucky! The cake was moist and soft, just like what a good tasting butter cake should be.

butter cake 3


Basic Butter Cake
Makes one round 20cm cake

Ingredients:

250g unsalted butter
100g Sugar
1 tsp vanilla extract
4 eggs (separate the egg yolks and egg whites in 2 clean, dry bowls)
1 1/2 Tbsp milk
1 tsp grated orange zest
200g cake flour, sifted
1 tsp baking powder
1/2 tsp salt
80g sugar (to be added to the egg white)

Method:

1) Beat the butter and 100g sugar until light and creamy.

2) Add in the egg yolks one at a time and beat until creamy. Then add in the vanilla extract, orange zest and milk and beat until incorporated.

3) Fold in seived cake flour, baking powder and salt. Leave aside.

4) Whisk egg white until foamy. Then add in all the 80g sugar and beat until soft peaks.

5) Add the egg white in 2 separate additions into the cake batter. Gently fold in the egg whites. Do not overbeat the egg whites as it will result in a dry cake.

6) Pour into a 20 cm round tin which has been buttered and lined with parchment paper. Bake in pre-heated oven at 175C for about 45 mins or until cake skewer comes out clean. Do not overbake as it will dry out the cake.


butter cake 2


butter cake 1

Saturday, November 13, 2010

Creamy Curry Prawns

Having too much seafood is not good for your cholesterol level! That's what we always read in any health magazines. Well I say having it once in a while should be fine. The thing about having seafood is that you really, really must buy the freshest. Any seafood that isn't, be it fish, prawns or crabs, will end up totally destroying your entire dish.

So before you go out to buy your next batch of prawns, you should be looking out for:

* The shell of the prawns should be firm and glossy and not broken or slippery

* There should be no discolouration of the heads or the shells, as this is an indication that the meat is starting to go bad

* They should smell fresh and salty. Avoid if there is any hint of a smell of ammonia

* The eyes should be prominent and shiny and not shrunken inwards or missing

* If you are buying raw prawns, do not be put off if they are translucent or a different colour then the typical pink prawn. Prawns and shrimp only turn this colour once they have been cooked

Curry prawns 2


Creamy Curry Prawns
Recipe Adapted from "Women's Weekly - July 2010" Edition
Serves 4


Ingredients:

1 Tbsp vegetable oil
30g unsalted butter
2 cloves garlic, crushed and roughly chopped
1 red chilli, sliced
1 1/2 tsp seafood curry powder
500g medium sized prawns, shelled with tail intact and deveined
2 stalks spring onions, sliced (extra for garnishing)
300ml thickened cream
Salt to taste

Method:

1) Heat oil and butter together in a large fyring pan over high fire. When the butter starts to bubble, turn fire to medium.

2) Add in the garlic and chilli and fry for 2 minutes.

3) Stir in the curry powder and cook for 30 seconds, stirring. Add prawns and spring onion and cook for 3 mins until prawns change colour.

4) Pour in the cream and bring to a boil. Reduce fire and cook for 1 - 2 mins, until sauce has thickened and prawns are cooked through. Season to taste with salt.

4) Serve immediately with a bowl of steaming white rice.


Curry prawn 1


Curry prawns 3

Monday, November 8, 2010

Thai Fried Rice with Clams and Holy Basil

When it comes to left-over white rice, it is astonishing what type of ingredients you could add to it to turn this into a simple fried rice dish. I would usually cook a Chinese fried rice version using Chinese sausages, frozen mixed vegetables and eggs. However this time round I wanted to do something different and be a bit more adventurous.

I decided on a Thai version using fresh basil as one of the key ingredients. So when I happened to be at my local supermarket buying groceries, I came across fresh white clams. I thought to myself “heh, how about some clams to go with the Thai fried rice! I could add some long beans as well.” I must confess that I had concocting this recipe as I was walking through the aisle in the supermarket. So with this in mind, I started to throw packs of ingredients into my shopping basket. If you are not into clams, you can use prawns or even chicken meat as substitute. And again if long beans are not your “thing” substitute with frozen mixed vegetables, peas, carrots, corn … or just do your own thing! The dish will still come out delicious.

Basil fried rice 1


Basil fried rice 2


Thai Fried Rice with Clams and Holy Basil
Serves 2

Ingredients:

2 Tbsp vegetable oil
3 cloves garlic, roughly minced
1 ½ Tbsp of Thai chillie paste (found in local Asian groceries. Vary the chilli paste according to your taste)
2 cups heaped cold cooked rice
200g - 250g white clams, shell intact and thoroughly cleaned
1 ½ Tbsp fish sauce, or more to taste
¾ cup of long beans, chopped to ¼” thick
1/2 cup loosely packed Thai holy basil (regular basil ok)
2 medium sized eggs, lightly beaten
Dash of white pepper
1 Tbsp chopped fresh cilantro and extra sprigs for decoration

Method:

1) In a wok or large skillet over medium fire, heat up the oil. Add the garlic and fry until lightly browned

2) Then add in the chilli paste and stir fry for about a minute. Add in the clams and basil leaves, and fry for about 2 minutes. Add the long beans and fry until slightly soften (not too soft). Add the cold rice and fry for about 3 to 4 minutes.

3) Add fish sauce and pepper. Then drizzle the beaten egg onto the rice and stir to mix well. Fry for another 1 to 2 minutes.

4) Finally add in the chopped fresh cilantro. Dish out warm and serve with lime wedges, Thai chillie sauce and cilantro for decoration.


Basil fried rice 3


Basil fried rice 4

Wednesday, November 3, 2010

Coconut Tart

Coconut tarts have always been a favourite of mine since I was young. I would eat all the coconut filing first before finishing up the tart pastry. Call me weird alright but don’t you have a particular method of eating a favourite dish or dessert of yours that would seem odd by other people’s standards. I could name you more than a handful of my peculiar eating habits when young. For example, have you never had Milo drizzled with condensed milk. Then mix it all up on the back of a spoon to resemble a huge chocolate ball and literally licking it slowly like a lolly pop!

I don’t actually eat coconut tarts like I used to when young. As I grew up I started to eat the normal way but I still enjoy it as much I did years ago. This particular recipe is ever so easy to make. No mixer is required at all. In fact the tart shells can be made way beforehand and just thrown into the freezer. Whenever I feel like having a coconut tart, or any other tart, I would just take out a empty tart shell and proceed to fill it with my choice of filings. I have reduced the sugar content (as with all my other tried recipes) from the original recipe and find my adapted version to be most suited for my palate. The tarts are absolutely delicious on the day of baking but keeps well in the fridge for about to 5 days (I kid you not). Just pop them into a warm oven to crisp up the pastry a bit before consuming. Definitely a keepsake recipe in my books!

Coconut tart 2


Coconut Tart

Recipe for the Tart Shell.

For the Coconut Filling:
Makes about 7 tarts

Ingredients:

50g butter
50g sugar
1 egg
25g plain flour (sift)
25g desiccated coconut
1/2 tsp vanilla essence

Method:

1) Cream butter and sugar until light. Then add in the egg (one at a time, if you are doubling the recipe) and mix well. Add the vanilla essence and mix.

2) Add in sifted flour all at once. Mix until all flour has been incorporated into the batter. Then add in the desiccated coconut. Stir in to mix until incorporated only. No need to over-mix.

3) Scoop mixture into unbaked tart shells. Bake the tarts in a preheated oven at 180C for about 18 - 20 minutes (depending on the size of your tart).

Coconut tart 1


Coconut tart 3

Friday, October 29, 2010

Five Spice Braised Pork Belly

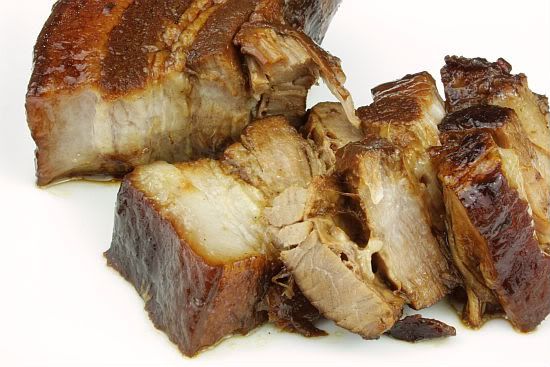
I hardly ever cook pork at all in my kitchen simply because my late dear LT never liked eating it. I remembered when I made this particular dish, he said the house had such a "porky" smell and he kept covering his nose. In a way the smell was kind of "porky" in the beginning but once the spices started to develop into the dish, it was really quite fragrant. I simmered the pork belly for about 3 and a half hours and by the end of it's cooking time, the sauce had become very dark and thick.The meat was also very soft and smooth. In fact when I started slicing the pork belly, the meat was practically falling apart.

I decided to serve the slices of pork belly with steamed Chinese buns. I also added thin slices of cucumber and green spring onions. The buns were bought from a local supermarket and I steamed them first before adding the pork slices in-between each bun. This particular dish is now very popular in Chinese restaurants and you can also find food kiosks at local shopping malls selling them as well.

pork belly 1


pork belly 3


Five Spice Braised Pork Belly
Recipe adapted from Chez Pim
Serves 5 - 6

Ingredients:

1.5 kg of pork belly with skin on (If you can find the belly with the rib bones attached, use it (rinse well and pat dry)
2" long knob of ginger, peeled, sliced thinlyand but into thin slices, lengthwise
1 1/2 Tbsp Five Spice powder
3 cloves of garlic, smashed
2 Tbsp cooking oil
2 Tbsp dark soy sauce (You can substitute 2 Tbsp regular soy sauce plus 1/2 tbsp brown sugar)
3 Tbsp soy sauce (plus more to taste)
1 piece of cinnamon stick, 2" in length
3 star anise
5 cloves
A small bunch of cilantro leaves for garnish.

Method:

1) Use a large dutch oven or heavy pot big enough to lay the pork belly insside.

2) Heat up the oil, then add the ginger and garlic. Then add the five spice powder and other spices. Cook for about 2 minutes until fragrant.

3) Then add the pork, skin side down over the garlic and spices.Add enough water to completely cover the belly and a bit more. Add the dark and light soy sauce.

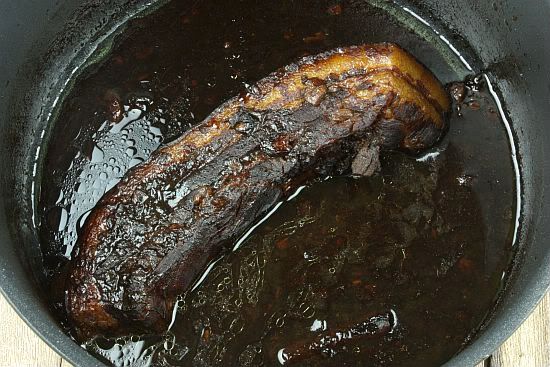
4) Put the lid on the pot and turn the heat up to high and bring the pot to a boil. Skim any foamy scum from the top. Then, open the lid slightly, and let simmer over low heat for at least 3 hours (skim occasionally) or until the pork is falling off the bone tender.

5) Once the belly is ready, remove it from the pot. Then reduce the sauceto a thick, caramel like consistency.

6) To serve, warm back the pork belly. Slice it thinly and lay on a plate. Drizzle the gravy and garnish with sprigs of cilantro. Alternatively you can serve the pork belly slices with steamed Chinese buns.

pork belly 2


pork belly 4
Related Posts with Thumbnails